

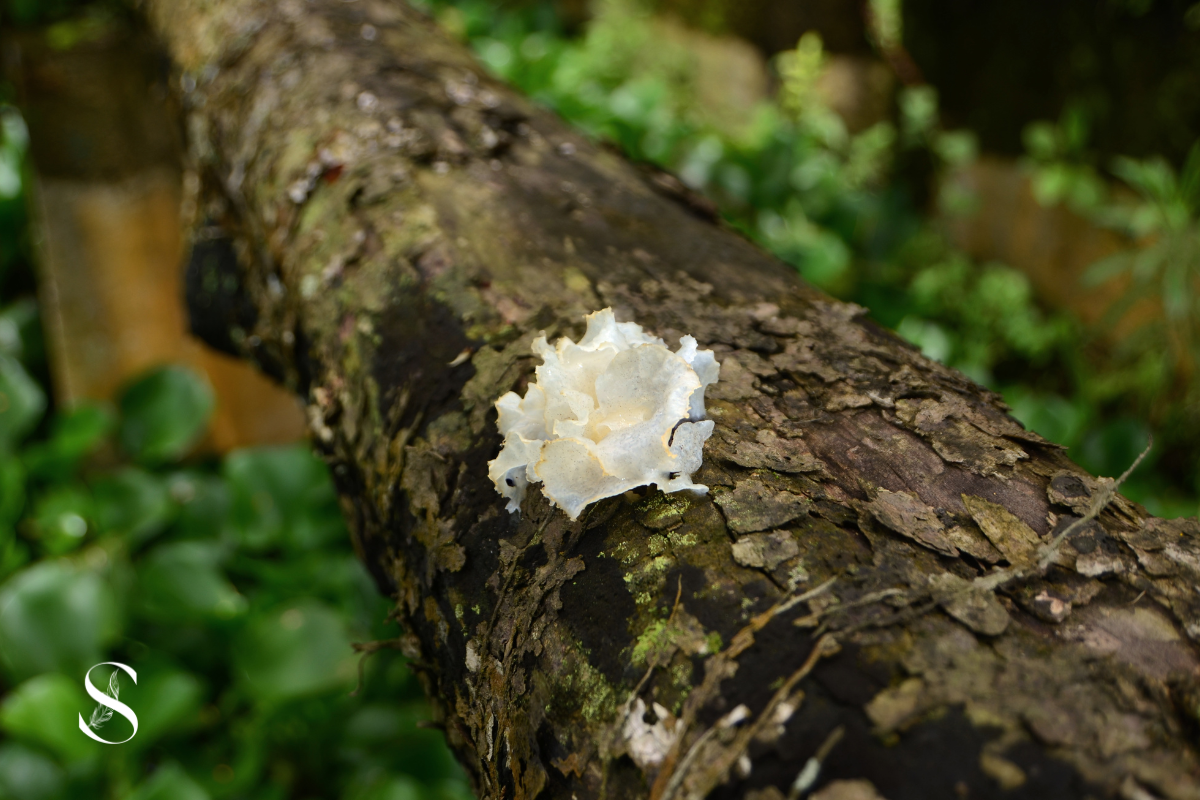
Tremella Mushroom Face Mask: Nature's Hyaluronic Acid for Glowing Skin
What if there was a face mask that could give you brighter, dewier, more radiant skin, without any of the redness, tightness, or irritation that seems to come with every product you try these days? Enter tremella mushroom, an ancient beauty secret that's finally getting the recognition it deserves. This isn't another ingredient making big promises it can't keep. Tremella mushroom is clinically proven to hydrate skin more effectively than hyaluronic acid, holding up to 500 times its weight in water while also supporting collagen production and calming inflammation. When combined with gentle clays and soothing botanicals in a powder mask, it delivers something your skin desperately needs right now: gentle renewal that actually NOURISHES instead of stripping. Here's why tremella mushroom is about to become your new obsession—and how to choose the best natural face mask for perimenopausal skin that leaves you glowing, not frustrated.
Have you discovered tremella mushroom yet?
If not, you're about to fall in love.
Also called "snow mushroom," tremella has been a beauty secret in Traditional Chinese Medicine for centuries and used specifically to maintain radiant, hydrated, youthful skin.
And modern science has finally caught up: tremella mushroom is clinically proven to be MORE effective than hyaluronic acid for deep, lasting hydration.
It holds up to 500 times its weight in water, penetrates deeper into your skin than HA, stimulates collagen production, and provides antioxidant protection, all while being incredibly gentle on sensitive skin.
For women in their 40s and beyond navigating hormonal skin changes, tremella mushroom is a game-changer.
Here's why this ancient ingredient is having a major moment in 2026 and how to find the best natural face mask for perimenopause that harnesses its power.
What Makes Tremella Mushroom So Special?
Let's start with the good stuff: what tremella actually DOES for your skin.
It's Nature's Hyaluronic Acid (But Better)
You've probably heard of hyaluronic acid and it's been a skincare superstar for years because it can hold up to 1,000 times its weight in water.
But here's what makes tremella different (and better):
Tremella holds up to 500 times its weight in water and because of its smaller molecular structure, it penetrates DEEPER into your skin and creates a more flexible, longer-lasting hydration film.
Clinical studies show tremella is 15% more effective than hyaluronic acid at hydrating skin.
It doesn't just sit on the surface. It actually gets IN there.
It Does More Than Just Hydrate
Unlike hyaluronic acid (which is basically just a moisture magnet), tremella mushroom is multitasking:
Stimulates collagen production (hello, firmness and elasticity)
Provides antioxidant protection (fights free radical damage and environmental stress)
Supports barrier function (strengthens your skin's protective layer)
Calms inflammation (reduces redness and reactivity)
This isn't just hydration. This is skin REPAIR.
It's Incredibly Gentle
Here's a fun fact: hyaluronic acid can sometimes backfire in low-humidity environments by pulling water OUT of your skin, leaving you drier than before.
Tremella doesn't have that problem.
It creates a protective hydration barrier that LOCKS moisture in, regardless of climate or season.
This makes it perfect for skin that's become more sensitive and reactive over time.
It's Completely Natural and Plant-Based
Most hyaluronic acid in skincare is synthetically produced through bacterial fermentation or historically, it was extracted from rooster combs.
Tremella is a pure mushroom extract. Clean, vegan, botanical.
No wonder it's been used for centuries in Eastern beauty rituals.

Why Tremella is Perfect for Skin in Your 40s and Beyond
If you've noticed your skin changing or getting drier, looking duller, reacting to products that never bothered you before, you're not imagining it.
Hormonal shifts during perimenopause affect your skin in very specific ways:
Your barrier gets thinner (you produce fewer natural oils and protective lipids)
Cell turnover slows down (dead skin sticks around longer, creating dullness)
You're chronically dry (your skin produces less natural hyaluronic acid)
You're more sensitive (weakened barrier = more reactive skin)
This is why your old skincare routine may not be getting you results or stopped working.
It's also why tremella mushroom is an ingredient that you should look at adding to your regimen.
It hydrates deeply (replacing what your skin isn't producing naturally anymore)
It renews gently (working WITH your slower cell turnover, not against it)
It strengthens your barrier (supporting your skin's natural protective layer)
It calms reactivity (anti-inflammatory, soothing, gentle)
Tremella was made for hormonal skin.
What to Look for in the Best Natural Face Mask for Perimenopause
Now that you know WHY tremella is amazing, let's talk about what else makes a face mask perfect for skin longevity.
The best natural face mask should do TWO things at once:
1. Gently exfoliate (to remove dullness and texture)
2. Deeply hydrate (to nourish and plump your skin)
Most masks make you choose. Exfoliating masks strip and irritate. Hydrating masks don't address texture.
But what if you could have BOTH?
Here's what to look for:
Gentle Clays (Not Harsh Drying Clays)
Look for:
White kaolin clay (the gentlest clay—detoxifies without stripping)
French pink clay (gently draws out impurities while being soothing)
Avoid:
Bentonite clay (too drying for delicate skin)
Charcoal (too stripping for a weakened barrier)
Tremella Mushroom (The Star Ingredient)
Look for:
Tremella fuciformis extract or powder
Listed high in the ingredient list (not just a trace amount)
Why it matters:
Holds 500x its weight in water
Penetrates deeper than HA
Collagen-boosting + antioxidant
Perfect for dry, sensitive skin
Calming, Anti-Inflammatory Botanicals
Look for:
Calendula (healing, anti-inflammatory, soothing)
Rose petal (calms redness, balances skin)
Marshmallow root (soothes irritation, softens skin)
Hibiscus (gentle natural vitamin C, brightening)
Avoid:
Synthetic fragrances (trigger sensitivity)
Strong essential oils (can irritate)
Harsh acids (glycolic, lactic in high concentrations)
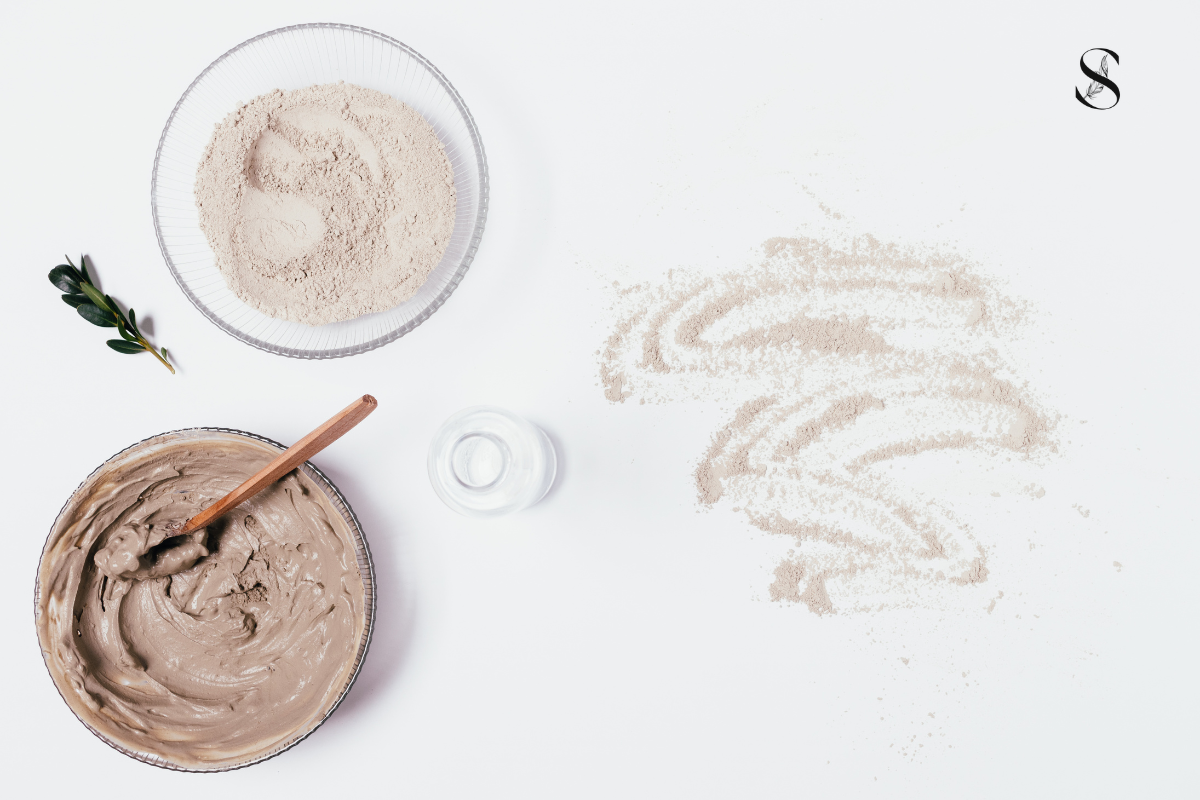
Powder Formula (Activated Fresh)
Why powder is better:
You activate it fresh every time (no preservatives needed)
You control the consistency (thick for intense hydration, thin for gentle exfoliation)
Ingredients stay potent until you mix them
No fillers, no water weight just pure concentrated botanicals
What the IDEAL Natural Face Mask Looks Like
Based on everything we know, here's the perfect formula:
GENTLE RENEWAL:
White kaolin clay + French pink clay (detoxify without stripping)
DEEP HYDRATION:
Tremella mushroom (nature's hyaluronic acid, 500x water retention, collagen-boosting, antioxidant protection)
SOOTHING BOTANICALS:
Marshmallow root (calms, softens)
Calendula (anti-inflammatory, healing)
Rose petal (balances, soothes)
Hibiscus (gentle brightening, vitamin C)
What this mask does:
While you wear it:
Gentle clays draw out impurities
Tremella floods your skin with hydration
Botanicals calm and soothe
When you rinse it off:
Your skin is BRIGHTER (renewed without irritation)
Your skin is SOFTER (botanical enzymes gently smoothed texture)
Your skin is HYDRATED (tremella penetrated deeply)
Your skin is CALM (no redness, no tightness, just glow)
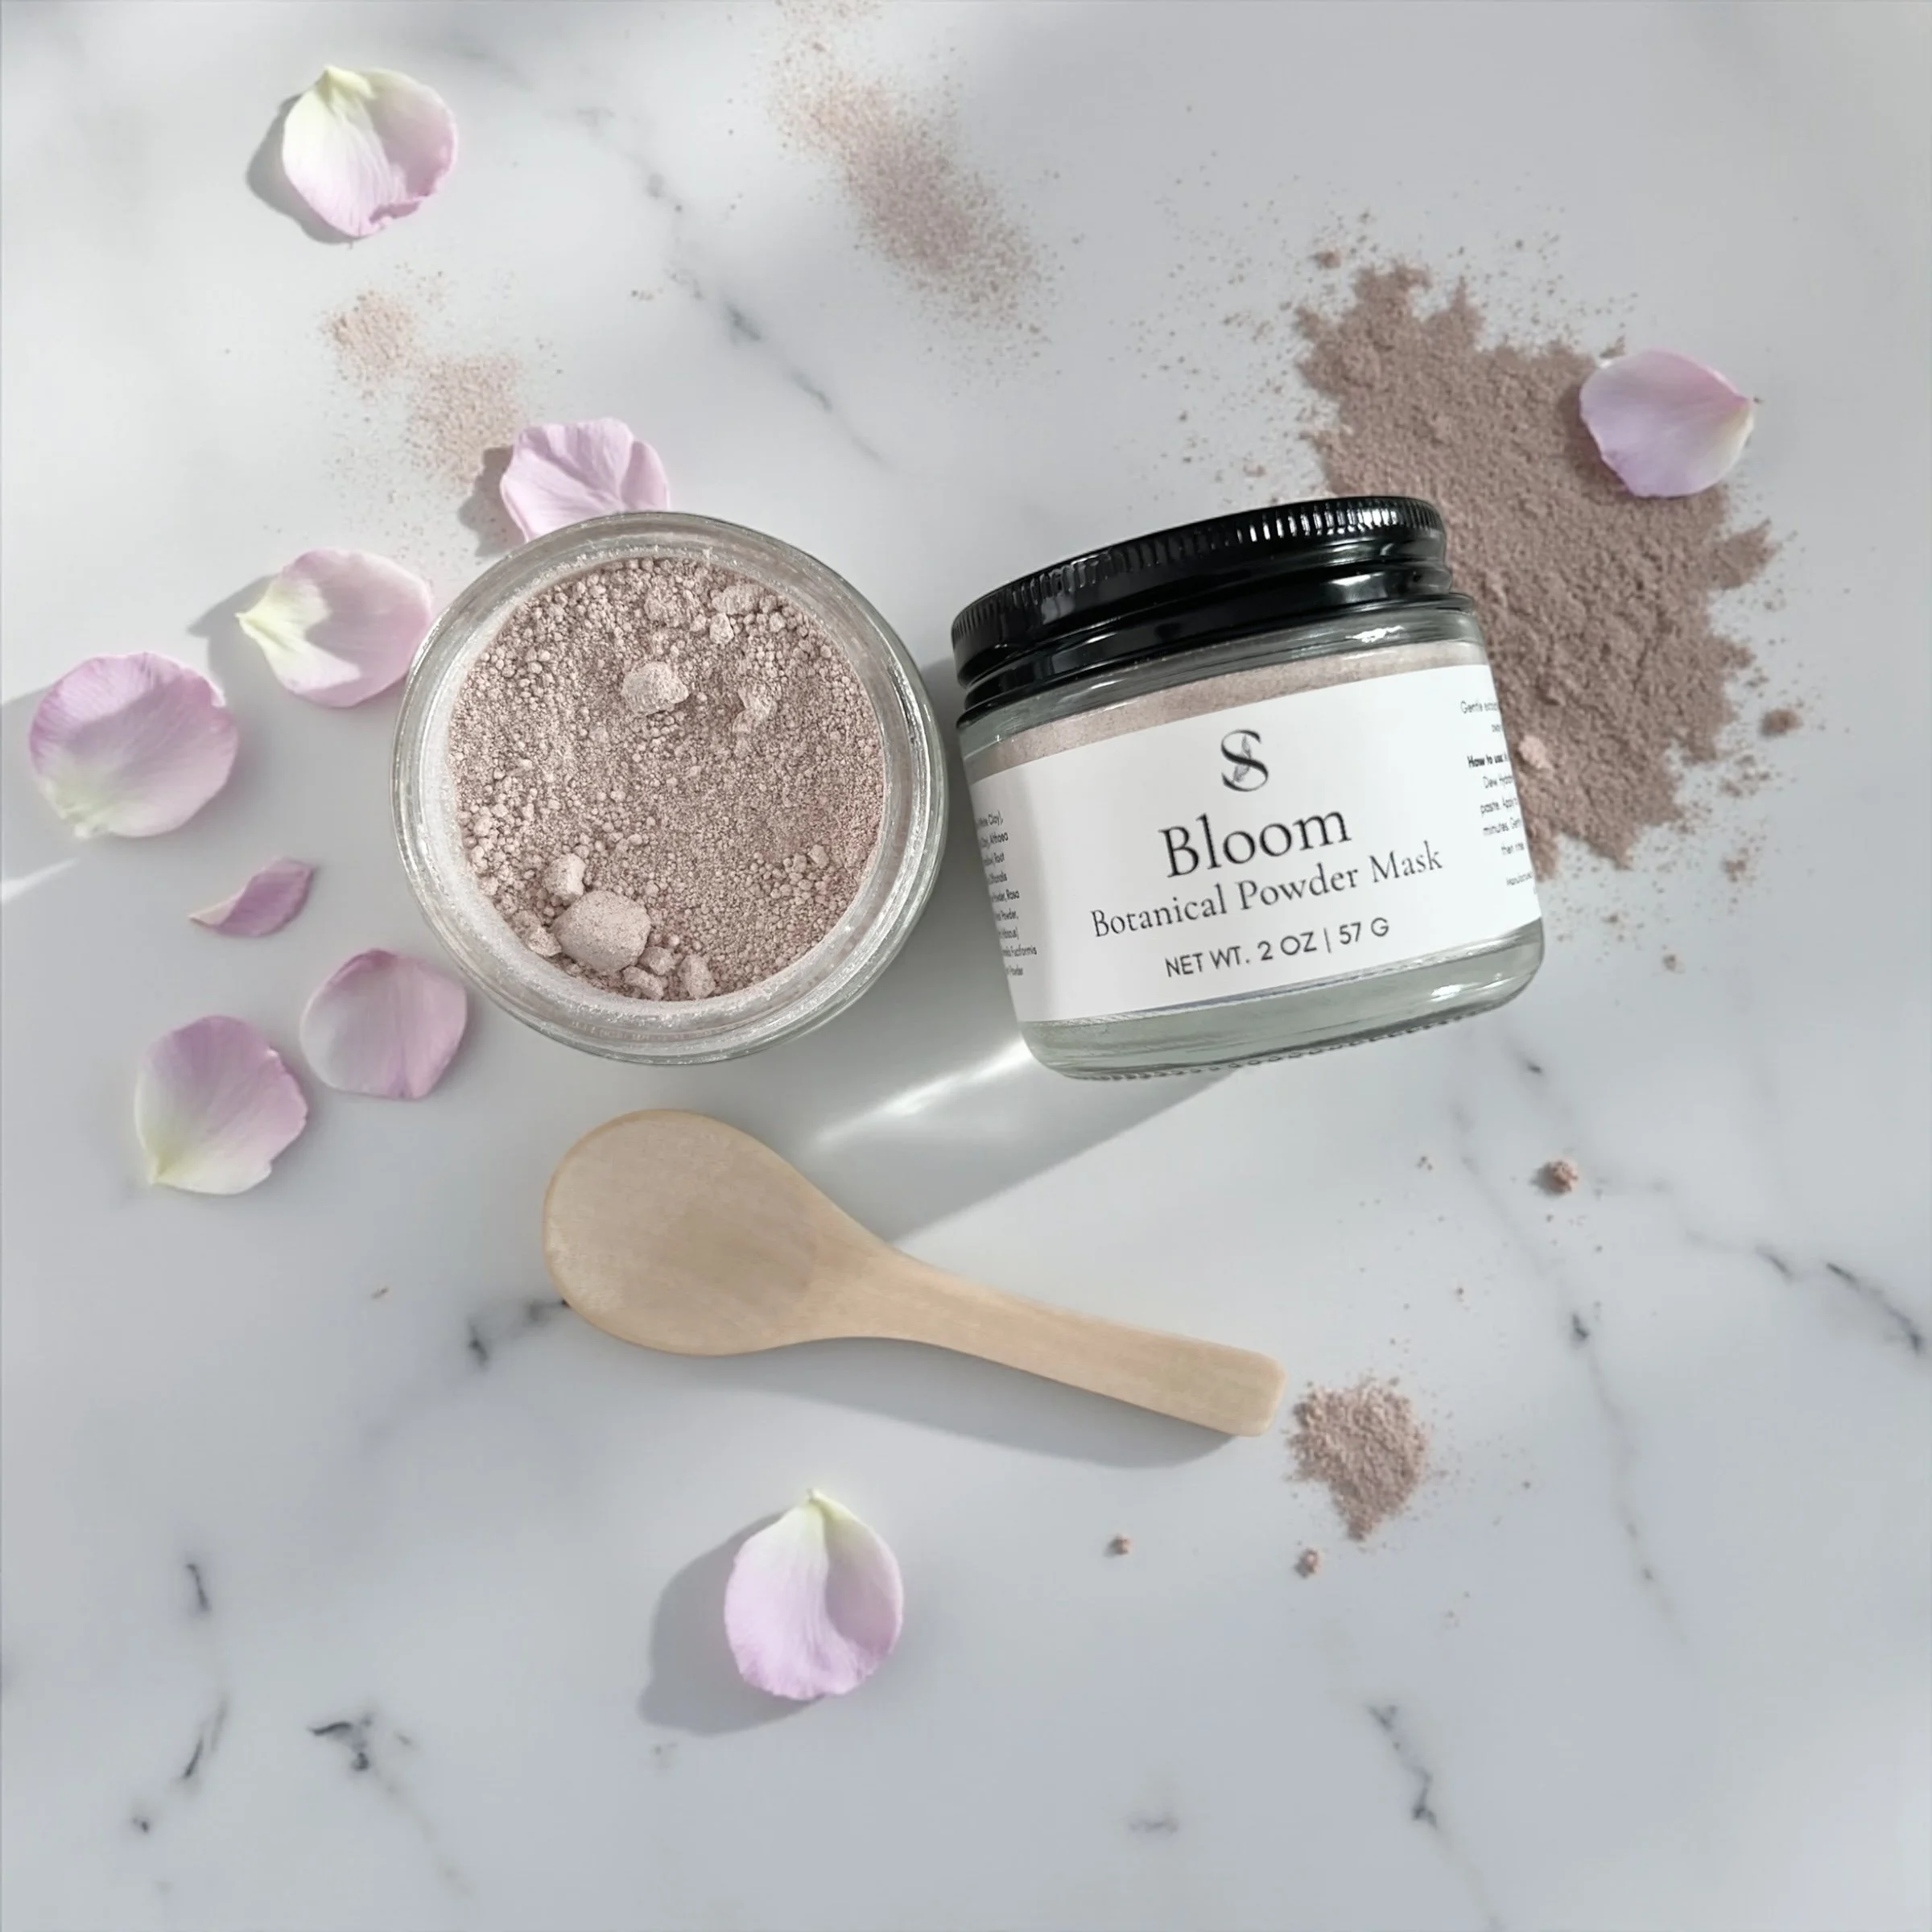
This is what Bloom does.
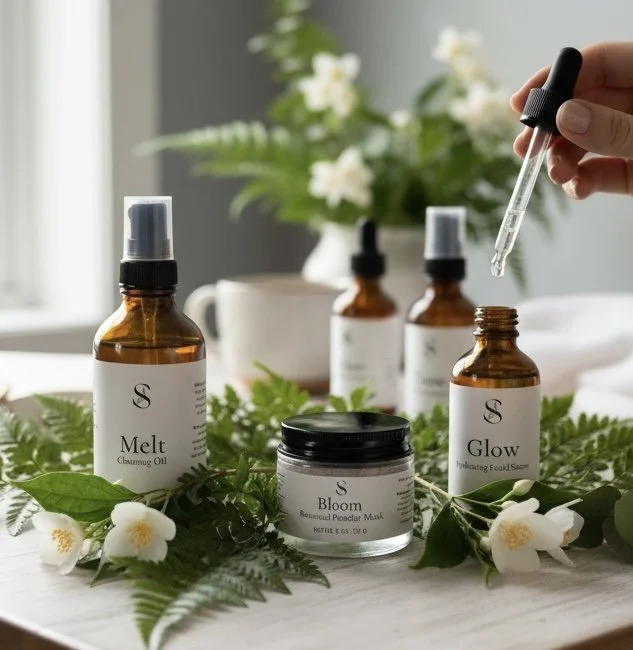
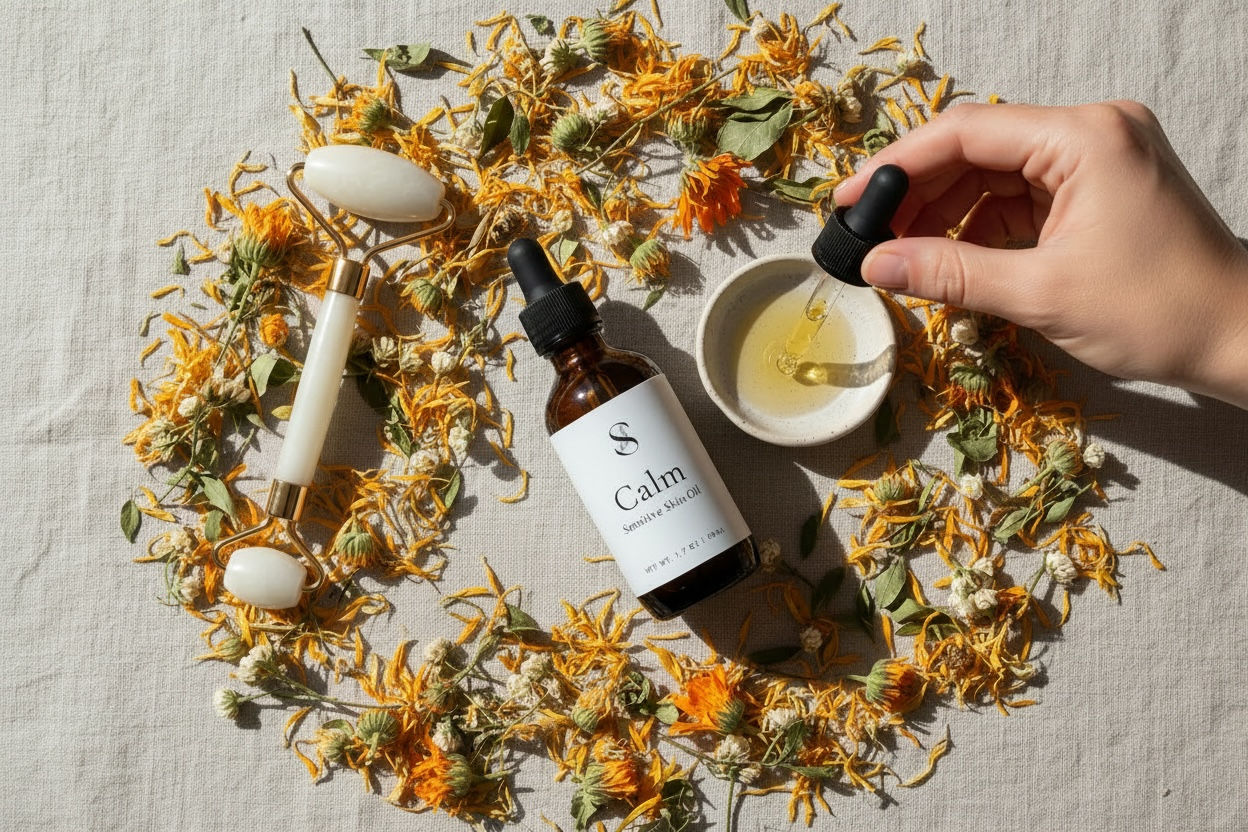
Bloom: Your New Favorite Mask Ritual
Bloom is a powder mask that you mix fresh with water (or a hydrating mist) to activate.
Here's what's inside:
White kaolin clay + French pink clay (gentle detoxification)
Tremella mushroom (deep hydration, collagen support, antioxidant protection)
Marshmallow root (soothing, softening)
Calendula powder (calming, healing)
Rose petal powder (balancing, anti-inflammatory)
Hibiscus powder (natural vitamin C, brightening)
7 pure botanical ingredients. Nothing else.
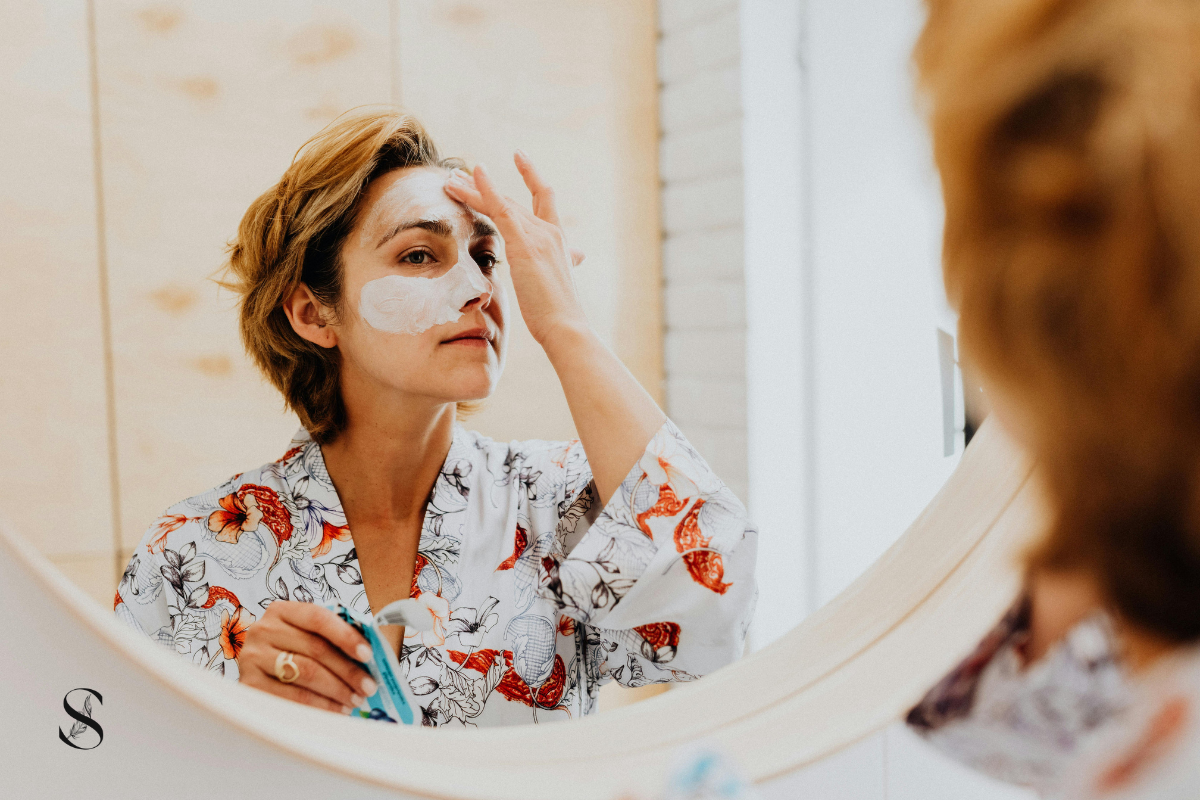
How to use it:
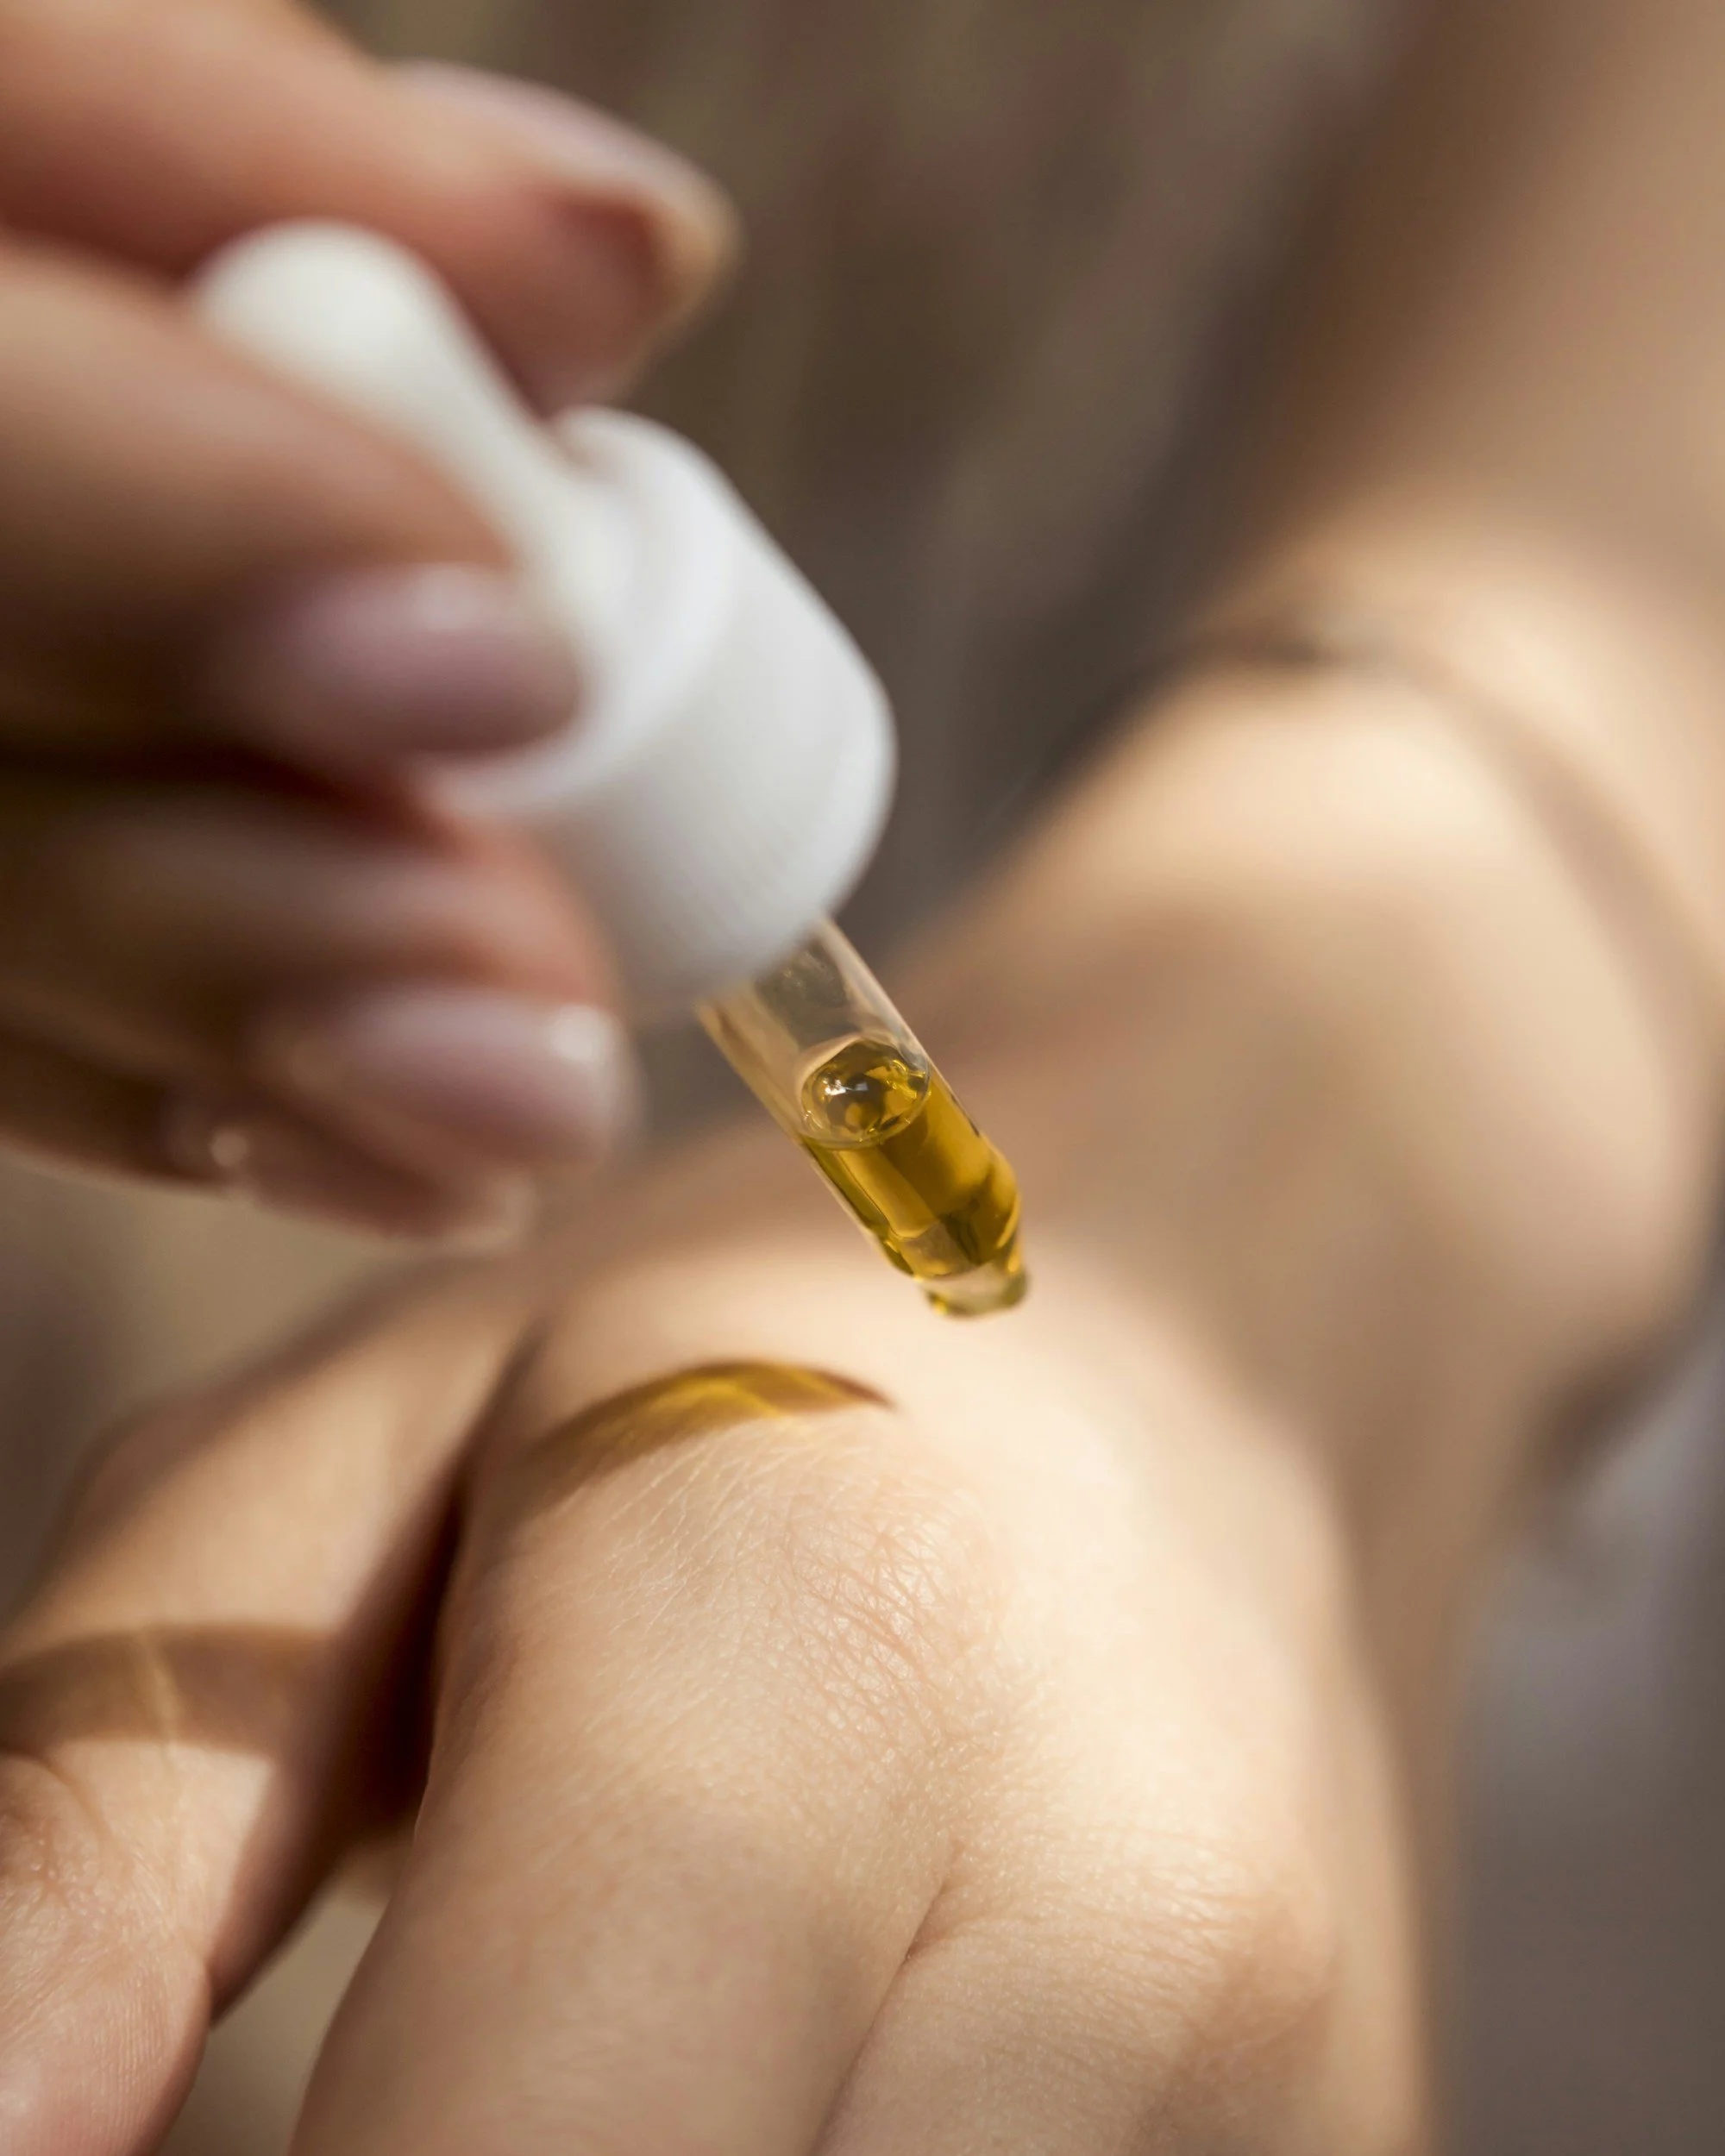
Mix 1-2 teaspoons of Bloom powder with water (or Dew hydrating mist for extra nourishment).
Apply to clean skin, avoiding the eye area.
Leave on for 10-15 minutes, your skin will feel cool and soothed, never tight.
Rinse with warm water.
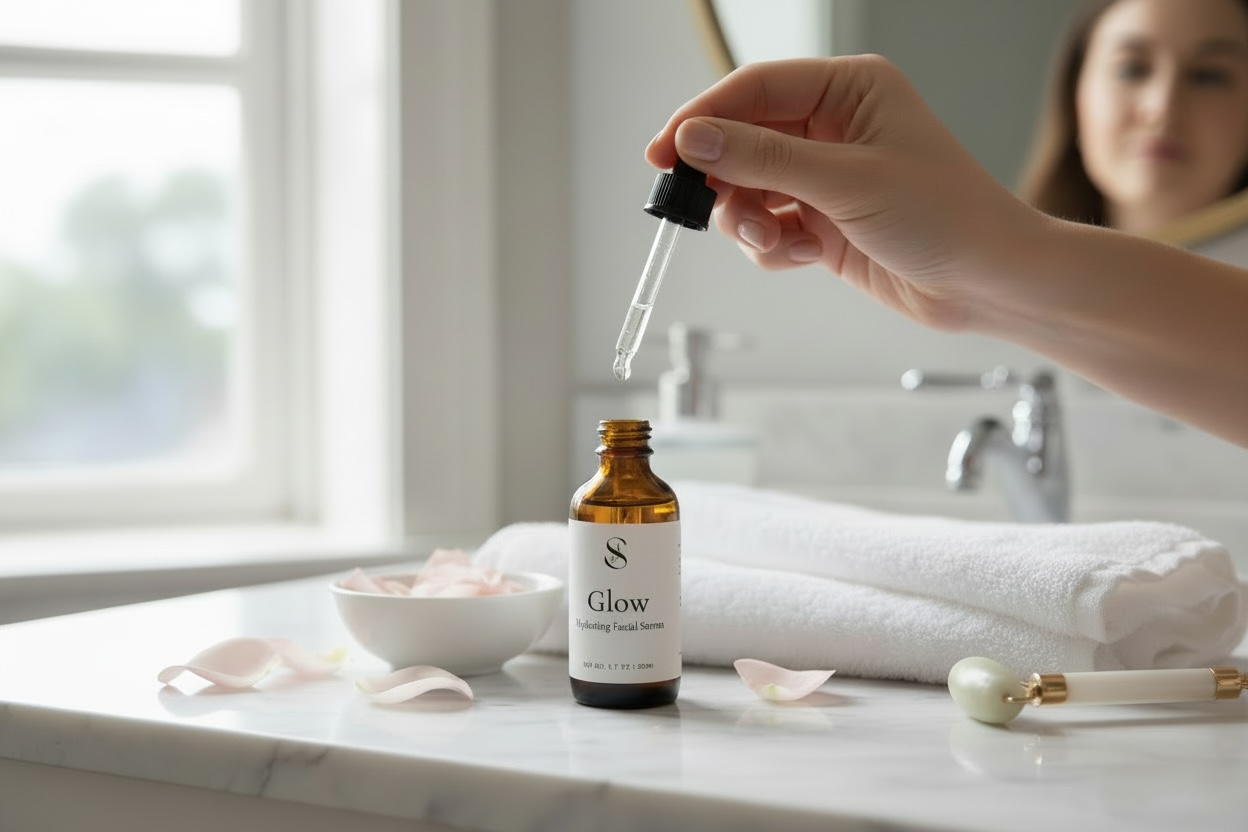
Follow with your serum (Renew) and facial oil (Glow).
Use 1-2 times per week.
What you'll notice:
Immediately: Brighter, dewier, softer skin. No tightness, no redness, just a healthy glow.
After 4 weeks: Smoother texture, more even tone, visibly hydrated and plumper skin.
Why This Mask is Different
Most exfoliating masks: Strip your skin, cause redness, damage your barrier.
Bloom: Gently renews while NOURISHING with tremella mushroom.
Most hydrating masks: Sit on the surface, don't address dullness or texture.
Bloom: Tremella penetrates deeply while gentle clays renew the surface, both at once.
Most clay masks: Leave your skin tight, dry, uncomfortable.
Bloom: Tremella HYDRATES while the clays work. You get renewal + hydration simultaneously.
Most "natural" masks: Full of fillers, fragrances, synthetic ingredients.
Bloom: 7 pure botanicals. Vegan, clean, effective.
Common Questions About Tremella Mushroom Face Masks
Q: How is tremella mushroom different from hyaluronic acid?
A: Both hydrate, but tremella does MORE. It holds 500x its weight in water (comparable to HA's 1,000x), but tremella has a smaller molecular size so it penetrates deeper. Plus, tremella stimulates collagen, provides antioxidant protection, and is gentler on sensitive skin. Clinical studies show it's 15% more effective than HA at hydrating skin.
Q: Can I use this mask if my skin is very sensitive?
A: Yes! Tremella mushroom is incredibly gentle and anti-inflammatory. The clays in Bloom are the gentlest available (white kaolin, French pink clay), and the botanicals (calendula, rose, marshmallow root) are all calming and soothing. This mask is specifically formulated for sensitive, reactive skin.
Q: How often should I use a face mask?
A: 1-2 times per week is perfect. Once a week maintains glow and clarity. Twice a week if your skin is particularly dull or needs extra hydration.
Q: Can I mix the powder with something other than water?
A: Absolutely! Try:
Dew (hydrating mist) for extra hydration
Aloe vera gel for soothing
Honey for antibacterial benefits
Q: Will this help with dryness?
A: Yes! Tremella mushroom is one of the most effective natural hydrators available. It penetrates deeply and creates a lasting moisture barrier. Unlike some masks that hydrate temporarily, tremella's effects last.
Q: How long does a jar last?
A: If you use it once a week, a jar typically lasts 8-12 weeks. Powder formulas are concentrated, you only need 1-2 teaspoons per use.
The Ancient Secret Your Skin Has Been Waiting For
Tremella mushroom has been a beauty secret for centuries.
Now, science has proven what ancient practitioners already knew: it's one of the most effective natural hydrators on earth.
More effective than hyaluronic acid. Gentler on sensitive skin. Collagen-boosting, antioxidant-rich, barrier-supporting.
When you combine tremella with gentle clays and calming botanicals, you get something special: a face mask that renews your complexion while deeply nourishing it.
This is Bloom.
It's not harsh. It's not stripping. It's not discouraging.
It's gentle, effective, botanical renewal for skin that's needs hydration and gentle exfoliation.
Ready for Your Glow-Up?
Bloom Powder Mask gives you:
Deep hydration with tremella mushroom (nature's hyaluronic acid)
Gentle renewal with white kaolin + French pink clay
Calming botanicals (calendula, rose, marshmallow root, hibiscus)
7 pure ingredients. Nothing else.
Mix. Apply. Glow.
Shop: skinsoulrituals.com
Your skin is changing. That's not a problem to fix, it's a transition to support. And tremella mushroom knows exactly how to do that.
Why Your Skincare Stopped Working in Your 40s
If you've looked in the mirror lately wondering why your favorite moisturizer doesn't work anymore, why your serum just sits on top of your skin, or why your cleanser leaves you tight and stripped, you're not imagining it. Your skin has changed. In your 40s, perimenopause triggers rapid hormonal shifts that fundamentally alter your skin's structure and needs. The products that worked at 35 can't solve the problems your skin has at 45 because those problems are biologically different. You're losing collagen fast (30% in the first 5 years), your barrier is weaker, cell turnover has slowed, and you're producing less natural hydration. This isn't gradual aging, this is your hormones and the good news? There is a clear easy path to adjust your routine to meet your skin’s needs now.
By Amber Boone, Licensed Aesthetician & Founder of Skin Soul Rituals
If you've looked in the mirror lately and thought, "What happened? My moisturizer used to work. My serums used to make my skin glow. Now... nothing," you're not imagining it.
Your favorite products didn't suddenly become ineffective. Your skincare routine didn't fail you randomly.
Something changed. And that something is more than likely related to hormonal changes that come along with perimenopause.
What Happened? Why Did My Skincare Stop Working?
Here's what probably happened:
The cleanser that kept your skin balanced now leaves it tight and stripped.
The moisturizer that used to last all day now absorbs in an hour and your skin still feels dry.
The serum that gave you that glow? It sits on top of your skin and feels like its doing nothing.
The exfoliator that smoothed your texture now irritates and reddens your skin.
You've tried buying more expensive products. You've layered on extra hydration.
And nothing works the way it used to.
Here's the truth that the beauty industry doesn't want to talk about…
This Isn't Aging, This Is Hormonal
Most "anti-aging" skincare is not designed for this.
Your skin in your 40s isn't gradual aging and can sometimes feel like its changed overnight.
It's perimenopause. And perimenopause is hormonal, not chronological.
Here's what that means:
When you were in your 20s and 30s, estrogen was quietly doing a lot of heavy lifting for your skin:
Producing natural oils that kept your barrier strong
Stimulating collagen production to keep skin firm
Helping your skin retain water and stay plump
Supporting cell turnover to keep skin smooth and bright
Regulating oil production to keep skin balanced
Then, somewhere in your late 30s or early 40s, estrogen levels start to fluctuate and decline. Not gradually. Erratically.
Some days high, some days low, all over the place, until eventually, they settle at much lower levels than before.
And when estrogen drops, all those functions it was quietly handling? They drop too.
The 4 Skin Changes That Make Your Products Stop Working
I’m breaking down exactly what's happening and why the products that used to work don't anymore.
Change #1: Your Skin Barrier Is Weaker (Why Your Moisturizer Doesn't Work Anymore)
Think of your skin barrier like a brick wall. The "bricks" are skin cells, and the "mortar" holding them together is made of natural oils (lipids, ceramides, cholesterol).
Estrogen helps your skin produce that mortar.
When estrogen drops, your skin produces less of it. The mortar weakens. The wall develops gaps.
This is why:
Your moisturizer absorbs quickly but your skin feels dry an hour later (the moisture is escaping through the gaps)
Products that never bothered you now sting or burn (irritants are getting through the weak barrier)
Your skin feels sensitive to everything, the weather, fabrics, ingredients (your barrier can't protect you like it used to)
What your old routine was doing: Sitting on top of a strong barrier, adding a little extra hydration.
What your skin needs now: Barrier repair. Not just hydration but actual lipid replenishment to rebuild that mortar.
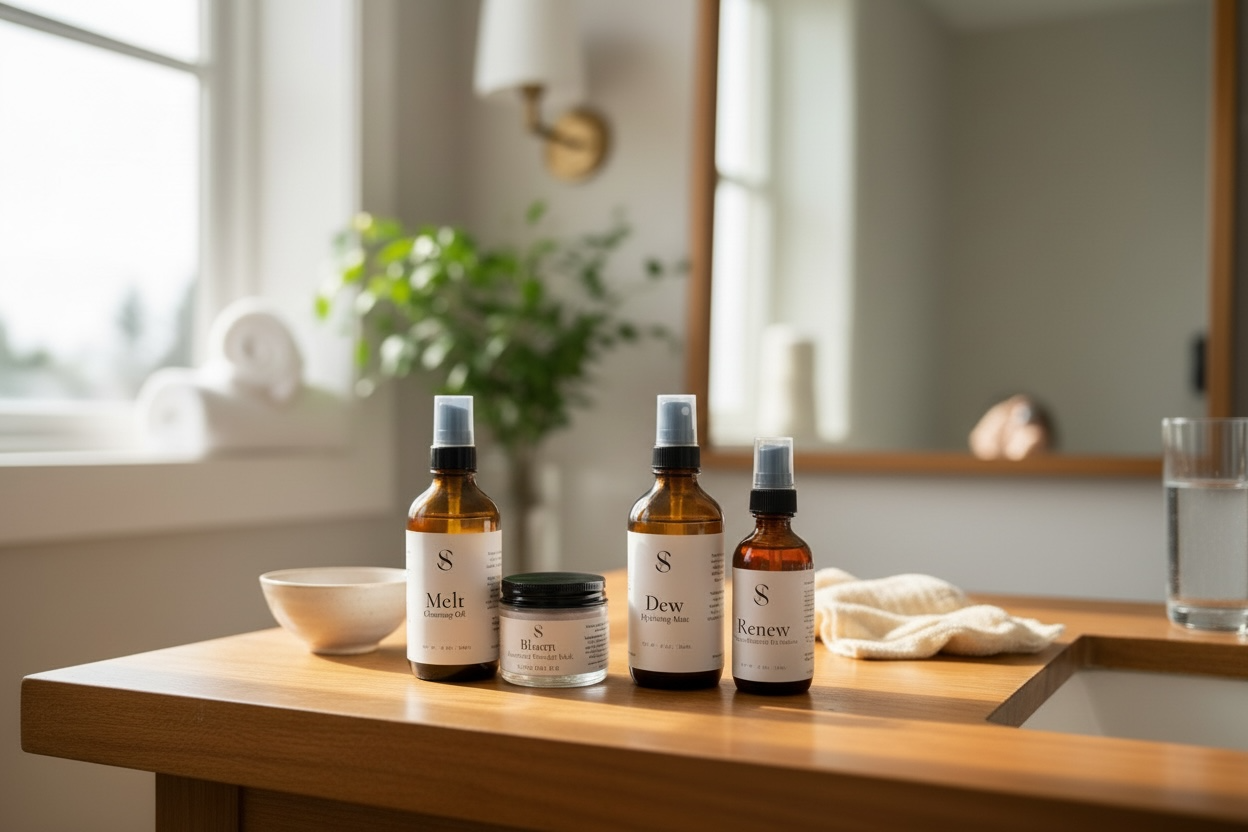
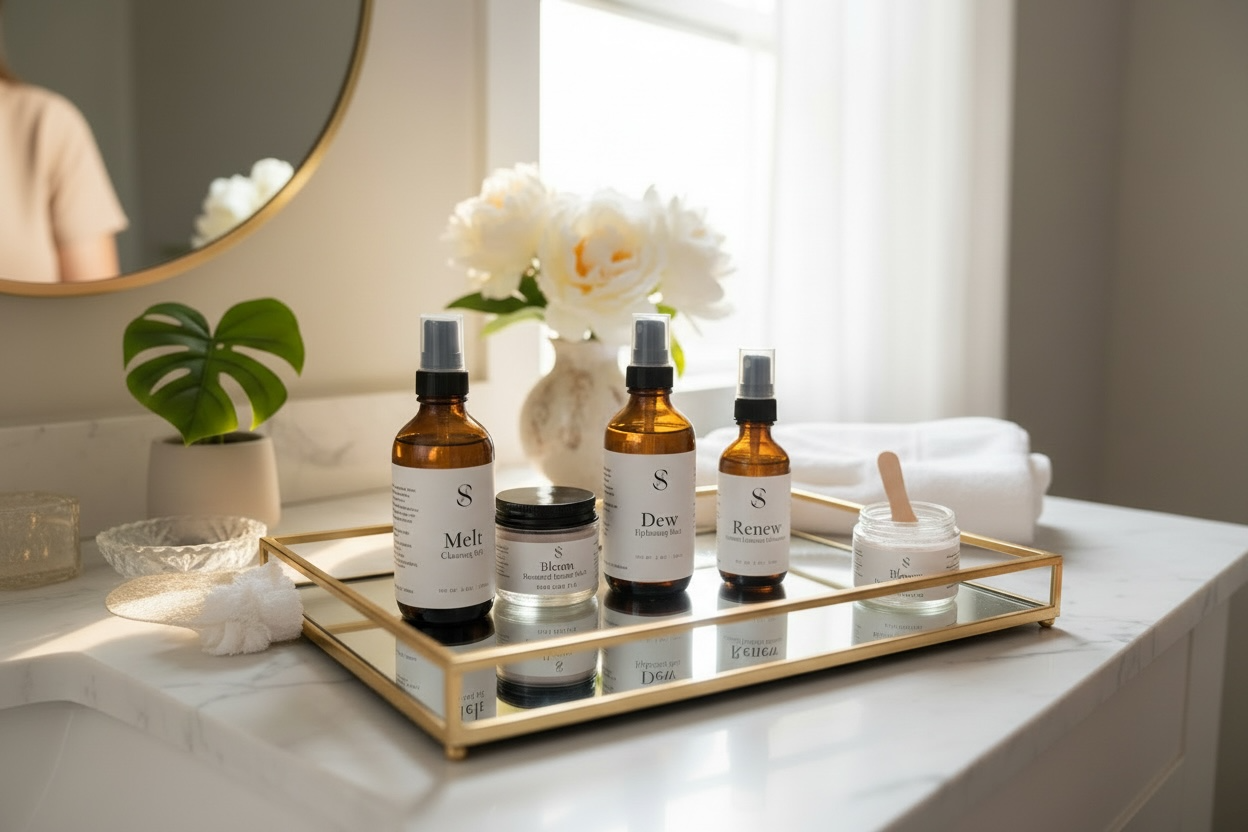
What works: Oil-based cleansers that don't strip your barrier (like Melt), hydrating mists that prep skin (like Dew), and nourishing facial oils that replace lost lipids (like Glow).
Change #2: You're Losing Collagen Fast (Why Your Serums Don't Firm Anymore)
Here's the number that matters:
In the first 5 years of perimenopause and menopause, women lose approximately 30% of their skin's collagen.
Not 30% over your lifetime. 30% in 5 years.
After that, you continue losing about 2% per year.
This is rapid structural change. Not simply gradual aging.
This is why:
Fine lines that used to appear only when you smiled are now visible all the time
Your skin feels thinner, more fragile, less resilient
Firmness is disappearing and jowls appear, skin starts to sag
Your "anti-aging" serum that worked at 35 barely makes a dent now
What your old routine was doing: Maintaining collagen levels that were naturally strong.
What your skin needs now: Collagen stimulation, but gentle stimulation that won't damage your weakened barrier.
What works: Bakuchiol (the gentle retinol alternative that stimulates collagen without irritation, like in Renew) paired with barrier-supporting oils, not harsh retinol that strips your already-fragile skin.
Change #3: Your Cell Turnover Has Slowed Way Down (Why Exfoliators Don't Brighten Anymore)
When you were younger, your skin renewed itself about every 28 days.
In your 40s and beyond, that can stretch to 40-60 days and sometimes longer.
Dead skin cells stick around longer. New, fresh cells take longer to reach the surface.
This is why:
Your skin looks dull, even when you moisturize
Texture feels rough or uneven
Products seem to sit on top of your skin instead of absorbing
Your old exfoliator (that used to reveal glowing skin) now just irritates without results
What your old routine was doing: Speeding up a naturally fast process.
What your skin needs now: Gentle enzymatic exfoliation that works WITH your slower turnover, not harsh scrubs or acids that damage your barrier.
What works: Clay and botanical-based masks with natural enzymes (like Bloom's blend of marshmallow root, calendula, rose, hibiscus, and gentle clays) plus tremella mushroom for deep hydration while you exfoliate.
Change #4: You're Producing Less Natural Hydration (Why Everything Feels Dry)
Estrogen helps your skin produce hyaluronic acid naturally. The molecule that holds up to 1,000 times its weight in water.
When estrogen drops, your skin produces less of it.
You're also producing fewer natural oils (sebum), which means your skin can't seal in the hydration it does get.
This is why:
Your skin feels chronically dry no matter how much moisturizer you apply
You wake up with dry, flaky patches that never used to be there
Makeup doesn't sit right, it emphasizes texture and dryness
You're constantly reaching for lip balm, hand cream, body lotion
What your old routine was doing: Adding a little extra moisture to skin that was already well-hydrated.
What your skin needs now: Deep hydration PLUS a way to seal it in (because your skin can't do it on its own anymore).
What works: Layering water-based hydration (like Dew's rose hydrosol, aloe, and glycerin) with oil to lock it in (like Glow's calendula-rose infused jojoba and rosehip). Tremella mushroom (nature's hyaluronic acid) also helps, it holds up to 500x its weight in water and is in Bloom.
Why the "Just Use Stronger Actives" Advice Makes It Worse
Here's what probably happened when you noticed your skin changing:
You went to a dermatologist, or read an article, or asked for advice and someone told you:
"Use stronger actives. More retinol. More acids. Exfoliate more. Fight the aging harder."
So you did. And your skin got worse.
Redder. Drier. More irritated. More sensitive.
You thought, "Maybe I need to push through? Maybe my skin needs to adjust?"
But it didn't adjust. It just got more reactive.
Here's why that advice fails perimenopausal skin:
Those "anti-aging" actives were designed for skin with a strong barrier.
Your barrier is now thinner, weaker, and more fragile.
Harsh retinol, glycolic acid, strong exfoliants, they strip your barrier further.
They damage the very thing your skin is desperately trying to protect.
You don't need stronger products. You need different products.
Products that work WITH your changing skin, not against it.
Products that rebuild your barrier while gently supporting collagen.
Products that hydrate deeply AND seal that hydration in.
Products made for hormonal skin changes that meet you where you are now. A simple, effective botanical routine.
What Your Skin Actually Needs Now
If your skincare stopped working, it's not because you need to try harder.
It's because your skin's needs have fundamentally changed.
Here's what works now:
1. Gentle, Oil-Based Cleansing
Your weakened barrier can't handle harsh, foaming cleansers anymore.
You need oil-based cleansers that:
Remove makeup and sunscreen without stripping your natural oils
Emulsify with water (so they rinse clean without residue)
Nourish your skin while cleansing
What this looks like: Melt, an oil cleanser with macadamia nut oil, meadowfoam seed oil, sunflower seed oil, and vitamin E. It melts away makeup and impurities, then emulsifies into a milky texture that rinses clean—all while nourishing your barrier, not stripping it.
Why it works: Oil dissolves oil. You're balancing your skin, not fighting it.
2. Hydration That Actually Stays (Not Just Surface Moisture)
Your skin can't hold onto water like it used to.
You need:
Water-based hydration to plump skin
A way to seal that hydration in (because your skin doesn't produce enough oil to do it naturally)
What this looks like:
Step 1: Dew, a hydrating mist with rose hydrosol, aloe, and vegetable glycerin. It delivers botanical hydration that preps your skin to receive treatment products.
Step 2: Glow, a nourishing facial oil with jojoba (infused with calendula and rose), rosehip, and vitamin E. It seals in all that hydration and replaces the lipids your skin isn't producing anymore.
Why it works: You're layering water and oil—the way your skin used to do naturally before estrogen declined.
3. Gentle Collagen Stimulation
You're losing collagen fast. You DO need to stimulate collagen production.
But you need to do it WITHOUT damaging your fragile barrier.
You need:
Bakuchiol (the gentle retinol alternative that stimulates collagen without irritation)
Nourishing oils that support your barrier while the bakuchiol works
What this looks like: Renew, a bakuchiol serum with 1% bakuchiol in a base of squalane, jojoba, rosehip, macadamia nut, meadowfoam, and sea buckthorn oils. Plus vitamin E, frankincense, and jasmine.
Why it works: Bakuchiol delivers the collagen-boosting benefits of retinol without the peeling, redness, or irritation. It works WITH your barrier, not against it.
4. Gentle Exfoliation + Deep Hydration
Dead skin cells are sticking around longer. You need exfoliation.
But harsh scrubs and strong acids will damage your barrier.
You need:
Gentle clay-based exfoliation that detoxifies without stripping
Botanical enzymes that dissolve dead skin cells (not scrub them off)
Deep hydration AT THE SAME TIME (because your skin is dry!)
What this looks like: Bloom, a powder mask you mix with water. It contains:
White kaolin clay and French pink clay (gentle detoxification)
Marshmallow root, calendula, rose petal, and hibiscus (calming botanicals)
Tremella mushroom (nature's hyaluronic acid—holds up to 500x its weight in water!)
Why it works: You're exfoliating gently while flooding your skin with hydration. You're renewing AND nourishing at the same time.
The Simple 3-Step Routine w/weekly exfoliation 1/2 x’s
The Simple Routine That Actually Works for Perimenopausal Skin
If your tired of guessing what will work for your skin. Here's the routine:
MORNING:
Cleanse: Melt (oil cleanser—nourishes while cleansing)
Hydrate: Dew (rose hydrosol mist—preps and plumps)
Treat: Renew (bakuchiol serum—gentle collagen boost)
Seal: Glow (facial oil—locks in hydration, replaces lipids)
Protect: SPF 30+ (mineral sunscreen is gentler)
EVENING:
Same routine (skip the SPF)
WEEKLY (1-2x):
Bloom powder mask (gentle exfoliation + deep hydration with tremella mushroom)
That's it.
No 10-step routine. No harsh actives. No fighting your skin.
Just simple, effective support for what your skin actually needs now.
If You Have Very Sensitive Skin
If your skin has become highly reactive during perimenopause, start even simpler:
Melt, Dew & Calm: Melt, a barrier repair oil cleanser, Dew, a hydrating mist that will soothe irritation (only 4 ingredients) and Calm a soothing serum to calm and heal with only 2 ingredients designed for inflammation and redness.
Perimenopause can make skin incredibly sensitive. Sometimes you need to strip it all back and start with the absolute gentlest option.
Common Questions About Perimenopause Skincare
Q: How do I know if my skin changes are perimenopause or just aging?
A: If you're in your 40s and you've noticed sudden changes such as dryness that appeared seemingly overnight, products that used to work suddenly don't, increased sensitivity, texture changes, that's perimenopause.
Gradual aging happens slowly over decades. Perimenopause skin changes happen in a few years (sometimes months). The speed of change is the giveaway.
Q: Will my skin ever feel "normal" again?
A: Your skin will adapt and stabilize after menopause (when hormone levels settle at a new baseline). But "normal" means something different now.
With the right support, and products made FOR hormonal skin, your skin can feel comfortable, hydrated, and healthy again. Just not in the same way it did at 30. But that’s okay. We want to look our best not necessarily younger.
Q: Can I still use retinol?
A: If your barrier is strong and you've been using retinol for years with no issues, you might be able to continue, but watch for increased sensitivity.
If you're new to retinol or your skin has become sensitive, bakuchiol is the better choice. It stimulates collagen without the irritation, peeling, or barrier damage that retinol causes. It’s my new favorite.
Q: How long until I see results?
A: Barrier repair: 1-2 weeks (skin will feel more comfortable, less tight)
Hydration improvement: 2-3 weeks (plumper, dewier skin)
Collagen stimulation: 4-6 weeks (smoother texture, improved firmness)
Give your skin time. It took months for these changes to develop. Healing takes time too.
Q: Do I really need oil if my skin is oily?
A: Yes. Even if your skin is oily, it's likely dehydrated during perimenopause.
Your skin might be overproducing oil to compensate for the weak barrier and lack of moisture. Adding the right oil (like jojoba, which mimics your skin's natural sebum) can actually balance oil production. Trust me on this one. I know it seem contradicting.
Q: What about diet, sleep, and lifestyle?
A: Absolutely crucial. Your skin is an organ, and it responds to how you care for your whole body.
Sleep: Skin repairs itself at night. 7-8 hours minimum.
Hydration: Drink half your body weight in ounces of water daily.
Stress: Cortisol breaks down collagen. Manage stress actively.
Nutrition: Omega-3s, antioxidants, collagen-building foods matter.
Movement: Circulation = glow. Even 20-minute walks help.
Skincare can't fix internal dehydration, chronic stress, or poor sleep. So make sure your also supporting your skin from the inside out.
The Bottom Line
If your skincare stopped working in your 40s, you didn't do anything wrong.
You're not "bad at skincare."
Your skin changed. Biologically. Structurally. At a cellular level.
The products that worked at 35 can't solve the problems your skin has at 45, because those problems are fundamentally different.
You don't need to fight your skin. You need to support it.
You don't need "anti-aging” skincare. You need perimenopause-specific skincare.
You don't need 10 steps and harsh actives. You need simple, gentle, targeted support:
Barrier repair (oil cleansing, lipid replenishment)
Deep hydration (water + oil layering)
Gentle collagen stimulation (like bakuchiol, sea buckthorn)
Gentle exfoliation + hydration (clay and botanicals with tremella)
Want to hear me walk through this in person? I made a whole video on this exact topic, come hang out:
Ready to Give Your Skin What It Actually Needs?
I created The Skin Reset Collection and it gives you everything you need for perimenopausal skin:
Melt (oil cleanser—nourishes while cleansing)
Dew (hydrating mist—preps and plumps)
Renew (bakuchiol serum—gentle collagen boost)
Bloom (powder mask with tremella—gentle renewal + deep hydration)
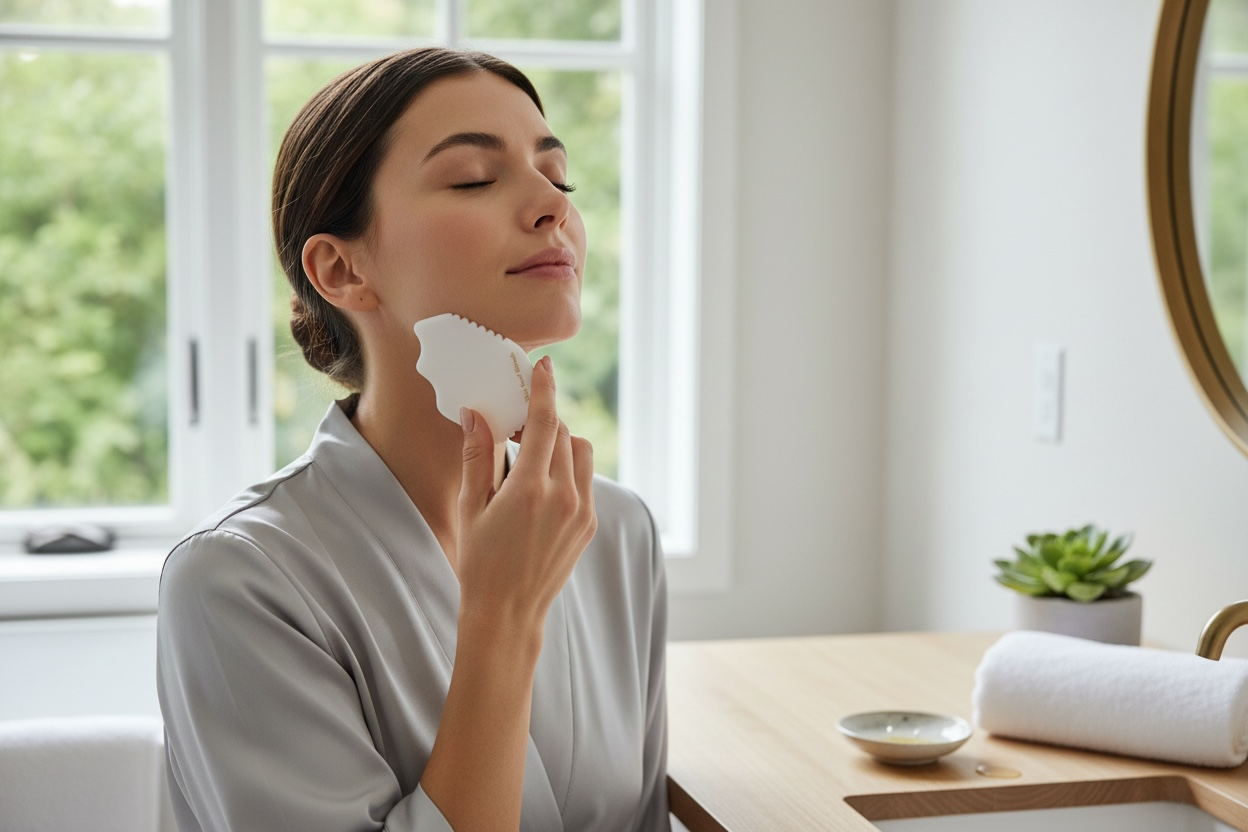
Add Glow & Lift Kit (facial oil + gua sha tool) for the final step that promotes circulation and seals in all that hydration and replaces lost lipids.
If your skin is highly sensitive, start with Calm (two-ingredient serum that soothes with just calendula + jojoba).
Shop:skinsoulrituals.com
Subscribe on YouTube:@skinsoulrituals
Sign up to get new blog posts delivered to your inbox: https://skinsoulrituals.myflodesk.com/blog
With Gratitude & Good Skin Days,
Amber, Licensed Holistic Aesthetician (13+ years)
Skin Soul Rituals
Are Seed Oils Bad for Your Skin? The Truth About Seed Oils in Skincare
If you've been following wellness trends, you've probably heard that seed oils are inflammatory, toxic, and something to avoid at all costs. But does that apply to skincare? As a licensed holistic aesthetician with 13 years of experience formulating botanical products, I'm here to separate the science from the fear-mongering. The truth is more nuanced than social media makes it seem - and understanding the difference between eating seed oils and applying them to your skin changes everything.
by Amber Boone, Holistic Aesthetician & Founder of Skin Soul Rituals
You've seen the videos. The Instagram posts. The passionate warnings about seed oils destroying your health, causing inflammation, and basically ruining everything.
"Avoid seed oils at all costs!" they say. "They're toxic! Inflammatory! Processed!"
And then you look at your favorite face oil, the one that makes your skin glow, and see sunflower oil or jojoba oil listed. You start to wonder: Am I harming my skin?
As a licensed holistic aesthetician with over 13 years of experience formulating botanical skincare, I've been asked this question more times than I can count lately. The seed oil controversy has people genuinely confused and worried about products they've been using safely for years.
Here's what you need to know: The seed oil debate is primarily about diet, not skincare. And the science behind topical use of seed oils is completely different from the concerns about consuming them.
Let me break this down so you can make informed decisions about what you put on your skin.
Important Disclaimer: I'm a licensed aesthetician, not a medical doctor or registered dietitian. I cannot provide medical or nutritional advice. This information is educational and based on dermatological research and my professional experience with botanical skincare ingredients. Always consult your healthcare provider for medical concerns.
What's the Seed Oil Controversy About?
Before we talk about skincare, let's understand where the concern comes from.
The dietary argument:
Critics of seed oils in food argue that:
High omega-6 fatty acid content: Seed oils (canola, soybean, corn, sunflower, safflower, etc.) are high in omega-6 polyunsaturated fats, specifically linoleic acid.
Modern diet imbalance: The Western diet has dramatically more omega-6 than omega-3 fatty acids. The ideal ratio is thought to be around 4:1 or lower; the typical American diet is closer to 16:1 or higher.
Inflammation concerns: Some research suggests that excessive omega-6 intake, especially when out of balance with omega-3s, may promote systemic inflammation.
Oxidation during processing and cooking: Seed oils are often highly processed and refined using heat and chemicals. When heated to high temperatures during cooking, they can oxidize and form harmful compounds.
Industrial production methods: Many commercial seed oils undergo extensive processing, bleaching, deodorizing, chemical extraction and that degrades their nutritional quality.
Is the dietary concern legitimate?
The science is still debating this. Some studies show associations between high omega-6 intake and inflammation; others don't. The quality of the oil (refined vs. cold-pressed), how it's used (high-heat cooking vs. raw), and the overall dietary context all matter.
But here's the key: This entire conversation is about eating seed oils, not applying them to your skin.

Why Topical Use Is Completely Different
Your skin is not your digestive system. The way oils behave when you eat them versus when you apply them to your skin is fundamentally different.
Your Skin Barrier Is Designed to Keep Things OUT
Your skin's outermost layer, the stratum corneum is specifically designed as a protective barrier. It's structured like a brick wall:
The "bricks" are dead skin cells (corneocytes)
The "mortar" is a matrix of lipids (fats)
This barrier exists to prevent things from penetrating into your body. It's remarkably effective at its job.
What this means for oils:
When you apply oil to your skin, the fatty acids in that oil primarily work on and within the barrier layers, not through them into your bloodstream.
The large molecular size of most fatty acids in carrier oils (like those in jojoba, sunflower, or rosehip) prevents them from penetrating deeply enough to enter systemic circulation in meaningful amounts.
What Actually Absorbs Through Skin?
For a substance to penetrate skin and enter your bloodstream in significant amounts, it needs to meet specific criteria:
Molecular size: Generally under 500 daltons (a measure of molecular weight). Most fatty acids in oils are much larger than this.
Lipophilicity/hydrophilicity balance: It needs to be able to cross both oil-loving and water-loving environments. Carrier oils are very lipophilic, which means they interact well with your skin's lipid barrier but don't easily pass through it entirely.
Skin condition: Broken, damaged, or highly compromised skin does allow more absorption but even then, the amount of fatty acids entering circulation from topical oil is minimal.
Things that DO penetrate more deeply:
Essential oils (very small molecules)
Certain pharmaceutical actives (specifically engineered for penetration)
Transdermal patches (medications designed to deliver drugs systemically)
Carrier oils like sunflower, jojoba, or rosehip? They work on the surface and within your barrier, not in your bloodstream.
Linoleic Acid Is Actually GOOD for Your Skin
Here's where it gets really interesting: linoleic acid, the omega-6 fatty acid that's the source of concern in dietary seed oils is actually essential for healthy skin when applied topically.
Research shows:
Linoleic acid is a key component of your skin's natural barrier. Your skin produces its own lipids to maintain barrier function, and linoleic acid is one of the most important.
People with acne-prone skin often have LOW linoleic acid in their sebum. Studies show that sebum low in linoleic acid is more likely to be comedogenic (pore-clogging). Topical linoleic acid can actually help normalize sebum and reduce breakouts.
Linoleic acid supports barrier repair. It helps skin cells produce ceramides (another critical barrier lipid) and reduces transepidermal water loss (TEWL), keeping skin hydrated.
It has anti-inflammatory properties topically. While excessive dietary omega-6 may promote systemic inflammation, topical linoleic acid has been shown to reduce skin inflammation, redness, and irritation.
So the very thing people are afraid of in dietary seed oils is actually beneficial when applied to skin. Context matters.
The Real Concern: Quality and Oxidation
While the "seed oils are inflammatory" argument doesn't hold for topical use, there IS a legitimate concern worth paying attention to: oxidation.
Oxidized oils ARE bad for your skin.
When oils oxidize (go rancid), they form free radicals and peroxides that can damage skin cells, cause inflammation, and accelerate aging.
Oxidation happens when oils are exposed to:
Heat
Light
Oxygen
Time
This is where quality matters enormously:
Refined, heavily processed seed oils (like those used in cheap, mass-market skincare) have often been stripped of their natural antioxidants during processing, making them more vulnerable to oxidation.
Cold-pressed, minimally processed seed oils (like those used in high-quality botanical skincare) retain their natural vitamin E, polyphenols, and other antioxidants that protect against oxidation.
Fresh, small-batch formulations are far less likely to be oxidized than products that have been sitting in warehouses or on shelves for months or years.
This is actually an argument FOR botanical, artisan skincare, not against seed oils themselves, but for choosing high-quality, fresh, properly stored oils over cheap, degraded ones.
The Best Seed Oils for Skincare (And Why They're Worth Using)
Not all seed oils are created equal. Some are exceptionally well-suited for skincare and have been used safely and effectively for decades in professional formulations.
Here are the ones I use and trust:
Jojoba Oil
Technically: Jojoba is a liquid wax, not a true oil, which makes it incredibly stable and resistant to oxidation.
Why it's excellent for skin:
Mimics human sebum more closely than almost any other botanical ingredient
Non-comedogenic (won't clog pores)
Suitable for all skin types, including oily and acne-prone
Balances oil production rather than adding to it
Extremely shelf-stable
The science: Jojoba's unique fatty acid profile (primarily eicosenoic acid) makes it nearly identical to the wax esters in human skin. This is why it absorbs beautifully and rarely causes reactions.
I use jojoba as a base in many of my formulations because it's universally compatible and acts as a carrier for other beneficial botanicals.

Sunflower Seed Oil
Why it's excellent for skin:
High in linoleic acid (60-70%), which as we discussed, supports the skin barrier
Rich in vitamin E (a powerful antioxidant)
Gentle and suitable for sensitive, dry, and eczema-prone skin
Non-comedogenic when cold-pressed and high-quality
Studies show it actually supports skin microbiome health
The science: Research published in Pediatric Dermatology found that topical sunflower seed oil significantly improved skin barrier function and didn't promote infection (unlike some other oils tested). It's genuinely therapeutic.
The key: Cold-pressed, organic sunflower oil is a completely different ingredient than the highly refined, oxidized sunflower oil used in cheap lotions.

Meadowfoam Seed Oil
Why it's excellent for skin:
Exceptionally stable and resists oxidation far better than most seed oils
Forms a protective, non-greasy film on skin that locks in moisture
Rich in long-chain fatty acids that support skin elasticity
Actually extends the shelf life of other oils when blended with them
The science: Meadowfoam contains over 98% long-chain fatty acids, including eicosenoic acid (like jojoba). This unique composition makes it one of the most stable natural oils available.
This is a formulator's secret ingredient and it makes other oils work better and last longer.
Rosehip Seed Oil
Why it's excellent for skin:
High in linoleic acid (supports barrier)
Rich in trans-retinoic acid (a natural form of vitamin A that supports cell turnover and anti-aging)
Packed with vitamin C and antioxidants
Helps fade hyperpigmentation and scars
Lightweight despite being deeply nourishing
The science: Studies show rosehip oil improves skin elasticity, reduces wrinkles, and fades post-inflammatory hyperpigmentation. It's one of the most research-backed botanical oils for anti-aging.
The quality matters here, cold-pressed, organic rosehip oil stored in dark glass is potent. Cheap, oxidized rosehip oil doesn't deliver the same benefits.
Sea Buckthorn Seed Oil
Why it's excellent for skin:
Rare source of omega-7 fatty acids (palmitoleic acid), which decline in skin as we age
Incredibly rich in antioxidants (vitamins A, C, E, and carotenoids)
Supports skin regeneration and wound healing
Anti-inflammatory and soothing
The science: Omega-7 is naturally abundant in young, healthy skin but decreases significantly with age. Topical application helps replenish what's lost, supporting a more youthful lipid profile.
How to Know If a Seed Oil Product Is High-Quality
Not all products containing seed oils are created equal. Here's how to identify quality:
✓ Look for:
Cold-pressed or expeller-pressed oils
Organic certification
Dark glass bottles (protects from light oxidation)
Recent manufacturing dates
Minimal ingredient lists
Clear sourcing information
Storage instructions (keep in cool, dark place)
✗ Avoid:
"Refined" seed oils high on ingredient lists
Products in clear plastic bottles
Old stock (especially if discounted because it's been sitting)
Strong, off, or rancid smells (sign of oxidation)
Products with seed oils listed after a long list of synthetic ingredients
The freshness factor: Small-batch, artisan skincare has a real advantage here. Products made fresh in small quantities and sold quickly are far less likely to oxidize than mass-market products made months ago and sitting in warehouses.
What About "Seed Oil Free" Skincare?
You'll see some brands marketing themselves as "seed oil free" to capitalize on the dietary controversy.
Here's the truth: This is mostly marketing.
Avoiding seed oils in skincare isn't necessary for skin health. In fact, eliminating beneficial oils like jojoba, rosehip, and sunflower means missing out on ingredients with proven barrier-supporting, anti-inflammatory, and anti-aging benefits.
What they replace seed oils with:
Often saturated fats like coconut oil or shea butter (which can be comedogenic for some skin types)
Synthetic alternatives
Sometimes just fewer beneficial ingredients overall
When "seed oil free" makes sense: If you have a documented allergy to a specific seed oil, absolutely avoid it. But that's individual sensitivity, not a blanket reason to avoid an entire category of beneficial ingredients.
My Professional Take: Quality Over Category
After 13 years a licensed aesthetician and formulating botanical skincare, working with hundreds of clients with every skin type and concern, here's what I know to be true:
The fear of seed oils in skincare is misplaced. It's based on a dietary conversation that doesn't translate to topical use.
Quality matters infinitely more than category. A fresh, cold-pressed, organic sunflower oil is exponentially better for your skin than a rancid, oxidized, "seed-oil-free" alternative.
Your skin needs fatty acids. Linoleic acid, oleic acid, palmitoleic acid, these are not your enemies. They're essential components of healthy skin.
Small-batch, botanical formulations have a real advantage in this conversation. Fresh oils, minimal processing, proper storage, these are what protect against oxidation and deliver real benefits.
I grow my own calendula, source my oils carefully, formulate in small batches, and store everything properly because I understand the science. Quality is everything.
Final Thoughts: Trust the Science, Not the Fear
The wellness world loves a good villain. First it was gluten, then it was lectins, now it's seed oils. There's always something to be afraid of.
But skincare shouldn't be driven by fear, it should be driven by science, quality, and understanding what actually works for your skin.
Seed oils, when chosen carefully and used properly, are some of the most beneficial ingredients in botanical skincare. They support your barrier, reduce inflammation, nourish deeply, and have decades of safe use and research backing them.
The conversation about dietary seed oils is worth having, how they're processed, how they're used in cooking, how they fit into your overall diet. But that's a completely separate discussion from whether jojoba or rosehip oil belongs in your face serum.
Your skin is not your stomach. Topical is not the same as internal. Quality matters more than category.
Choose fresh, cold-pressed, organic botanical oils from trusted sources. Store them properly. Use them confidently.
About the Oils in Skin Soul Rituals
Every oil I use in my formulations, jojoba, sunflower, meadowfoam, macadamia, rosehip, sea buckthorn is chosen for its proven skin benefits, carefully sourced, and used fresh in small-batch production.
I formulate with the same oils I trust on my own skin and recommend to clients. Quality, freshness, and botanical integrity are non-negotiable.
Explore the Skin Soul Rituals collection to see how these beautiful seed oils work in practice, nourishing, supporting, and enhancing your skin's natural health and glow.

Calendula for Eczema: What It Is, Why It Works, and How to Use It Safely
If you or your child struggles with eczema, you know the exhausting cycle: flare-ups that appear without warning, skin so irritated it cracks and bleeds, the desperate search for something, anything, that soothes without stinging or making it worse. As a licensed holistic aesthetician with over 13 years of experience working with sensitive, compromised skin, I've seen calendula transform eczema-prone skin when almost nothing else worked. Here's the science behind why this gentle botanical is so effective, and how to use it safely for both children and adults.
by Amber Boone, Holistic Aesthetician & Founder of Skin Soul Rituals
You've tried the creams. You've read the labels. You've watched your child scratch at skin that just won't calm down and you're tired of reaching for the hydrocortisone knowing it's only a temporary fix.
There's a botanical that's been quietly working for centuries. And the research on it is really solid.
Important Disclaimer: I'm a licensed aesthetician, not a medical doctor or dermatologist. I cannot diagnose or treat medical conditions. Eczema (atopic dermatitis) is a medical condition that should be managed with guidance from your healthcare provider. This information is educational and based on my professional experience and current research. Always consult with your doctor before trying new treatments, especially for children.
What Is Calendula?
Calendula officinalis, commonly called pot marigold is a bright orange-yellow flower that's been used medicinally for centuries. It's not the same as the marigolds you see in garden centers (those are Tagetes); calendula is its own distinct plant with a long history in herbal medicine.
Traditional uses of calendula: Throughout history, calendula has been used topically for wounds, burns, skin inflammation, rashes, and infections. Herbalists called it "wound herb" because of its ability to support healing and reduce inflammation.
What makes calendula special for skin: The flowers contain powerful anti-inflammatory, antimicrobial, and skin-soothing compounds including:
Flavonoids (anti-inflammatory and antioxidant)
Triterpenoids (promote wound healing and tissue repair)
Carotenoids (antioxidant protection)
Essential oils (antimicrobial properties)
When these compounds are extracted from the flowers, typically through oil infusion they create a gentle but effective topical treatment that's safe enough for the most delicate skin, including babies and children.
Understanding Eczema (So You Know Why Calendula Helps)
Before we talk about how calendula works, you need to understand what's actually happening with eczema so the mechanism makes sense.
What eczema is: Atopic dermatitis (the medical term for eczema) is a chronic inflammatory skin condition characterized by a compromised skin barrier, immune system overreaction, and extreme sensitivity to triggers.
What's happening in eczema-prone skin:
Damaged skin barrier: Your skin's outermost layer normally acts like a brick wall, skin cells are the bricks, lipids (fats) are the mortar. In eczema, this wall is faulty. The "mortar" is deficient, creating gaps that allow:
Moisture to escape (causing dryness)
Irritants, allergens, and bacteria to penetrate (causing inflammation)
Overactive immune response: When irritants get through the damaged barrier, the immune system overreacts, releasing inflammatory chemicals that cause redness, swelling, itching, and pain.
The itch-scratch cycle: Itching triggers scratching, which further damages the barrier, which allows more irritants in, which causes more inflammation and itching. It's a vicious cycle.
Microbial imbalance: Eczema-prone skin often has an overgrowth of Staphylococcus aureus bacteria, which produces toxins that worsen inflammation.
Common eczema triggers:
Harsh soaps and detergents
Fragrances and synthetic chemicals
Wool and rough fabrics
Temperature extremes and sweating
Stress
Allergens (food, environmental)
Dry air
Why most products make it worse: Many conventional skincare products contain ingredients that further damage the barrier, sulfates, alcohol, synthetic fragrances, preservatives that irritate. Even products marketed for "sensitive skin" can contain hidden irritants.
This is where calendula comes in. It addresses multiple aspects of the eczema problem at once.
Skin Soul Rituals | Jojoba & Calendula Oil
How Calendula Helps Eczema: The Science
Calendula isn't a cure for eczema, there is no cure. But research shows it can significantly reduce symptoms, support the skin barrier, and calm the inflammatory response that drives flare-ups.
Here's what calendula does for eczema-prone skin:
1. Powerful Anti-Inflammatory Action
The primary benefit of calendula for eczema is its anti-inflammatory effect. Studies show that calendula extracts significantly reduce inflammation markers in the skin.
How it works: The flavonoids and triterpenoids in calendula inhibit the inflammatory pathways that cause redness, swelling, and pain. It's gentler than hydrocortisone but works through a similar anti-inflammatory mechanism.
What this means for eczema: Less inflammation = less redness, less swelling, less discomfort. The angry, hot feeling that comes with flare-ups calms down.
2. Supports Wound Healing and Skin Repair
Calendula has been extensively studied for wound healing. It promotes the formation of new tissue, increases collagen production, and speeds up epithelialization (the process of skin growing back over wounds).
How it works: The triterpenoids stimulate fibroblast activity (the cells that produce collagen and repair tissue). Calendula also increases blood flow to the area, bringing nutrients and oxygen needed for healing.
What this means for eczema: The cracked, broken skin that comes with severe eczema heals faster. The skin barrier repairs more efficiently, reducing vulnerability to irritants.
3. Antimicrobial Properties
Calendula has natural antimicrobial activity against bacteria, fungi, and some viruses, including Staphylococcus aureus, the bacteria that commonly overgrows in eczema.
How it works: The essential oils and other compounds in calendula disrupt bacterial cell membranes and inhibit their growth.
What this means for eczema: Reduces the risk of infected eczema (a common and painful complication). Helps rebalance the skin's microbiome.
4. Soothes Itching and Discomfort
While the mechanism isn't fully understood, calendula has a documented soothing effect on itchy, irritated skin.
What this means for eczema: Breaking the itch-scratch cycle is crucial. If you can reduce the urge to scratch, you prevent further damage to the barrier.
5. Hydrates Without Irritation
When calendula is infused into a carrier oil (like jojoba), it delivers moisture and nourishment to dry, damaged skin without any of the irritating ingredients found in conventional creams.
What this means for eczema: Hydration supports barrier function. Eczema skin is chronically dehydrated, and calendula-infused oil provides essential fatty acids and moisture that compromised skin desperately needs.
The Research: What Studies Show
I'm not just recommending calendula based on tradition or anecdote, there's actual research backing its use for inflammatory skin conditions.
Key studies:
A 2009 study published in the Journal of Clinical Oncology compared calendula cream to trolamine (a common anti-inflammatory) for radiation-induced dermatitis (which shares characteristics with eczema). Calendula was significantly more effective at preventing and reducing skin inflammation.
A 2012 study in Advances in Therapy found that calendula extract reduced inflammation and promoted wound healing in skin injuries.
Multiple studies have confirmed calendula's antimicrobial activity against S. aureus, the bacteria implicated in eczema flare-ups.
While there aren't large-scale clinical trials specifically on calendula for atopic dermatitis, the anti-inflammatory, wound-healing, and antimicrobial properties documented in research directly address the mechanisms of eczema.
Calendula Oil vs. Calendula Cream: What's the Difference?
You'll find calendula in different forms, creams, ointments, salves, and oils. Here's what you need to know:
Calendula-infused oil:
Dried calendula flowers steeped in a carrier oil (jojoba, olive, sunflower, etc.) to extract the beneficial compounds
Pure, simple, minimal ingredients
Excellent for very sensitive skin because there are no emulsifiers, preservatives, or additives
Absorbs well, nourishes deeply
Best for: Daily moisture, barrier support, gentle treatment
Calendula cream/ointment:
Calendula extract or infused oil mixed with water, emulsifiers, and often preservatives to create a spreadable cream
May contain additional beneficial ingredients (colloidal oatmeal, shea butter, etc.)
Can be more convenient for some people
Risk: Additional ingredients may irritate sensitive skin
Best for: People who prefer cream texture over oil
My professional recommendation for eczema: Pure calendula-infused oil in a gentle carrier oil is the safest, most effective option, especially for children and severely compromised skin. The fewer ingredients, the lower the risk of irritation.
How to Use Calendula Oil for Eczema
Using calendula correctly matters. Here's my protocol based on years of working with eczema-prone clients:
Step 1: Choose the Right Calendula Oil
Not all calendula oils are created equal. Look for:
High-quality carrier oil: Jojoba is ideal because it's non-comedogenic, shelf-stable, and mimics skin's natural sebum. Olive, sunflower, and sweet almond oil are also good choices.
Organic calendula flowers: Pesticides and chemicals defeat the purpose of using a gentle botanical.
Proper extraction method: Heat or cold infusion extracts the beneficial compounds. Avoid products that just add calendula fragrance or have "calendula" far down the ingredient list.
Minimal ingredients: The best calendula oil for eczema is just two ingredients.
Step 2: Patch Test First
Even gentle ingredients can cause reactions in highly sensitive skin. Before using calendula oil all over:
Apply a small amount to the inside of the forearm
Wait 24-48 hours
Check for any redness, itching, or irritation
If clear, proceed to use on affected areas
Step 3: Apply to Damp Skin
Oil works best when applied to slightly damp skin, it seals in moisture rather than sitting on top of dry skin.
The routine:
Bathe or wash the affected area with lukewarm (not hot) water and a gentle, fragrance-free cleanser (or just water for babies)
Pat skin mostly dry but leave it slightly damp
Apply a few drops of calendula oil to your palm
Warm it between your hands
Gently press and massage into the affected areas, don't rub vigorously, use gentle patting and pressing motions
Allow it to absorb for a few minutes
Step 4: Use Consistently
For active flare-ups: Apply 2-3 times daily (morning, midday if needed, and before bed)
For maintenance: Apply once or twice daily to prevent flare-ups
For children: Apply after bath time and in the morning, more frequently during cold, dry weather
Step 5: Combine with Other Eczema Management Strategies
Calendula works best as part of a comprehensive approach:
Avoid known triggers
Use gentle, fragrance-free cleansers
Keep nails short to minimize damage from scratching
Dress in soft, breathable fabrics
Use a humidifier in dry climates
Manage stress (stress worsens eczema significantly)
Work with your doctor on any underlying allergies or immune issues
Is Calendula Safe for Babies and Children?
This is one of the most common questions I get, and it's the right question to ask.
Yes, calendula is generally considered safe for babies and children when used topically.
Here's what you need to know:
Safety profile: Calendula has been used for centuries on infants and young children. It's one of the gentlest botanicals available and has a very low risk of allergic reaction.
Precautions for babies:
Always dilute: Use calendula-infused oil, not pure essential oil or alcohol-based extracts
Patch test first, even on babies
Avoid eyes, mouth, and any open, weeping wounds (wait until the acute phase calms)
Use organic, pure formulations with minimal ingredients
Consult your pediatrician before starting any new treatment, especially for infants under 6 months
Why parents choose calendula for children's eczema: Parents are rightfully cautious about using steroids on young children. While topical steroids prescribed by a doctor are sometimes necessary, many parents want gentler options for daily maintenance and mild flare-ups. Calendula offers that.
What Results to Expect (And When)
Let me set realistic expectations so you're not disappointed or give up too soon.
Within 24-48 hours:
Reduced redness and inflammation
Less intense itching
Skin feels more comfortable and soothed
The "angry" feeling of a flare-up starts to calm
Within 1 week:
Visible reduction in redness and swelling
Cracked skin begins to heal
Less frequent scratching
Improved sleep (if itching was disrupting sleep)
Within 2-4 weeks:
Skin barrier function improves
Flare-ups become less frequent
Affected areas start to look and feel more like normal skin
Overall skin texture smoother and healthier
Long-term (2-3 months of consistent use):
Significantly fewer flare-ups
Baseline skin health much improved
Less dependency on rescue treatments like steroids
Better tolerance of previously triggering situations (weather changes, stress, etc.)
Important: Calendula is not a cure. Eczema is chronic and will require ongoing management. But calendula can dramatically reduce symptom severity and frequency when used consistently.
When Calendula Alone Isn't Enough
Calendula is incredibly effective for mild to moderate eczema and as a maintenance treatment. But there are situations where you need more intervention:
See a doctor if:
Eczema is severe, widespread, or getting worse despite treatment
Skin shows signs of infection (yellow crusting, oozing, increased pain, fever)
Eczema is significantly impacting quality of life or sleep
You suspect an underlying allergy or trigger that needs identification
Home treatments aren't providing adequate relief
Calendula works well alongside medical treatment: Many dermatologists actually support using gentle botanicals like calendula for maintenance between steroid treatments. It's not an either/or as it can be both.
Choosing a Quality Calendula Product
If you're buying rather than making your own calendula oil, here's what to look for:
Ingredient list should be short: Ideally just: [Carrier oil] infused with Calendula Officinalis Flower, Tocopherol (Vitamin E)
Avoid:
Long ingredient lists with chemicals you can't pronounce
Synthetic fragrances (even "unscented" products can have masking fragrances)
Alcohol, parabens, sulfates
Calendula listed far down the ingredient list (means there's very little actual calendula)
Look for:
Organic or wildcrafted calendula
Cold-pressed or properly infused oils
Dark glass bottles (protect from light degradation)
Clear information about sourcing and extraction method
Where to buy:
Reputable natural skincare brands
Herbalists and botanical product makers
Aesthetician-formulated products (like Skin Soul Rituals)
Avoid: Random Amazon listings, suspiciously cheap products
My Personal Experience with Calendula for Eczema
I want to share why I'm so passionate about calendula for eczema beyond just the research.
Over my 13 years as a holistic aesthetician, I've worked with dozens of clients, adults and children, struggling with eczema. I've seen the physical discomfort, the emotional toll, the frustration with products that promise relief but deliver irritation.
Calendula has been one of my most consistently effective recommendations. Not because it's trendy or profitable, but because it genuinely works and it's safe.
I grow calendula in my own garden specifically because I want complete control over the quality of what goes into the products I create. I harvest the flowers at peak bloom, dry them carefully, and infuse them slowly into organic jojoba oil. The resulting oil is simple, pure, and effective.
That's the power of simple, quality botanical skincare, it doesn't need a marketing team or celebrity endorsement. It just needs to work.
Final Thoughts: Gentle, Effective, and Safe
If you or your child struggles with eczema, you don't have to choose between effective and gentle. Calendula offers both.
It won't cure eczema, nothing will. But it can significantly reduce inflammation, support your skin's natural barrier, calm itching, and help you manage flare-ups without harsh chemicals or constant steroid use.
The key is consistency, quality, and patience. Give calendula at least 2-4 weeks of daily use before deciding if it's working. Support it with gentle skincare practices, trigger avoidance, and medical guidance when needed.
Your skin (or your child's skin) deserves care that doesn't cause more harm in the process of trying to heal. Calendula is that kind of care, ancient wisdom backed by modern research, gentle enough for the most delicate skin, and effective enough to make a real difference.

Calm Sensitive Skin Oil | Skin Soul Rituals
Ready to try Calm for yourself?
I formulated Calm specifically for eczema-prone, reactive, and sensitive skin, including children's. Two ingredients. Calendula flowers, infused into organic jojoba oil. Nothing else.

The Complete Gua Sha Guide: Everything You Need for Lifted, Sculpted, Glowing Skin
You've seen the before-and-after photos. The glowing skin, the lifted jawlines, the sculpted cheekbones. You've wondered if gua sha could actually work for you, for your skin, your concerns, your busy life. As a holistic aesthetician who's practiced gua sha for over 13 years, I'm giving you everything: the science, the techniques, the realistic timelines, the mistakes to avoid, and the truth about what this ancient practice can and cannot do. Whether you have 5 minutes or 15, sensitive skin or mature skin, this is your complete roadmap to making gua sha work for you.
By Amber Boone, Holistic Aesthetician & Founder of Skin Soul Rituals
You've been scrolling. Seeing the photos. Watching women with glowing skin, defined jawlines, and that effortless radiance you want to have too.
They're all talking about gua sha.
And you're wondering: Could this actually work for me?
Maybe you've already bought a stone that's been sitting in a drawer because you're not sure you're doing it right. Or maybe you haven't started yet because you're overwhelmed, too many videos, conflicting advice, no clear path forward.
Maybe you're skeptical. You've tried things before that promised results and delivered nothing. You don't have time for another skincare trend that doesn't work.
Here's what I want you to know: Gua sha is not a trend. It's a 2,000-year-old practice that actually works when you understand how to do it properly, what to expect, and how to make it fit into your real life.
I'm Amber, a licensed holistic aesthetician with over 13 years of hands-on experience. I've used gua sha in my treatment room with hundreds of clients. I've practiced it on my own face almost every day for years. I've seen the transformation it creates not through filters or perfect lighting, but through consistent, intentional practice.
This guide is everything I wish someone had told me when I started. It's comprehensive but not overwhelming. It's honest about what works and what doesn't. And it's designed to meet you exactly where you are, whether you're a complete beginner or someone who's been practicing but not seeing the results you want.
By the end of this guide, you'll know:
Exactly what gua sha does (and doesn't do) for your skin
How to choose the right tool and use proper technique
What results to expect and when
How to customize your practice for YOUR specific goals
The common mistakes that sabotage results
How to fit this into your life, even if you only have 5 minutes
You don't need to become an expert overnight. You just need to start with the right information, the right tools, and the right support.
Let's do this together.

Part 1: What Gua Sha Actually Is (And Why It Works)
The Ancient Practice, Modernized
Gua sha (pronounced "gwah-shah") comes from traditional Chinese medicine. The term literally translates to "scraping sand"—referring to the light, speckled marks that sometimes appear on skin after treatment.
Traditionally, gua sha was used on the body to release muscle tension, improve circulation, and move stagnant energy (called "qi" in Chinese medicine). Practitioners used smooth-edged tools made from jade, horn, or stone to apply pressure and gliding strokes along specific pathways.
Modern facial gua sha adapts this ancient technique for the delicate skin and muscles of the face. Instead of the deeper pressure used on the body, facial gua sha uses gentle, intentional strokes to:
Drain lymphatic fluid
Release facial muscle tension
Increase circulation
Stimulate collagen production
Sculpt and lift facial contours
It's the same foundational principles—just refined for the specific needs of your face.
What Happens When You Do Gua Sha
Here's the science behind why this works:
Lymphatic drainage: Your lymphatic system is your body's waste removal and immune support network. Unlike your circulatory system (which has your heart as a pump), your lymphatic system relies on muscle movement and manual stimulation to move fluid.
Your face has a complex network of lymph vessels, and fluid easily pools there, especially after sleeping flat all night, eating salty foods, or experiencing hormonal changes. When lymphatic fluid stagnates, your face looks puffy, swollen, and dull.
Gua sha manually moves this fluid toward your lymph nodes (located primarily at your neck and near your ears) where it can be filtered and drained. The result? Immediate depuffing and a lighter, more sculpted appearance.
Increased microcirculation: The gentle pressure and gliding motions stimulate blood flow to your skin's surface. Fresh, oxygenated blood brings nutrients and removes waste products. This is what creates the immediate "glow" you see after a session, your skin is literally more oxygenated and nourished.
Muscle tension release: You hold tension in your face just like you do in your shoulders. Clenching your jaw, furrowing your brow, squinting and this creates chronic muscle tightness that pulls your face down and creates wrinkles.
Gua sha releases this tension, allowing muscles to relax and lengthen. When facial muscles aren't chronically contracted, your face looks more lifted, open, and youthful.
Collagen stimulation: The micro-pressure from gua sha signals your skin cells to produce more collagen and elastin, the proteins responsible for firmness, elasticity, and youthful structure. This is a gradual process, but with consistent practice over weeks and months, it genuinely improves skin quality.
Nervous system regulation: The slow, intentional practice activates your parasympathetic nervous system (rest mode), reducing stress hormones like cortisol. Lower stress = less inflammation = healthier, calmer skin.
What Gua Sha Can Realistically Do
Let's be clear about what's possible and what's hype.
Gua sha CAN:
Reduce puffiness and fluid retention (immediately and cumulatively)
Sculpt and define your facial contours over time
Release chronic muscle tension (jaw, temples, forehead)
Soften fine lines caused by dehydration or muscle tension
Improve circulation for brighter, more radiant skin
Support lymphatic drainage for clearer skin
Provide a gentle, cumulative lifting effect
Reduce inflammation and calm reactive skin
Help your skincare products absorb better
Gua sha CANNOT:
Change your bone structure
Erase deep wrinkles or reverse significant sun damage
Work miracles in one session
Fix severe skin issues that require dermatological care
Substitute for healthy lifestyle habits
Think of gua sha like exercise for your face. One workout won't transform your body, but consistent practice over time creates real, visible change
The bottom line: Gua sha works. But it requires consistency, proper technique, and realistic expectations.
Feeling overwhelmed by where to start? I created a free 5-Day Gua Sha Challenge that walks you through the fundamentals step-by-step the proper technique, full-face routine, and how to target your specific concerns.Join the challenge here and start seeing results within the first week
Part 2: Getting Started - What You Actually Need
You don't need a lot. In fact, simplicity is better when you're starting out.
Your Gua Sha Tool: How to Choose
What to look for in a quality tool:
Smooth, polished edges - No rough spots that could scratch your skin
Proper shape with curves - Multiple edges that fit your facial contours (jaw, cheekbones, under-eyes)
Comfortable size - Not too large (unwieldy) or too small (hard to grip)
Solid construction - One-piece stone, no cracks or chips
Appropriate thickness - Substantial enough to glide smoothly but not clunky
The stone material question:
Here's the truth…
I work with different stones—white jade, green aventurine, moss agate and I love each for different reasons. White jade is naturally cooling and has a clean, elegant energy. Green aventurine feels heart-centered and abundant. Moss agate has a grounding, earthy quality.
What matters: That the stone is smooth, well-made, and feels good in your hand. A high-quality rose quartz will outperform a cheap, poorly-made jade every time.
My recommendation for beginners: Choose a stone that appeals to you aesthetically. If you love how it looks and feels, you'll actually use it and consistency is what creates results.
In my Glow & Lift Kit, I currently offer moss agate because I love its gentle, grounding energy and beautiful natural patterns. I also offer white jade and green aventurine as individual stones for those who feel drawn to their specific qualities. Try what calls to you.
The Facial Oil: Non-Negotiable
Don’t do gua sha on dry skin. Dragging a stone across dry skin creates friction that can irritate, damage capillaries, and even cause premature wrinkles.
You need a facial oil or serum that provides "slip" smooth gliding without pulling.
What to look for:
Lightweight enough to glide smoothly
Nourishing enough to benefit your skin during the 5-10 minute massage
Non-comedogenic (won't clog pores)
Made with quality plant oils
Pleasant or neutral scent (you'll be breathing it in)
I formulated my Glow Elixir specifically for gua sha practice, it's the perfect weight for smooth gliding, packed with botanical oils (jojoba, rosehip, calendula) that nourish during the massage, and the hinoki-bergamot-sandalwood scent is calming and grounding.
But any quality facial oil works, just make sure it's actually an oil, not a cream (which doesn't provide enough slip).
That's It. Seriously.
You need:
A quality gua sha stone
A good facial oil
Everything else is extra.
You don't need jade rollers, electric devices, twelve different stones, or complicated routines. Simple is better, especially when you're starting.
Ready to start with everything you need? The Glow & Lift Kit includes a professional-grade gua sha stone and our Glow Elixir facial oil, the exact tools I use and recommend to beginners. It's everything to start your practice with confidence.
Part 3: The Technique - How to Actually Do It
This is where most people get stuck. Technique matters and the difference between results and wasted time is understanding how to do this correctly.
The Golden Rules of Gua Sha
Before I give you specific techniques, understand these principles:
1. Light to medium pressure - NEVER hard Your lymphatic vessels sit very close to the surface of your skin. Deep pressure bypasses them entirely. You want gentle, intentional gliding, not aggressive scraping.
If you're seeing significant redness, broken capillaries, or bruising on your face, you're pressing way too hard.
2. Always move in the correct direction Lymph only flows one way. You're moving fluid OUT (away from the center of your face) and DOWN (toward your neck where your lymph nodes are and ultimately towards the heart).
Never scrape back and forth randomly. Always: out and down.
3. Slow, intentional strokes Each stroke should take 3-5 seconds. You're coaxing fluid to move, not frantically scraping. Slow = effective.
4. ALWAYS start with your neck This is the most important step everyone skips. Your neck is where all facial lymph drains. If you don't "open the drain" first, you're just moving fluid around your face with nowhere for it to go.
5. Use enough oil If you feel any dragging, pulling, or friction, you can add a few more drops of oil. You should glide smoothly without any resistance.
The Basic Full-Face Routine (5-10 Minutes)
This is the foundation. Master this, and everything else is just refinement.
Step 1: Prep Your Drainage Pathways (1 minute)
Sit comfortably. Take 3 deep breaths.
Place the flat edge of your tool just below your ear, at the side of your neck. Glide straight down toward your collarbone. Use smooth, gentle firm strokes.
Repeat 3-5 times on each side.
Why this matters: You're opening your cervical lymph nodes so the fluid you drain from your face has somewhere to go.
Step 2: Jawline Sculpting (2 minutes)
Place the curved notch of your tool at the center of your chin. Glide along your jawbone toward your ear. The tool should follow the natural line of your jaw.
Repeat 3-5 times on each side.
What you're doing: Draining fluid, releasing jaw tension (especially if you clench or grind), defining your jawline.
Step 3: Cheek Lifting (2 minutes)
Start at the side of your nose (where your cheek begins). Using the long curved edge, glide upward and outward along your cheekbone toward your ear.
Repeat 3-5 times on each side.
What you're doing: Lifting cheek tissue, draining puffiness, defining cheekbones, bringing circulation to the mid-face.
Step 4: Under-Eye Depuffing (1-2 minutes)
Using the flat or gently curved edge with the LIGHTEST possible pressure, start at the inner corner of your under-eye. Glide outward toward your temple and all the way to your hairline.
Repeat 3-5 times under each eye.
What you're doing: Draining the most delicate, puff-prone area. Be extremely gentle here, the skin is thin.
Step 5: Forehead Smoothing (1 minute)
Start in the center of your forehead between your brows. Glide outward toward your temple. Work in horizontal sections until you've covered your entire forehead.
Repeat 3-5 times across each section.
What you're doing: Releasing tension (especially if you furrow your brow), smoothing forehead lines, draining forehead puffiness.
Step 6: Complete the Drainage (1 minute)
Finish by sweeping down your neck again, from below your ear to your collarbone. This completes the drainage circuit.
Repeat 3-5 times on each side.
Total time: 5-10 minutes depending on how many strokes you do.
The beauty of this routine? It works even if you only have 5 minutes. Do fewer repetitions if you're short on time. Consistency matters more than duration.
Want to see this technique in action? My free 5-Day Gua Sha Challenge includes video tutorials showing you exactly how to do each step, common mistakes to avoid, and how to customize the routine for your specific concerns. Join here and start practicing with confidence.
Part 4: Choosing Your Path - Gua Sha by Goal
Not everyone has the same skin concerns. Here's how to focus your practice based on what YOU need.
If Your Goal Is: Depuffing and Lymphatic Drainage
Your main issue: You wake up puffy, especially around your eyes and jawline. Your face feels heavy and swollen. You retain fluid easily.
What to focus on:
Always start with neck drainage (this is your #1 priority)
Spend extra time on under-eyes with very light pressure
Do jawline work slowly and intentionally
Practice first thing in the morning when puffiness is worst
Timeline for results:
Immediate reduction in puffiness after each session
Within 2-3 weeks: morning puffiness less severe overall
Within 4-6 weeks: chronic puffiness significantly reduced
Additional tip: Keep your gua sha stone in the fridge. The cold enhances the anti-inflammatory, de-puffing effect dramatically.
Read more: Gua Sha for Lymphatic Drainage, Gua Sha for Puffy Eyes
If Your Goal Is: Sculpting and Facial Definition
Your main issue: You want higher cheekbones, a sharper jawline, and overall more defined facial contours. You might have mild jowling or loss of definition.
What to focus on:
Jawline work is your priority, consistent, intentional strokes along the bone
Cheek lifting with upward and outward movements
Releasing jaw muscle tension (masseter muscle) which can make your face look wider
Consistent daily practice (sculpting is cumulative)
Timeline for results:
Temporary definition immediately after sessions
Visible cumulative sculpting starts around week 4-6
Dramatic transformation by week 8-12
Additional tip: Pair gua sha with a renew serum with bakuchiol to support collagen production and firmness from within.
Read more: Gua Sha Before & After: Real Results, How Long Does Gua Sha Take to Work
If Your Goal Is: Jaw Tension and TMJ Relief
Your main issue: You clench or grind your teeth. Your jaw is tight, sore, or clicks. You carry stress in your face.
What to focus on:
Slow, intentional work along your jawbone
Massaging the masseter muscle (the thick muscle on your lower cheek, just above your jawbone)
Circular motions at your temples
Evening practice to release the day's tension
Timeline for results:
Immediate relief and relaxation after each session
Reduced chronic tension within 2-3 weeks
Significant lasting improvement by 4-8 weeks
Additional tip: Gua sha works best for TMJ when combined with stress management practices such as breath work, meditation, or therapy if stress is the root cause.
Read more: Gua Sha for Jaw Tension and TMJ
If Your Goal Is: Anti-Aging and Wrinkle Reduction
Your main issue: You're in your 40s, 50s, or beyond. You want to slow visible aging, soften fine lines, and maintain firmness without botox or harsh treatments.
What to focus on:
Consistent daily practice (anti-aging is cumulative)
Full-face routine with emphasis on areas of concern (forehead lines, crow's feet, nasolabial folds)
Pair with quality serums and oils that support collagen
Be patient, collagen stimulation takes weeks to months
Timeline for results:
Improved circulation and glow immediately
Softened fine lines from fluid retention and tension within 2-4 weeks
Visible improvement in skin firmness and texture by 8-12 weeks
Maximum collagen benefits by 3-6 months
Additional tip: Gua sha is incredibly effective for mature skin when paired with gentle, nourishing botanical products. Avoid harsh actives that compromise your barrier.
Read more: Gua Sha in Your 40s, Can Gua Sha Replace Botox?
Part 5: When and How Often to Practice
The most common question I get: "How often should I do gua sha?"
The answer depends on your goals and your life.
For Best Results: Daily Practice
Why daily works:
Your lymphatic system responds best to regular, gentle stimulation
Muscle tension builds up daily, daily release prevents chronic tightness
Collagen production is stimulated cumulatively over time
You build a habit that sticks
The reality: Even 5 minutes daily beats 20 minutes twice a week. Consistency > duration.
Minimum for Results: 3-5 Times Per Week
If daily feels impossible, aim for at least 3-5 times per week. You'll still see results, but the timeline will be longer.
Morning vs. Evening
Morning gua sha (best for de-puffing):
Reduces overnight fluid accumulation
Wakes up your skin and circulation
Creates a smooth canvas for makeup
Energizes you for the day
Evening gua sha (best for relaxation and tension release):
Releases the day's stress and muscle tightness
Activates rest mode (parasympathetic nervous system)
Supports better sleep
Gives your skincare time to absorb overnight
My take: Do what fits your schedule. The best time is the time you'll actually do it.
Read more: Morning vs. Evening Gua Sha
Part 6: Common Mistakes That Sabotage Results
After years of teaching gua sha, these are the mistakes I see most often:
Mistake #1: Skipping the neck prep If you don't open your drainage pathways at the neck first, you're just pushing fluid around your face. Always start at the neck.
Mistake #2: Pressing too hard More pressure does NOT equal better results. Lymphatic drainage requires gentle touch. Hard pressure can damage capillaries.
Mistake #3: Using dry skin Never drag your tool on dry skin. Always use oil. No exceptions.
Mistake #4: Moving in random directions Lymph flows in specific pathways. Scraping every which way doesn't support drainage. Always move OUT and DOWN.
Mistake #5: Expecting overnight miracles One session won't transform your face. Gua sha is a practice. Commit to 4-6 weeks before deciding if it works.
Mistake #6: Inconsistent practice Doing it sporadically doesn't give your lymphatic system or muscles time to retrain. Consistency is everything.
Mistake #7: Not using enough oil If you feel any tugging or friction, add a little more oil. Smooth gliding is essential.
Read more: 9 Gua Sha Mistakes Beginners Make
Part 7: What to Expect - Your Realistic Timeline
Let's set honest expectations so you know what's normal.
Immediately after your first session:
Face looks less puffy, especially under eyes
Skin has a visible glow from increased circulation
Cheekbones and jawline appear more defined (temporarily)
Face feels lighter, less tense
These immediate results will fade within a few hours. That's normal. You're building toward lasting change.
Week 1:
You're learning technique, building the habit
Immediate effects each time, but no permanent changes yet
You might feel areas of tenderness where you hold tension
Weeks 2-3:
Morning puffiness becomes less severe
The glow lasts longer throughout the day
Jaw tension doesn't return as quickly
You start to love the ritual itself
Weeks 4-6:
Visible cumulative changes begin
Facial contours look more defined consistently
Fine lines from dehydration soften
Other people might comment you look well-rested or "different"
Weeks 8-12:
Significant, lasting transformation
Lymphatic system drains efficiently on its own
Facial definition is obvious in photos
Skin texture and tone visibly improved
Long-term (3-6 months+):
Results stabilize and deepen
Your face functions better even when you skip days
Muscle patterns have retrained
Skin barrier is stronger, healthier
The key: Give it at least 6 weeks of consistent practice before deciding if it's working.
Read more: How Long Does Gua Sha Take to Work?, Gua Sha Before & After: 6-Week Journey
"I don't have time for another skincare step."
I hear this all the time. Here's the truth: gua sha doesn't have to be 15 minutes of complicated choreography.
Even 5 minutes makes a difference. Truly. Neck drainage + jawline + under-eyes = 5 minutes. That's it.
And those 5 minutes? They're not just "another task." They're a moment of care for yourself. A pause in the chaos. A ritual that actually makes you feel better, physically and mentally.
You have 5 minutes. I promise.
Ready to commit? The 5-Day Gua Sha Challenge is designed for busy women, each day is just 5-10 minutes of practice. Manageable, sustainable, effective.
Part 8: Beyond the Basics - Going Deeper
Once you've mastered the fundamentals, you can explore:
Combining with other practices: Pairing gua sha with facial exercises, breathwork, or meditation for holistic benefits.
Body gua sha: Using gua sha on your neck, shoulders, and décolletage for full-body lymphatic support and tension release.
Advanced techniques: Specific drainage patterns, acupressure points, and targeted muscle release.
But don't overwhelm yourself. Master the basics first. Everything else will follow.
Part 9: Your Questions Answered
Q: Can I do gua sha if I have acne or active breakouts? A: Yes, but avoid scraping directly over active pimples. Gua sha can actually help acne-prone skin by improving circulation and lymphatic drainage, which reduces congestion.
Q: Is gua sha safe during pregnancy? A: Gentle facial gua sha is generally safe, but check with your healthcare provider. Avoid aggressive pressure and skip certain acupressure points.
Q: Can I use gua sha if I've had Botox or fillers? A: Wait at least 2 weeks after injections, then use very gentle pressure and avoid injection sites for the first month.
Q: Will I bruise? A: Not if you're using proper technique. Bruising means you're pressing too hard. Use lighter pressure.
Q: Can gua sha damage my skin? A: Not when done correctly with proper oil and gentle pressure. Dragging on dry skin or using excessive force can damage capillaries.
Q: Do I need different stones for different concerns? A: No. One well-made stone with a good shape works for everything.
Final Thoughts: You're Ready
If you've read this far, you have everything you need to start.
You know what gua sha is, how it works, and what it can realistically do.
You know how to choose your tools and use proper technique.
You know what to expect and when.
You know the common mistakes to avoid.
Now you just need to begin.
Gua sha isn't complicated. It's not reserved for people with perfect skin or unlimited time or special knowledge. It's a simple, ancient practice that works for real women with real lives and real skin concerns.
It worked for me. It's worked for hundreds of my clients. And it will work for you, if you give it time, consistency, and the right foundation.
You don't have to be perfect. You just have to start.
And you don't have to do it alone.
Start Your Gua Sha Journey Today
Option 1: Learn the Technique (Free)
Join the5-Day Gua Sha Challenge and I'll teach you everything step-by-step:
Day 1: Proper technique and pressure
Day 2: Full-face drainage routine
Day 3: Targeting specific concerns
Day 4: Common mistakes and how to fix them
Day 5: Building a sustainable practice
Video tutorials, practice routines, and personalized guidance, all for free, delivered to your inbox.
Option 2: Get Everything You Need (Complete Kit)
The Glow & Lift Kit includes: Professional-grade gua sha stone our Glow Elixir botanical facial oil (perfect slip + skin-nourishing ingredients)
Everything you need to start your practice with confidence, in one beautiful package.
Welcome to Skin Soul Rituals. Welcome to your gua sha practice. Welcome to caring for yourself with intention, consistency, and grace.
I'm here with you every step of the way.
with gratitude and good skin days,
Amber
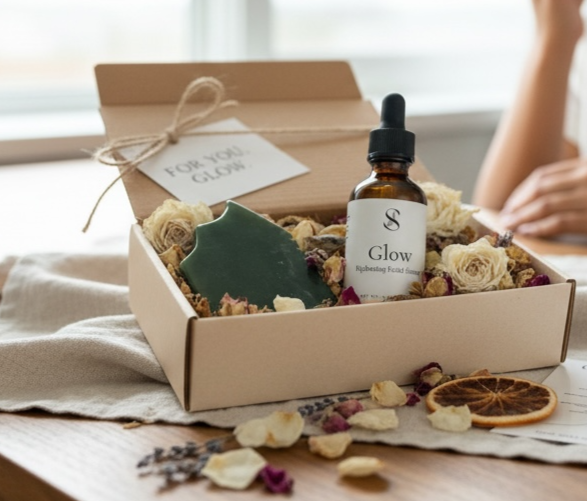
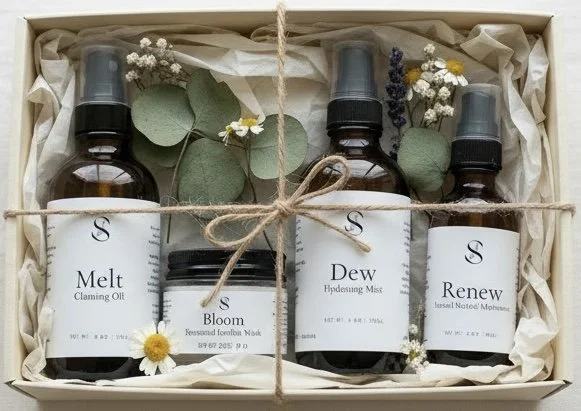
Spring Skin Reset: Detox Your Routine with Botanical Skincare
Spring isn't just about cleaning out your closet—it's the perfect time to reset your skincare routine too. After months of heavy winter products, indoor heating, and stale air, your skin is craving something fresh, clean, and alive. As a holistic aesthetician with 13 years of experience, I believe the best spring reset isn't about adding more products—it's about simplifying, swapping synthetic for botanical, and giving your skin exactly what it needs to renew itself. Here's how to detox your routine and embrace spring with glowing, healthy skin.
By Amber Boone, Holistic Aesthetician & Founder of Skin Soul Rituals
There's something about spring that makes you want to open all the windows, clear out the clutter, and start fresh.
The air smells different. Light lasts longer. Everything feels like it's waking up after a long winter sleep, including your skin.
As a licensed holistic aesthetician with over 13 years of experience, I've learned that the best spring reset is about simplifying. It's about stripping away the products that aren't serving you, detoxing your routine from harsh synthetics, and rebuilding with clean, botanical ingredients that work with your skin, not against it.
Spring is nature's renewal season. Your skincare should reflect that, simple, intentional, alive.
Let me show you how to reset your routine the right way.
Important Disclaimer: I'm a licensed aesthetician, not a medical doctor or dermatologist. This information is educational and based on my professional experience. If you have specific skin concerns or conditions, please consult with your healthcare provider or dermatologist.
Why Your Skin Needs a Spring Reset
Let's talk about what winter did to your skin because understanding the problem helps you solve it correctly.
What happens to skin during winter:
Harsh indoor heating: Strips moisture from the air and your skin, leaving it dehydrated and tight.
Heavy products: You likely switched to richer creams and oils to combat dryness. These products served their purpose in winter but can feel too heavy as weather warms.
Less circulation: Cold weather constricts blood vessels, reducing circulation to your skin. Less blood flow = less oxygen and nutrients = dull, lifeless complexion.
Dead skin buildup: Your skin's natural exfoliation process slows in winter. Combine that with heavy products sitting on top, and you have layers of dead cells making your skin look gray and textured.
Indoor air and lack of fresh oxygen: You've been breathing recycled, stale air for months. Your skin cells need fresh oxygen to function optimally.
Weakened skin barrier: The combination of harsh weather, indoor heating, and potentially irritating products has likely compromised your skin's protective barrier.
The result? Even if you don't have obvious problems, your skin probably feels:
Dull and lackluster
Congested or sluggish
Dry but also somehow oily (confused barrier)
Textured, rough, uneven
Tired and aged
Spring is the perfect reset opportunity because:
Weather is gentler (not too hot, not too cold)
Your skin is naturally more receptive to change
You can transition to lighter, fresher products without shock
It's psychologically motivating (fresh start energy)
But the reset has to be done right—intentionally, gently, with purpose.
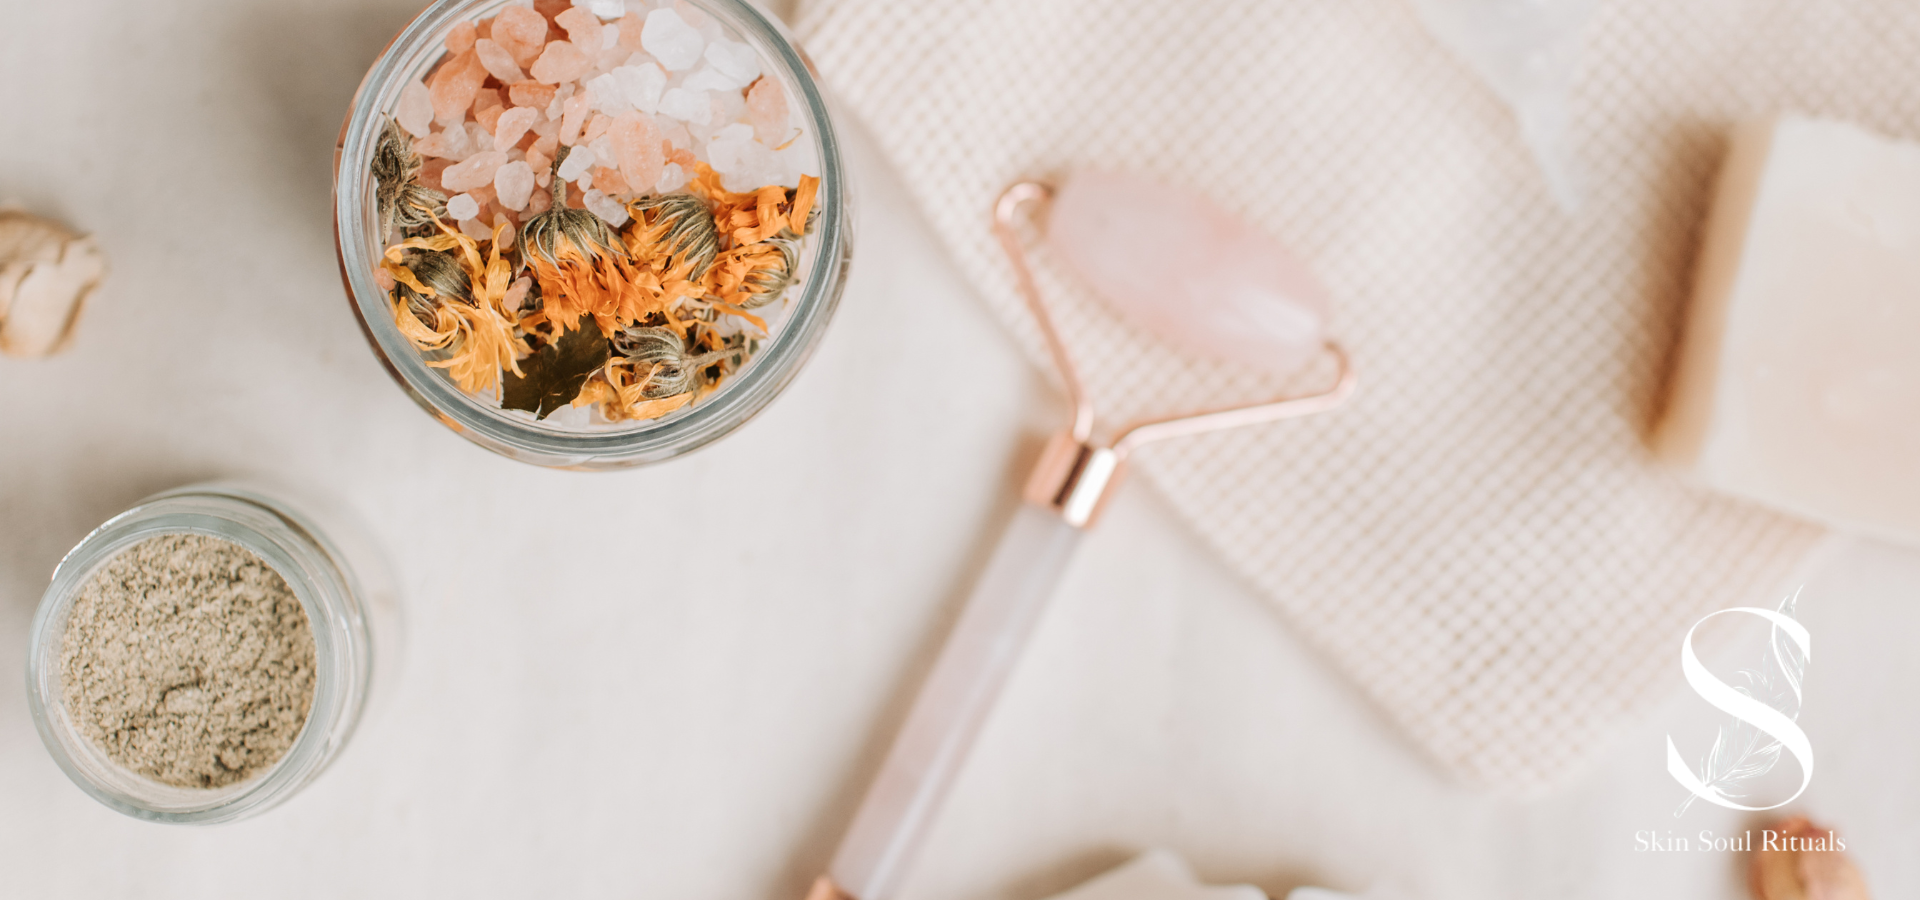
What "Detox Your Routine" Actually Means
Let's be clear: your skin doesn't "detox" in the way juice cleanses claim to detox your body. Your liver and kidneys handle detoxification. Your skin's job is protection and regulation.
When I say "detox your routine," I mean:
Remove products with synthetic ingredients that stress your skin:
Sulfates (harsh cleansing agents)
Synthetic fragrances (major irritants)
Silicones (can trap congestion)
Parabens and phthalates (endocrine disruptors)
Alcohol denat (extremely drying)
Artificial dyes and unnecessary fillers
Simplify to what your skin actually needs: Most people use too many products. Your skin doesn't need 12 steps. It needs cleansing, hydration, nourishment, and protection. That's it.
Swap synthetic for botanical: Plant-based ingredients work synergistically with your skin's natural processes. They nourish, support, and enhance, rather than force or override.
Support your skin's natural functions: Instead of products that do the work FOR your skin (making it lazy), use ingredients that support what your skin already knows how to do, renew, repair, protect, glow.
Think of it like this: you're not detoxing your skin, you're detoxing your routine to give your skin space to do what it does best naturally.
The Core Principles of a Spring Skin Reset
Before I give you the specific routine, understand these principles. They're more important than any product.
1. Less Is More
Your skin doesn't need layering upon layering of products. In fact, over-layering can:
Clog pores and cause congestion
Confuse your skin's natural oil production
Prevent products from actually absorbing
Waste money on products that aren't even reaching your skin
Spring reset principle: Strip down to essentials. If a product isn't actively serving a purpose, remove it.
2. Botanical Over Synthetic
Synthetic ingredients are created in labs to be stable, consistent, and shelf-stable. That's great for manufacturers, not always great for skin.
Botanical ingredients are alive. They contain hundreds of compounds that work together synergistically, antioxidants, vitamins, minerals, fatty acids, and phytonutrients that your skin recognizes and knows how to use.
Spring reset principle: Choose products with ingredient lists you can actually read and understand. If it sounds like a chemistry experiment, it probably is.
3. Support the Skin Barrier
Almost every skin issue, dryness, oiliness, sensitivity, acne, aging is made worse by a compromised skin barrier.
Your barrier is your skin's protective layer. When it's healthy, your skin can regulate moisture, defend against irritants, and function optimally. When it's damaged, everything goes wrong.
Spring reset principle: Every product you use should either support or at minimum not harm your barrier. Harsh cleansers, astringent toners, alcohol-based products, these damage your barrier. Gentle oils, hydrating mists, nourishing botanical ingredients, these support it.
4. Quality Over Quantity
One high-quality botanical serum will outperform five mediocre synthetic products.
Spring reset principle: Invest in fewer, better products. You'll save money in the long run and get better results.
5. Consistency Over Perfection
A simple routine you do every day beats an elaborate routine you do sporadically.
Spring reset principle: Choose a routine you'll actually stick with. Simple, effective, sustainable.

Skin Reset Collection | Skin Soul Rituals
The Spring Skin Reset Routine: A Botanical System
Here's the routine I recommend for spring renewal. It's simple, botanical, and designed to work as a complete system where each product enhances the next.
This is the exact approach I use in my own routine and recommend to clients transitioning into spring.
Step 1: Cleanse Away Winter with Oil (Melt)
Why oil cleansing for spring:
After months of heavy makeup, SPF, environmental pollutants, and dead skin buildup, your skin needs a deep but gentle reset. Oil cleansing is the most effective way to truly clean your skin without stripping it.
How it works: Oil dissolves oil. The oil cleanser binds to sebum, makeup, SPF, and impurities on your skin, then emulsifies with water and rinses away completely, taking all the buildup with it.
Unlike foaming cleansers that use harsh sulfates to strip everything (including your skin's natural protective oils), oil cleansing respects your skin barrier while still giving you a truly clean canvas.
The botanical difference:
Melt is formulated with nourishing plant oils, jojoba, meadowfoam, sunflower that cleanse deeply while simultaneously feeding your skin vitamins, antioxidants, and essential fatty acids. It's not just removing; it's replenishing.
How to use it:
Apply to dry skin with dry hands (yes, dry, this is key)
Massage gently for 1-2 minutes, focusing on congested areas
Add warm water to emulsify (it'll turn milky)
Rinse thoroughly
Use morning and/or evening
What you'll notice:
Skin feels clean but not tight or stripped
Makeup and SPF dissolve effortlessly
Blackheads and congestion gradually clear
Skin looks brighter almost immediately
This is your foundation, the reset starts here.
Step 2: Hydrate and Prep with Botanical Mist (Dew)
Why misting for spring:
Your skin lost a lot of moisture over winter. Before you can nourish it with oils or serums, you need to hydrate the deeper layers. That's where a botanical mist comes in.
How it works: Misting delivers water-based hydration directly into your skin. It plumps cells, preps your skin to absorb the next products more effectively, and creates a dewy, fresh base.
Most toners are alcohol-based and astringent (drying, pore-tightening). Dew is the opposite, it's pure hydration and botanical nourishment with zero harsh ingredients.
The botanical difference:
Dew contains rose hydrosol, aloe vera, and glycerin, all deeply hydrating and soothing. Rose is also gently toning (refines without stripping), aloe calms any irritation from winter damage, and glycerin is deeply hydrating.
How to use it:
After cleansing, mist generously over your face and neck
Let it sit for 30 seconds to absorb
While skin is still damp, apply your serum or oil (this locks in the hydration)
You can also mist throughout the day for a refresh
What you'll notice:
Instant plumpness and dewiness
Skin drinks it in (you'll see it absorb)
Makeup applies more smoothly
Fine lines from dehydration soften immediately
Think of Dew as giving your skin a drink of fresh water after months of drought.
Step 3: Renew with Gentle Retinol Alternative (Renew)
Why bakuchiol for spring:
Spring is renewal season and your skin is ready to renew too. You want to stimulate collagen, fade winter dullness and any hyperpigmentation from lack of sun, smooth texture, and support cell turnover.
Retinol does all of this but it's harsh, causes peeling and sensitivity, and makes you sun-sensitive (not ideal heading into brighter months). Bakuchiol delivers the same benefits without any of the harshness.
How it works: Bakuchiol is a plant-derived compound that stimulates collagen production, increases cell turnover, and improves skin texture and tone—just like retinol—but through gentler pathways. No irritation, no sun sensitivity, safe for sensitive skin.
The botanical difference:
Renew combines bakuchiol with nourishing botanical oils (rosehip for vitamin C and cell regeneration, jojoba for barrier support, sea buckthorn for antioxidants). It's anti-aging and nourishing in one step.
How to use it:
After misting with Dew (on damp skin for better absorption)
Apply 2-4 drops to face and neck
Gently press and massage in
Use morning and/or evening (unlike retinol, you can use it any time)
What you'll notice:
Smoother, more refined texture within 2-4 weeks
Brighter, more even tone
Softened fine lines
Firmer, more lifted skin over time
No peeling, no irritation
This is your active renewal step, the product doing the most transformation work.
Step 4: Reveal Fresh Skin with Gentle Exfoliation (Bloom)
Why a powder mask for spring:
You have months of dead skin buildup. Your skin's natural exfoliation slowed over winter, and heavy products have been sitting on top creating a barrier. You need to gently remove this layer to reveal the fresh, glowing skin underneath.
But harsh scrubs and chemical peels damage your barrier, exactly what you're trying to repair. Bloom offers gentle physical exfoliation that refines without destroying.
How it works: The powder mask contains:
French Pink Clay - draws impurities, gently exfoliates, refines pores
White Kaolin Clay - absorbs excess oil without stripping
Hibiscus Powder - natural fruit acids (AHAs) for gentle chemical exfoliation and brightening
Rose Petal Powder - toning, astringent, refines texture
Calendula Powder - calms inflammation, soothes sensitivity
Marshmallow Root Powder - creates slip, locks in moisture
Tremella Mushroom - holds moisture like hyaluronic acid, plumps skin
When you mix the powder with water (or Dew for extra hydration, or Melt for a cleansing treatment), it activates into a creamy paste. As it dries, it gently lifts dead skin. When you massage and rinse, you're physically buffing away dullness.
The botanical difference:
Every ingredient is plant-derived and serves multiple purposes; exfoliating, hydrating, soothing, brightening. No microbeads, no harsh acids, no synthetic fragrances. Just pure, effective botanicals.
How to use it:
Mix 1 tsp powder with water, Dew, or Melt to form a paste
Apply to clean, damp skin
Leave for 5-10 minutes
Gently massage in circular motions, adding water as needed
Rinse thoroughly
Use 1-2x weekly (more in early spring as you're resetting, then reduce to weekly maintenance)
What you'll notice:
Immediately softer, smoother skin
Visible glow and brightness
Refined pores and texture
Makeup applies like silk
Your other products absorb better
This is your deep reset step; the one that physically removes winter and reveals spring.
How the System Works Together
These four products aren't random. They're designed to work as a complete system where each step enhances the next:
Melt cleanses without stripping → creates a clean, receptive canvas
Dew hydrates and preps → allows Renew to penetrate deeply
Renew stimulates renewal from within → transforms skin over time
Bloom reveals fresh skin → removes the old to make room for the new
The synergy: Clean skin absorbs better. Hydrated skin responds better to actives. Renewed skin glows brighter when dead layers are removed. Everything works together.
This is what I mean by a system; not just products you use separately, but a ritual where each step builds on the last.
Beyond Products: Lifestyle Elements of a Spring Reset
Skincare products are important, but they're only part of the equation. True skin health is holistic. Here are the lifestyle shifts that support your spring reset:
1. Hydrate from within Drink more water. Your skin is an organ, and like all organs, it needs hydration to function. Aim for half your body weight in ounces daily.
2. Open the windows Fresh air and natural light do wonders for your skin and your circulating system. Let your home breathe.
3. Eat spring foods Fresh greens, berries, light proteins. Your skin reflects what you eat. Heavy winter foods served their purpose—now lighten up.
4. Move your body Exercise increases circulation, which brings oxygen and nutrients to your skin while flushing toxins through lymphatic drainage. Even a daily walk makes a difference.
5. Manage stress Stress destroys your skin. It triggers inflammation, breakouts, premature aging, and barrier damage. Spring is a good time to reassess your stress management practices, meditation, breathwork, time in nature, whatever works for you.
6. Sleep well Your skin repairs itself overnight. Poor sleep = poor skin recovery = dull, aged skin. Prioritize 7-9 hours.
7. Simplify your life, not just your skincare The philosophy of "less is more" applies beyond your bathroom shelf. What else in your life needs a spring cleaning? Clutter, toxic relationships, overcommitment? Simplify holistically.
Taking care of your skin is part of taking care of you, your whole self, not just your face.

Skin Reset Collection | Skin Soul Rituals
What to Expect: Your Spring Reset Timeline
Week 1:
Skin feels cleaner, fresher
Immediate hydration and dewiness
Slight adjustment period (your skin is getting used to new products)
You might purge a bit as congestion clears, this is normal
Weeks 2-3:
Texture starts smoothing
Dullness fades noticeably
Skin barrier feels stronger
Products absorb better
Morning puffiness reduces
Week 4-6:
Visible transformation, brighter, more even tone
Refined pores and texture
Fine lines soften
Skin looks healthier, more alive
People comment that you look well-rested
Long-term (2-3 months):
Sustained glow and clarity
Stronger, more resilient skin
Less reactivity to stressors
Your skin functions optimally on its own
You've built a sustainable routine you actually enjoy
The key is consistency. Commit to the reset for at least 6 weeks before deciding if it's working.
Common Mistakes to Avoid During Your Reset
1. Changing everything at once too fast Introduce new products one at a time over 1-2 weeks so you can identify any reactions.
2. Expecting overnight miracles Botanical skincare works with your skin's natural rhythms. It's effective but gradual. Give it time.
3. Adding "just one more" product The whole point is simplification. Don't sabotage yourself by sneaking in extra serums and treatments.
4. Not patch-testing Even natural ingredients can cause reactions. Patch test new products on your inner arm for 24 hours first.
5. Forgetting SPF Spring sun is deceptively strong. Protect your skin daily, especially if you're using any exfoliating products.
6. Going back to old habits Once you reset, maintain it. Don't go back to harsh cleansers and synthetic products just because they're familiar.
Final Thoughts: Spring as a Fresh Start
Spring reminds us that renewal is possible. That we're not stuck. That we can shed what's no longer serving us and start fresh.
Your skin is no different. It's been through a long winter, harsh weather, heavy products, stale air, stress. It's ready for something lighter, cleaner, more alive.
A spring reset isn't about buying everything new or following the latest trends. It's about simplifying, returning to what's real and botanical, and giving your skin exactly what it needs to do what it already knows how to do: renew itself.
You don't need 12 steps. You don't need synthetic miracles in a bottle. You need clean, gentle, effective botanical ingredients working together as a system.
Cleanse. Hydrate. Repair. Transform.
That's the reset.
Welcome spring with skin that glows from the inside out because you gave it the space, the nourishment, and the respect it deserves.
Ready for Your Spring Reset?
The Skin Reset Collection includes everything you need for a complete botanical spring renewal:
Melt - Gentle oil cleanser
Dew - Hydrating botanical mist
Renew - Bakuchiol renewal serum
Bloom - Gentle exfoliating powder mask
Complete system: $175 (save $17 vs. buying individually)
Each product is formulated with pure botanical ingredients, free from synthetic fragrances, sulfates, parabens, and unnecessary fillers. Just clean, effective skincare that works with your skin, not against it.
Shop the Skin Reset Collection
If your looking for more botanical skincare advice and tips. Checkout our Skin + Soul Education Hub
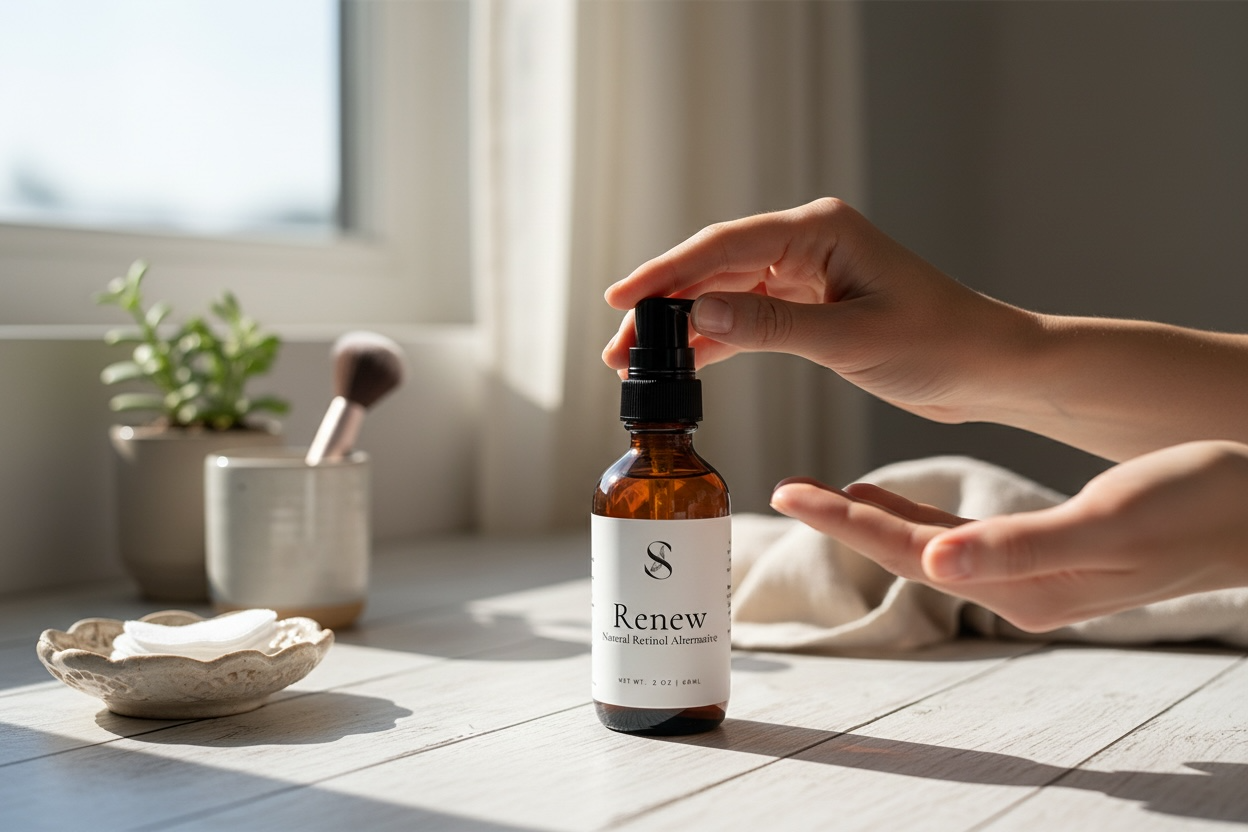
Bakuchiol vs Retinol: The Gentle, Natural Alternative for Anti-Aging Skin
If you've been told retinol is the gold standard for anti-aging but your skin can't tolerate the redness, peeling, and sensitivity it causes, there's a gentler path forward. Bakuchiol is a plant-derived ingredient that delivers many of retinol's benefits, smoother texture, reduced fine lines, improved firmness without the harsh side effects. As a holistic aesthetician who's spent 13 years working with sensitive, mature skin, I'm sharing everything you need to know about bakuchiol vs retinol so you can choose the right ingredient for your skin.
By Amber Boone, Holistic Aesthetician & Founder of Skin Soul Rituals
If you've spent any time researching anti-aging skincare, you've been told that retinol is the gold standard. The one ingredient dermatologists universally recommend. The proven wrinkle-fighter backed by decades of research.
And it's true, retinol works. But here's what they don't always tell you: for many people, especially those with sensitive skin, rosacea, or mature skin that's become more delicate, retinol can be incredibly harsh. The redness, the peeling, the increased sun sensitivity, the irritation that takes weeks to subside, it's a high price to pay for smoother skin.
As a licensed holistic aesthetician with 13 years of experience working with clients in their 40s, 50s, and beyond, I've watched countless women try retinol, struggle with the side effects, and eventually give up, convinced that effective anti-aging skincare just isn't for them.
But there's another option that's been quietly gaining attention in the holistic skincare world: bakuchiol. A plant-derived ingredient that delivers many of retinol's benefits without the irritation, sun sensitivity, or harsh adjustment period.
Let me break down everything you need to know about bakuchiol vs retinol so you can make an informed choice for your skin.
What Is Retinol and Why Is It So Popular?
Retinol is a derivative of vitamin A that's been used in skincare since the 1970s. It works by increasing cell turnover, stimulating collagen production, and speeding up the skin's natural renewal process.
What retinol does well:
Reduces the appearance of fine lines and wrinkles
Improves skin texture and smoothness
Fades hyperpigmentation and age spots
Unclogs pores and can help with acne
Increases collagen production for firmer skin
Backed by extensive clinical research
The science is solid. Retinol genuinely works for anti-aging. But effectiveness isn't the whole story.
The downsides of retinol:
Severe irritation during "retinization": When you first start using retinol, your skin often goes through an adjustment period that can last weeks or even months. Expect redness, peeling, flaking, dryness, and increased sensitivity.
Sun sensitivity: Retinol makes your skin more vulnerable to sun damage, requiring diligent daily SPF use and sun avoidance.
Not safe during pregnancy or breastfeeding: Vitamin A derivatives can cause birth defects, so retinol is off-limits for pregnant and nursing mothers.
Can worsen certain skin conditions: If you have rosacea, eczema, or very sensitive skin, retinol can trigger severe flares.
Requires careful layering: Using retinol with certain other active ingredients (like AHAs, BHAs, or vitamin C) can cause excessive irritation.
Inconsistent results: Some people's skin never adjusts, no matter how slowly they introduce it.
I've worked with so many clients who desperately wanted retinol to work for them but couldn't tolerate the side effects. Their skin would be red and angry for weeks, and they'd eventually stop using it, defeated and frustrated.
This is where bakuchiol enters the picture.
What Is Bakuchiol?
Bakuchiol (pronounced "bak-oo-chee-ol") is a plant-based compound extracted from the seeds and leaves of the Psoralea corylifolia plant, also known as babchi. This plant has been used in traditional Ayurvedic and Chinese medicine for centuries to treat various skin conditions.
But bakuchiol only started gaining attention in Western skincare around 2018-2019 when clinical studies began showing it could deliver retinol-like benefits without retinol-like irritation.
Here's what makes bakuchiol different from retinol:
Plant-derived: It comes from a botanical source, not synthesized vitamin A.
Gentle on skin: Clinical studies show minimal to no irritation, even for sensitive skin types.
No sun sensitivity: Unlike retinol, bakuchiol doesn't increase your skin's vulnerability to UV damage (though you should still wear SPF!).
Safe during pregnancy: While you should always check with your healthcare provider, bakuchiol is generally considered safe for pregnant and breastfeeding women since it's not a vitamin A derivative.
Works differently at the molecular level: Bakuchiol and retinol don't have the same chemical structure, but they produce similar results through different mechanisms.
Can be used morning or night: Retinol should only be used at night due to sun sensitivity; bakuchiol can be used any time.
Plays well with other actives: You can layer bakuchiol with vitamin C, AHAs, niacinamide, and other ingredients without the same risk of irritation.
Think of bakuchiol as the gentle, plant-based cousin of retinol one that delivers similar benefits through a kinder path.

Bakuchiol vs Retinol: The Science
Let's look at what clinical research actually shows about how these two ingredients compare.
The landmark 2018 study published in the British Journal of Dermatology directly compared bakuchiol and retinol in a 12-week trial. The results were remarkable:
Both groups (bakuchiol and retinol users) showed significant improvements in fine lines, wrinkles, pigmentation, elasticity, and firmness
The improvements were statistically equivalent between the two groups
The retinol group experienced significantly more scaling and stinging
The bakuchiol group reported far less irritation
How they work differently:
Retinol binds to specific receptors in your skin cells (retinoic acid receptors) and directly signals them to speed up cell turnover and increase collagen production. This aggressive signaling is effective but harsh.
Bakuchiol works through different pathways. It's an antioxidant that stimulates collagen production, regulates cell turnover, and reduces inflammation without binding to those same receptors. The gentler mechanism produces similar results with less trauma to the skin.
What bakuchiol does for your skin:
Stimulates collagen types I and III production (the same types retinol stimulates)
Reduces the appearance of fine lines and wrinkles
Improves skin firmness and elasticity
Fades hyperpigmentation and evens skin tone
Provides antioxidant protection against environmental damage
Reduces inflammation
Helps control excess oil production
The research is still emerging, but the studies we have are promising.
Who Should Use Bakuchiol Instead of Retinol?
Bakuchiol isn't just for people who "can't handle" retinol. It's a legitimate choice for anyone seeking gentler, more holistic anti-aging skincare. But it's especially well-suited for certain situations.
Choose bakuchiol if you:
Have sensitive, reactive, or rosacea-prone skin: If your skin flushes easily, reacts to many products, or you have diagnosed rosacea, bakuchiol is far less likely to trigger a flare.
Are pregnant or breastfeeding: Bakuchiol offers a way to address anti-aging concerns during a time when retinol is off-limits.
Experience hormonal skin changes: Perimenopause and menopause often bring increased skin sensitivity. Bakuchiol respects that sensitivity while still addressing aging concerns.
Can't tolerate retinol's adjustment period: Some people simply don't have the patience or tolerance for weeks of peeling and redness. That's completely valid.
Want to use actives during the day: If you prefer doing your treatment skincare in the morning, bakuchiol doesn't come with sun sensitivity concerns.
Prefer plant-based, natural skincare: If you're drawn to botanical ingredients and holistic beauty, bakuchiol aligns with that philosophy.
Have dry or dehydrated skin: Retinol can be extremely drying. Bakuchiol is much gentler on already-dry skin.
Are new to anti-aging actives: Starting with bakuchiol can be a gentler introduction before potentially trying retinol later (or not—bakuchiol may be all you need).
Who Should Stick with Retinol?
I want to be fair here. Retinol isn't the enemy, and for some people, it's still the better choice.
Retinol might be better if you:
Have very resilient, non-sensitive skin: If your skin tolerates everything and you don't experience irritation from retinol, it has decades of research backing it.
Have severe acne: While bakuchiol can help with breakouts, prescription-strength retinoids (like tretinoin) are more proven for severe acne.
Need prescription-strength treatment: Bakuchiol is available in over-the-counter products. If you need tretinoin or other prescription retinoids for medical reasons, bakuchiol won't replace that.
The truth is, both ingredients are effective. The question is which one aligns better with your skin's needs, your lifestyle, and your values.
Can You Use Bakuchiol and Retinol Together?
Interestingly, yes, though it's not necessary for most people.
Some skincare enthusiasts and formulators suggest that using bakuchiol and retinol together can enhance results while buffering retinol's irritation. The theory is that bakuchiol's anti-inflammatory properties help counteract retinol's harshness.
If you want to try this approach:
Use retinol at night (start slowly—once or twice a week)
Use bakuchiol in the morning or on retinol "off" nights
Monitor your skin closely for any irritation
This is more advanced and not necessary for beginners
My take: For most people seeking gentler anti-aging skincare, choosing one or the other makes more sense than combining them. If you're interested in bakuchiol specifically because you want to avoid retinol's harshness, just use bakuchiol on its own.
How to Use Bakuchiol in Your Routine
One of bakuchiol's biggest advantages is its simplicity. Unlike retinol's complicated introduction protocol, bakuchiol is straightforward.
Basic bakuchiol routine:
Step 1: Cleanse your face thoroughly
Step 2: Apply any hydrating mists or water-based serums (like hyaluronic acid if you use it)
Step 3: Apply your bakuchiol serum or oil
Use 2-4 drops for your entire face
Gently press and massage into skin
Focus on areas of concern (fine lines, uneven tone)
Step 4: Follow with a facial oil or moisturizer to seal everything in
Step 5: In the morning, always finish with SPF (even though bakuchiol doesn't cause sun sensitivity, UV protection is still crucial for anti-aging)
How often to use it: Unlike retinol, which you typically start using once or twice a week and slowly increase, you can use bakuchiol daily from day one. Most people use it once daily (morning or night), though some use it twice daily.
When to expect results: Clinical studies show visible improvements around 4-12 weeks of consistent use. This is similar to retinol's timeline. Be patient and consistent.
Can you layer it with other actives? Yes! Bakuchiol plays well with:
Vitamin C (great combo for brightening)
Niacinamide
Hyaluronic acid
AHAs and BHAs (though always patch test when combining actives)
Peptides
This flexibility is one of bakuchiol's major advantages over retinol.
What to Look for in a Bakuchiol Product
Not all bakuchiol products are created equal. Here's what to consider:
Concentration: Most effective bakuchiol serums contain 0.5% to 1% bakuchiol. Higher isn't always better—1% is considered the sweet spot for efficacy without waste.
Supporting ingredients: Bakuchiol works even better when formulated with complementary ingredients like:
Nourishing plant oils (jojoba, rosehip, squalane) that deliver the bakuchiol and support skin barrier function
Antioxidants (vitamin E, green tea extract) that enhance anti-aging benefits
Hydrating ingredients (hyaluronic acid, glycerin) that plump and smooth
Quality of the bakuchiol: Look for products that specify they use pure, high-quality bakuchiol extract (not just "babchi oil" which contains other compounds).
Texture and base: Bakuchiol can be formulated in different bases:
Oil-based serums and elixirs (luxurious, nourishing, great for dry/mature skin)
Water-based serums (lightweight, absorbs quickly)
Creams and moisturizers (convenient all-in-one option)
Choose based on your skin type and preference.
Packaging: Look for opaque or dark glass bottles that protect the formula from light degradation.

Renew, Natural Retinol Alternative
The Holistic Perspective: Why I Chose Bakuchiol
As someone who's practiced holistic aesthetics for over a decade, I've always believed that effective skincare doesn't have to be harsh. Our skin is remarkably intelligent, it knows how to heal, renew, and protect itself when given the right support.
Retinol takes an aggressive approach: force the skin to turn over faster, whether it's ready or not. And yes, that works. But it also creates inflammation, disrupts the skin barrier, and can leave skin vulnerable.
Bakuchiol takes a different approach: work with the skin's natural processes, stimulate collagen gently, provide antioxidant protection, and support, rather than force- renewal.
This aligns with everything I believe about holistic beauty:
Gentler is often more sustainable long-term
Plant-based ingredients can be just as effective as synthetic ones
Reducing inflammation is key to healthy aging
Skincare should feel nourishing, not punishing
When I formulate products for Skin Soul Rituals, I'm always asking: "What will genuinely serve the skin without causing harm?" Bakuchiol answers that question beautifully.
My Personal Experience with Bakuchiol
I started using bakuchiol after years of on-and-off struggles with retinol. My skin would improve with retinol, but the constant dryness and sensitivity felt like I was fighting my skin rather than supporting it.
Within weeks of switching to bakuchiol, I noticed:
Smoother skin texture without any peeling or flaking
Gradual fading of sun spots on my cheeks
Improved firmness, especially around my jawline
No redness or irritation
My skin felt calm and nourished
The results were comparable to what I'd seen with retinol, but the journey to get there was completely different. My skin felt healthy and happy throughout the process, not traumatized.
This personal experience, combined with my professional observations working with clients, convinced me that bakuchiol deserves a place in holistic anti-aging skincare.
The Future of Bakuchiol in Skincare
Bakuchiol is still relatively new to mainstream Western skincare, but it's gaining momentum rapidly. More brands are formulating with it, more studies are being published, and more people are discovering it works for skin that couldn't tolerate retinol.
I expect we'll see:
More clinical research confirming and expanding on current findings
Higher-quality bakuchiol formulations as brands refine their products
Increased education about bakuchiol as a legitimate retinol alternative, not just a "natural" trend
Combination products that pair bakuchiol with complementary botanicals for enhanced results
The ingredient is here to stay and for good reason.
Final Thoughts: Choosing What's Right for Your Skin
Here's the truth: both bakuchiol and retinol can be effective for anti-aging. Neither is universally "better." The right choice depends on your skin, your values, and what you're willing to tolerate.
Choose retinol if:
Your skin tolerates it well without excessive irritation
You're not pregnant/breastfeeding
You're willing to manage the adjustment period and sun sensitivity
Choose bakuchiol if:
You have sensitive, reactive, or mature skin
You want gentle, plant-based anti-aging support
You're pregnant, breastfeeding, or prefer to avoid vitamin A derivatives
You want to use actives without sun sensitivity concerns
You value holistic, inflammation-reducing skincare
For me, bakuchiol has been a revelation proof that you don't have to choose between gentle and effective. You can have both.
Your skin deserves to be treated with care, even as you ask it to look more youthful. Bakuchiol offers that possibility.
Shop Our Favorite Retinol Alternative here. If your looking for more skincare tips and advice checkout my Skin + Soul Education Hub

How to Choose Your First Gua Sha Tool: A Holistic Aesthetician's Buying Guide
Walking into the world of gua sha tools can feel overwhelming. Rose quartz or jade? Smooth edge or ridged? Large or small? As a holistic aesthetician who's used dozens of different gua sha tools over 13 years, both professionally and personally, I'm going to cut through the marketing hype and help you choose your first gua sha tool with confidence. Here's what actually matters and what's just noise.
by Amber Boone, Licensed Aesthetician and Founder of Skin Soul Rituals
You've decided to try gua sha. Maybe you've read about the benefits, seen the before-and-after photos, or heard friends raving about their morning gua sha ritual. You're ready to start.
Then you search "gua sha tool" online and you're hit with hundreds of options. Rose quartz. Jade. Bian stone. Amethyst. Heart-shaped. Wing-shaped. Curved edge. Ridged edge. $8 on Amazon. $68 from a luxury brand.
How on earth are you supposed to choose?
As a licensed holistic aesthetician with over 13 years of hands-on experience using gua sha tools, from cheap knockoffs to high-end luxury stones, from traditional shapes to modern designs, I'm going to help you cut through the marketing noise and choose your first gua sha tool with confidence.
Here's the truth: The "best" gua sha tool is the one you'll actually use consistently. But certain features genuinely matter for effectiveness, safety, and comfort. Let me show you what to look for.
Important Disclaimer: I'm a licensed aesthetician, not a medical professional. I cannot diagnose conditions or prescribe treatments. This guide is based on my professional experience and industry knowledge to help you make an informed purchasing decision.
What Actually Matters in a Gua Sha Tool (And What Doesn't)
Let's start by separating fact from marketing hype.
What DOES Matter:
1. Smooth, polished edges (safety) Your gua sha tool must have perfectly smooth edges with no rough spots or chips. You're gliding this across delicate facial skin so any roughness can scratch, irritate, or damage your skin.
2. Proper shape and curves (functionality) The tool should have multiple edges and curves that fit the natural contours of your face, your jawline, cheekbones, under-eyes and forehead. A well-designed shape makes the technique easier and more effective.
3. Comfortable size and weight (usability) Too large and it's unwieldy. Too small and you can't get good leverage. Too heavy and your hand gets tired. Too light and you can't apply adequate pressure. The tool should feel natural and comfortable in your hand.
4. Quality construction (durability and safety) A quality tool is cut from solid stone (not composite or resin), polished thoroughly, and finished properly. Poor-quality tools can have internal cracks, uneven surfaces, or break easily.
5. The right thickness (effectiveness) Tools that are too thin feel flimsy and don't have enough weight to glide smoothly. Tools that are too thick are clunky and hard to maneuver. There's a sweet spot (usually 5-8mm thick depending on the design).
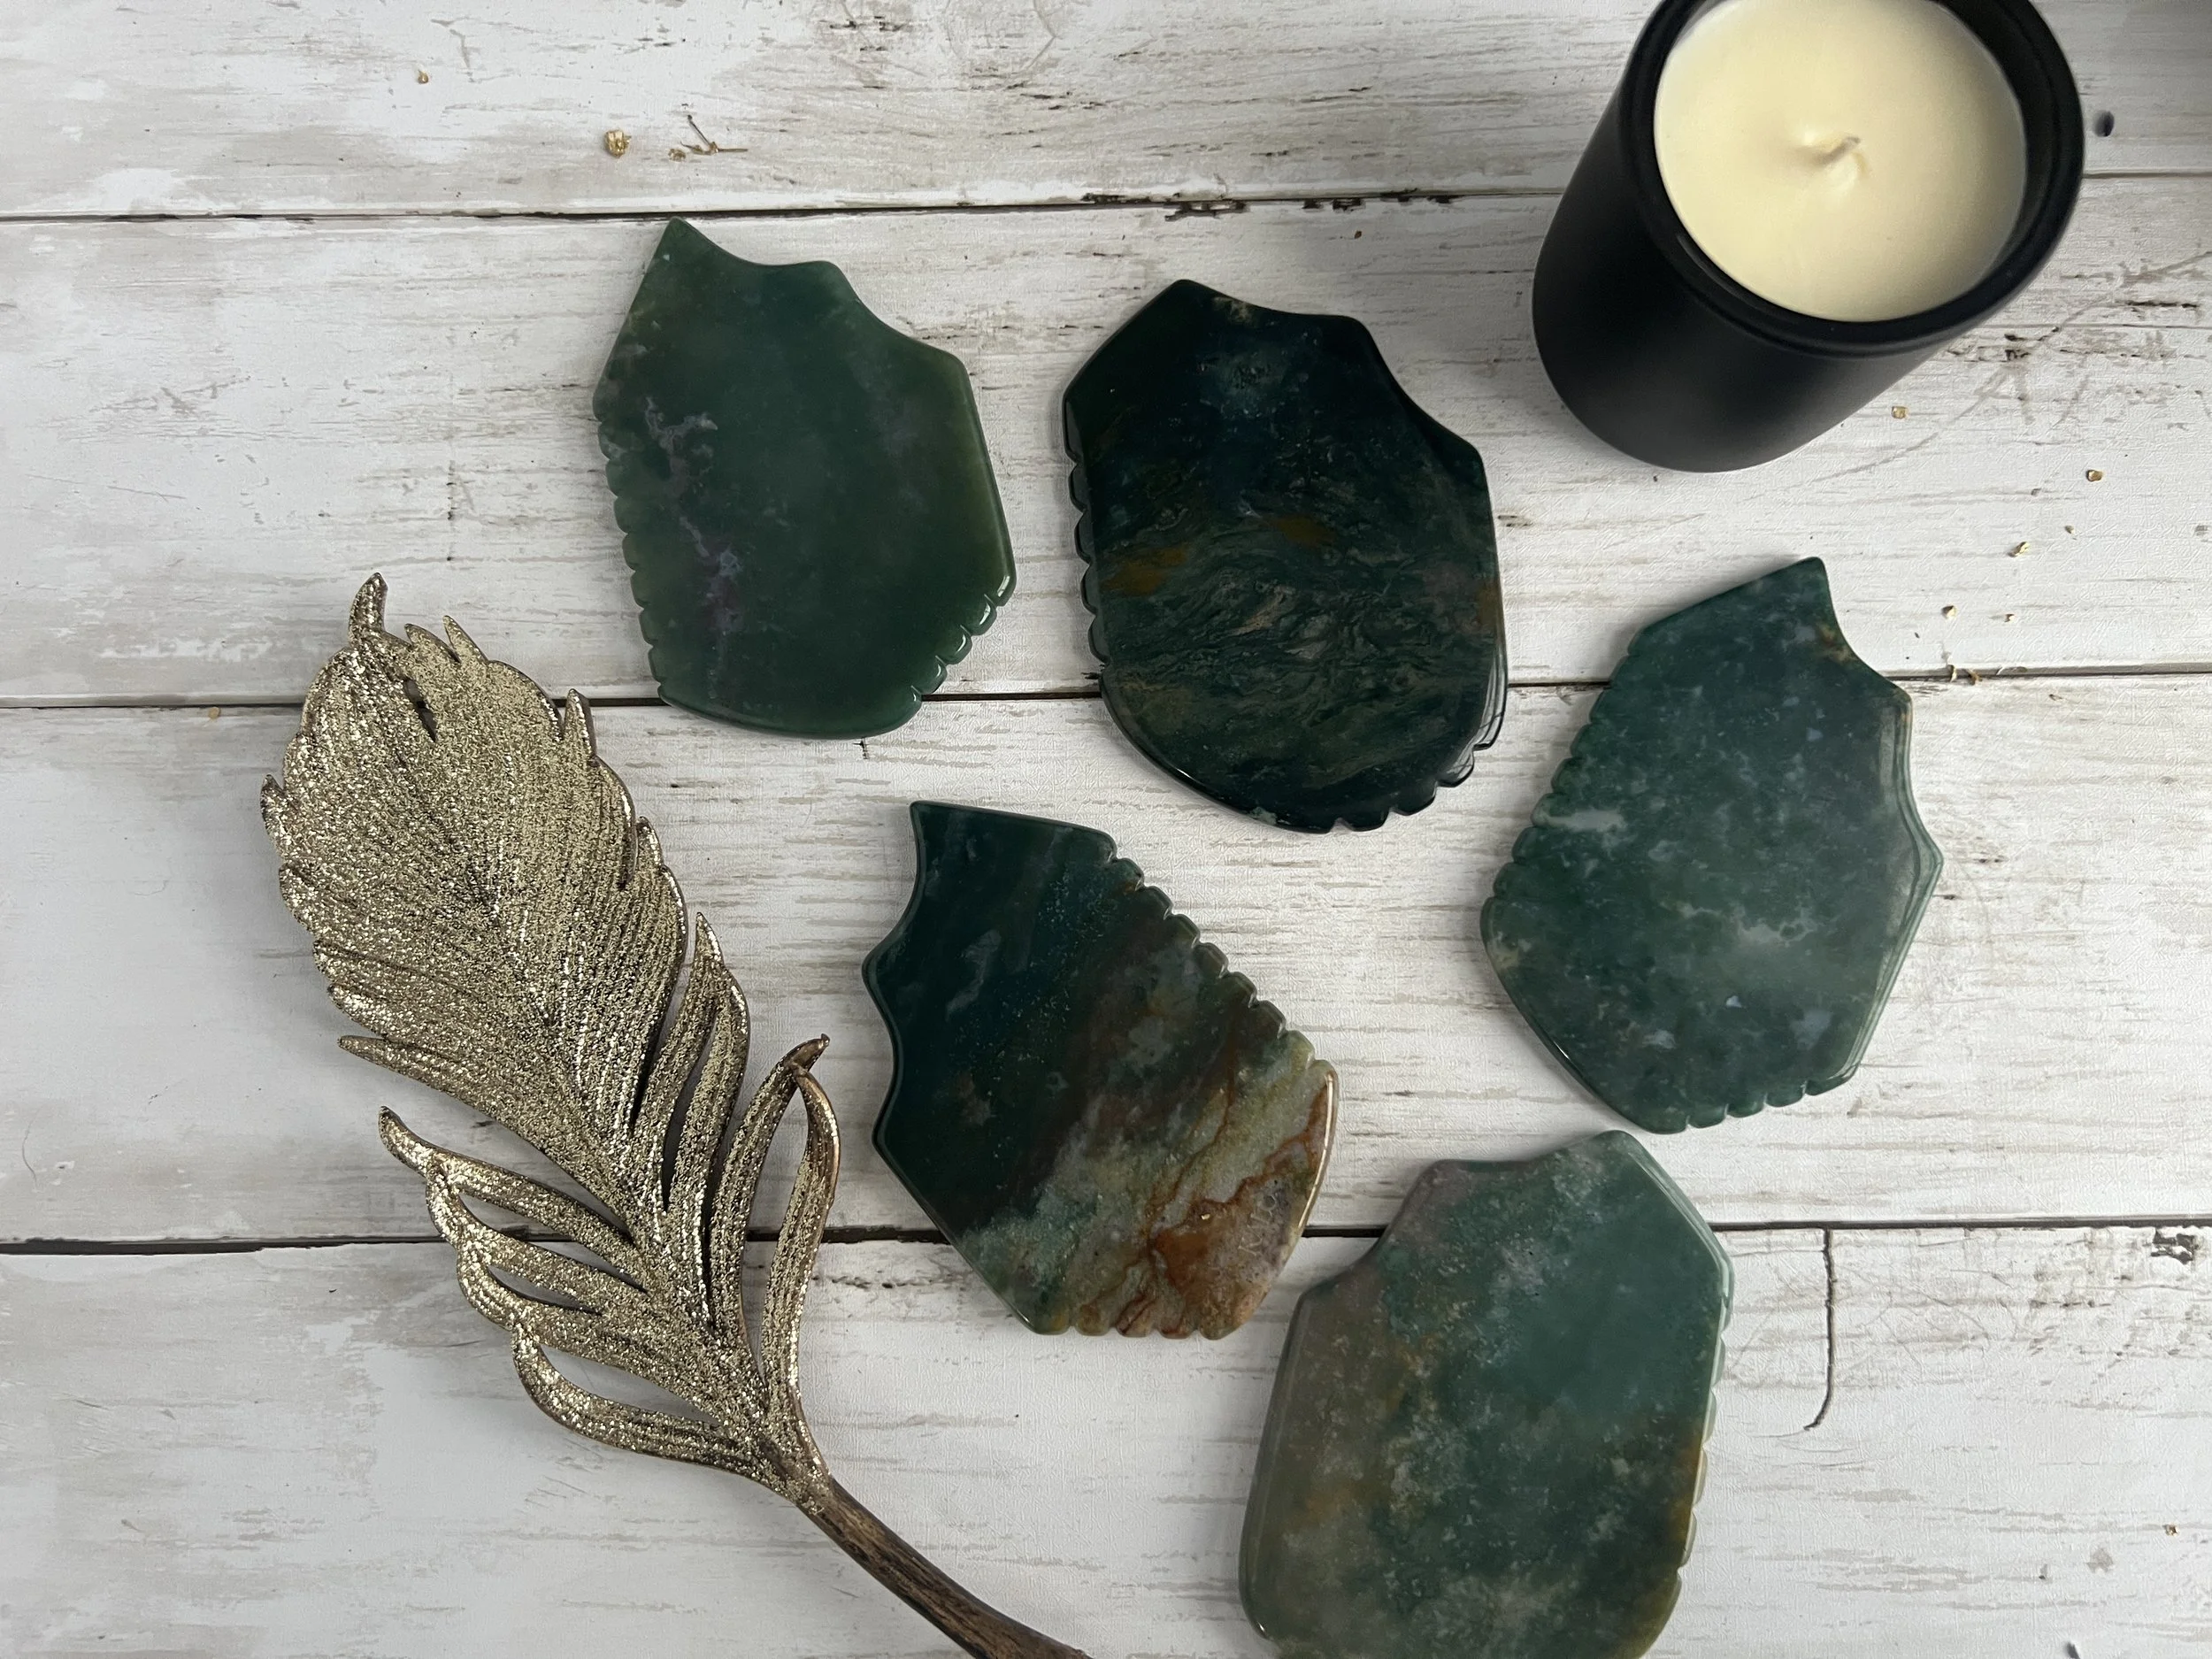
Understanding Gua Sha Stone Materials
Since this is the most commonly asked question, let me break down the different stone options.
The Most Common Materials:
Jade (Nephrite or Jadeite):
Pros: Naturally cool to the touch, durable, smooth when well-polished, traditional choice
Cons: Quality varies wildly (cheap "jade" is often dyed or fake), can be heavy
Best for: People who want a classic, cooling stone and don't mind a bit of weight
My take: Genuine jade is excellent if you buy from a reputable source. Be wary of suspiciously cheap jade, it's often fake.
Rose Quartz:
Pros: Beautiful pink color, smooth texture, moderate weight, popular
Cons: Can be more fragile than jade, often marketed with unproven "love energy" claims
Best for: People who want a lighter tool with a gorgeous aesthetic
My take: Works perfectly well. The "self-love" and "heart chakra" marketing is overhyped, but the stone itself is functional and pretty.
White Jade:
Pros: Clean aesthetic, smooth, cooling, durable
Cons: Can be harder to source in high quality
Best for: People who want jade benefits without the green color
My take: Excellent choice if you find a quality version. Very similar performance to green jade.
Bian Stone (Black Stone):
Pros: Naturally warm rather than cool, unique texture, traditional in Chinese medicine
Cons: Harder to find, can be expensive, marketing claims often exaggerated
Best for: People who prefer warmth over cooling
My take: Functional but not necessary.
Amethyst, Aventurine, Obsidian, Other Crystals:
Pros: Variety of colors and "energetic properties" for those who value crystal healing
Cons: Often more expensive, quality varies, purely aesthetic/energetic preference
Best for: People who connect with specific crystals for personal or spiritual reasons
My take: If you love a particular crystal, go for it. I have my favorites.
Stainless Steel or Metal:
Pros: Extremely durable, can be put in fridge/freezer for extra cooling, hygienic, long-lasting
Cons: Less traditional, some people don't like the feel of metal on skin
Best for: People who want maximum cooling effect and durability
My take: Underrated option. It’s not one I enjoy using.
My Honest Recommendation on Material:
Choose based on:
What feels good to you: Do you want cooling (jade, quartz, metal) or warming (bian stone)?
Quality over type: A high-quality rose quartz beats a cheap, poorly-made jade
Aesthetic preference: If a beautiful stone motivates you to use it daily, that matters
Don't choose based on:
What influencers say is "best" (it's often just sponsored content)
Price (expensive doesn't always mean better)
I personally use ocean agate, white jade stone & aventurine because I love the clean look and they stay naturally cool. But again, the best results are going to come with the stone you are consistent with. Most work if the shape and quality are right.

Understanding Gua Sha Tool Shapes
This matters MORE than most people realize. The shape determines how effectively you can work different areas of your face.
Common Shape Features to Look For:
1. Curved Long Edge (Essential):
Purpose: For sweeping along your jawline, cheekbones, and forehead
What to look for: A smooth, gently curved edge that's 2-3 inches long
Why it matters: This is the workhorse edge you'll use most often
2. Curved Notch or Heart Cutout (Very Helpful):
Purpose: Fits perfectly around your jawbone and chin for sculpting
What to look for: A curved indentation that cradles your jaw
Why it matters: Makes jawline work much easier and more effective
3. Flat or Gently Curved Surface (Important):
Purpose: For broad strokes on your cheeks, forehead, and neck
What to look for: A smooth flat side, large enough to cover area
Why it matters: Allows for efficient coverage of larger areas
4. Small Curved Edge (Helpful):
Purpose: For delicate work under eyes, around nose, on lips
What to look for: A small, gently curved edge (about 1 inch)
Why it matters: Gives you precision in small, delicate areas
5. Pointed or Tapered End (Optional but Nice):
Purpose: For acupressure points, temples, between brows
What to look for: A pointed or rounded tapered end
Why it matters: Allows targeted pressure on specific points
Shapes to Avoid:
Tools that are too flat/rectangular: Without curves, they won't fit your facial contours properly
Tiny tools: Cute but impractical. you can't get good leverage or coverage
My recommendation: Look for a traditional "wing" or "S-shape" design with multiple functional edges. This gives you versatility for all areas of your face.
Size Matters: Finding the Right Dimensions
Gua sha tools come in various sizes. Here's how to choose:
Standard Facial Tool:
Length: 3-4 inches
Width: 2-3 inches at widest point
Thickness: 5-8mm
Best for: Most people, all facial work
Why: Large enough for efficiency, small enough for precision
Larger/Body Tools:
Length: 5-6+ inches
Best for: Body gua sha, large coverage areas, people with larger hands
Skip for your first tool: Start with facial size
Mini/Travel Tools:
Length: 2-3 inches
Best for: Travel, purse carry, very small hands
Consider as second tool: Good for portability, but standard size is more versatile
My recommendation for beginners: Start with a standard-size facial tool (3-4 inches). It's versatile, comfortable to hold, and works for all facial techniques.
Quality Indicators: How to Spot a Good Tool
Not all gua sha tools are created equal. Here's how to identify quality:
Signs of High Quality:
Smooth edges: Run your finger along every edge, no rough spots
Even, consistent polish: The entire surface should be uniformly shiny and smooth
No visible cracks or chips: Inspect carefully, especially edges
Solid, one-piece construction: Not glued, not composite, not hollow
Clear product information: Reputable sellers specify stone type, origin, dimensions
Red Flags (Avoid These):
Suspiciously cheap price: A $5-8 gua sha is likely poor quality (real stone, proper finishing, and quality control cost money)
Rough or gritty texture: Will irritate and damage your skin
Excessive marketing claims: "Detoxifies," "removes wrinkles instantly," "ancient secret"—these are hype
Where to buy quality tools:
Reputable skincare brands (check reviews)
Specialty gua sha or facial tool companies
Aesthetician-created brands (like Skin Soul Rituals!)
Established wellness retailers
Where to be cautious:
Amazon (hit or miss—read reviews carefully, many fakes)
Suspiciously cheap marketplaces
My Top Recommendation for Your First Gua Sha Tool
If you're feeling overwhelmed and just want a clear recommendation, here it is:
Choose a tool with these features:
Material: Jade (white or green) whichever you prefer aesthetically
Shape: Traditional wing/S-shape with curved edges and a heart cutout
Size: Standard facial size (3-4 inches long)
Quality: Smooth, well-polished, solid construction
Price range: $30-50 (sweet spot for quality without overpaying)
This combination gives you:
Effective functionality for all facial techniques
Comfortable, easy-to-use design
Durable, long-lasting tool
Good value for money
Our Glow & Lift Kit features a carefully sourced professional gua sha stone that I selected specifically for its smooth finish, perfect weight, and versatile shape. The stone has multiple functional edges - a long curved edge for jawline and cheeks, a heart-shaped notch that cradles your jaw perfectly, a small curved edge for under-eyes, and a flat surface for broad strokes. It's the exact tool I use in my own morning routine and durable.
What About the Oil/Serum to Use With It?
Your gua sha tool is only half the equation. You need a facial oil or serum to provide slip so that you never drag a gua sha tool on dry skin.
What to look for in a gua sha oil:
Lightweight enough to glide smoothly
Nourishing enough to benefit your skin during the 5-10 minute massage
Non-comedogenic (won't clog pores)
Pleasant or neutral scent (you'll be breathing it in during your practice)
Made with quality plant oils (jojoba, rosehip, calendula, etc.)
Avoid:
Thick, heavy creams (won't provide enough slip)
Coconut oil (can clog pores for many people)
Fragranced oils with synthetic scents (can irritate)
Random carrier oils without facial-specific formulation
My Glow Serum is formulated specifically for gua sha practice, it provides perfect glide, absorbs beautifully, and nourishes skin with botanical oils. But any quality facial oil will work as long as it gives you smooth gliding without pulling.
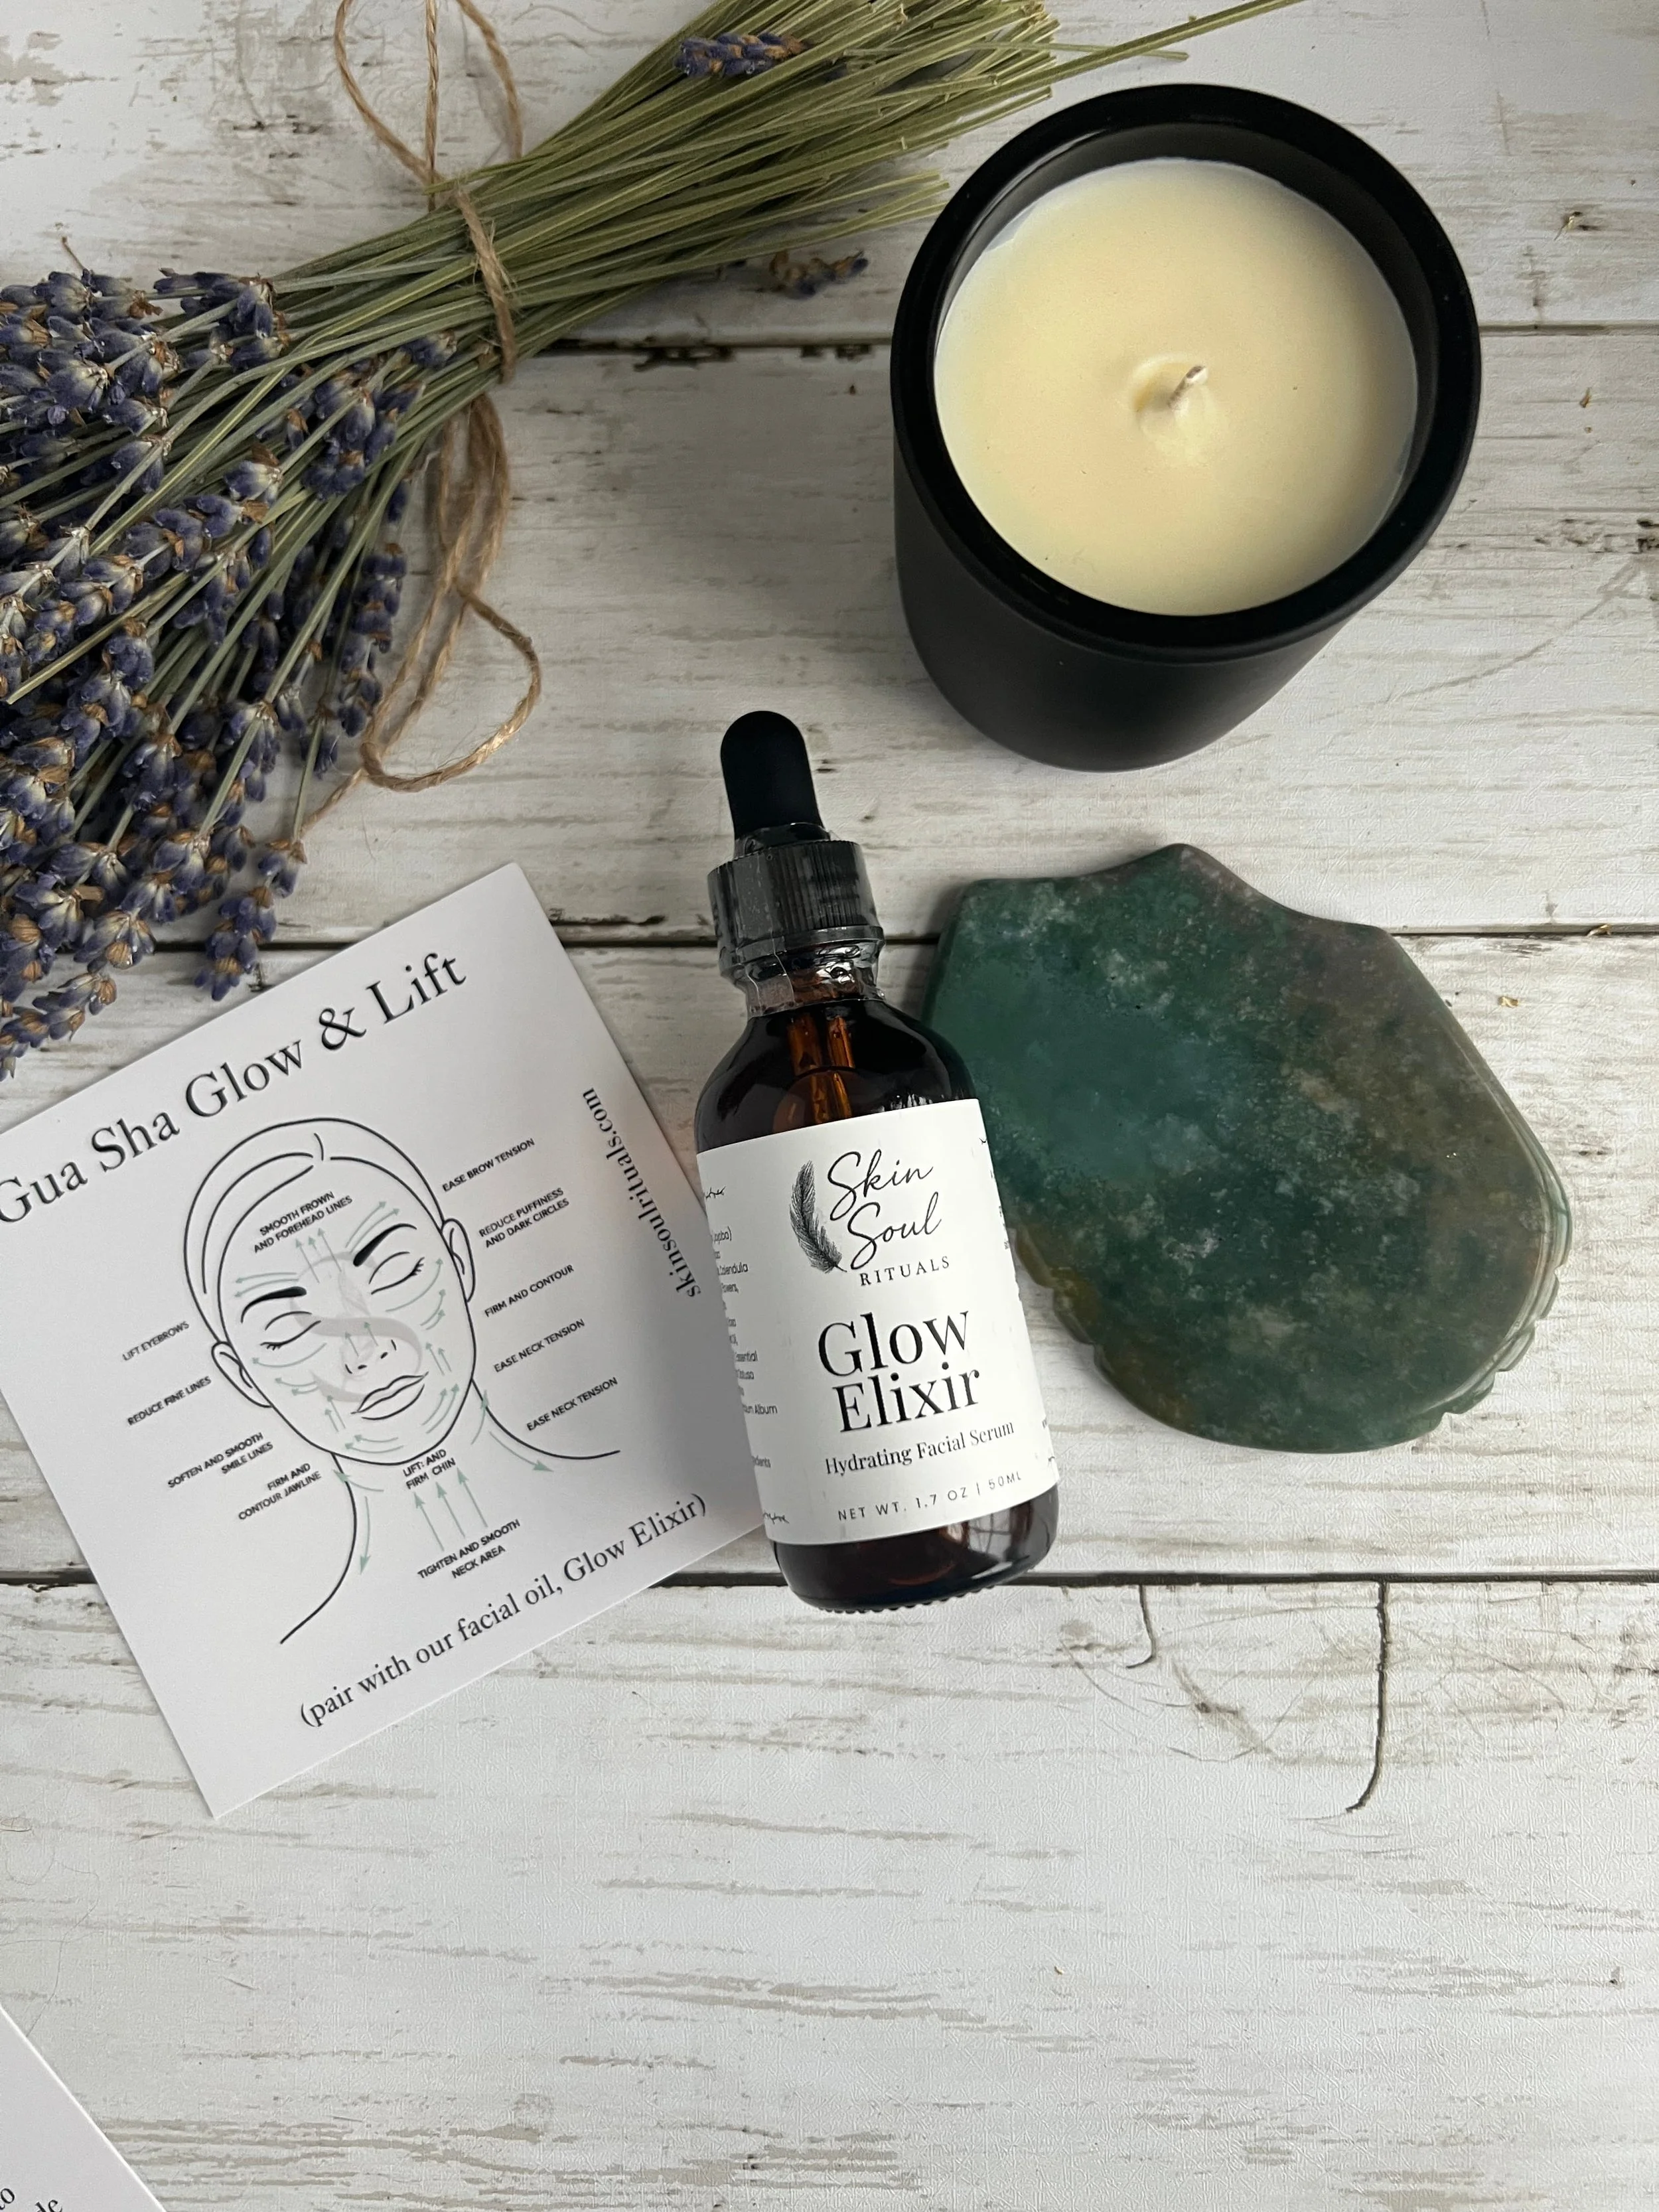
Common First-Timer Questions Answered
Q: Can I use the same tool on my body and face? A: You can, but I don't recommend it. Body gua sha uses firmer pressure and can make your facial tool rough over time. If you want to do body work, get a separate, larger tool.
Q: How do I clean my gua sha tool? A: After each use, wash with gentle soap and warm water, dry thoroughly. Store in a clean, dry place.
Q: How long does a gua sha tool last? A: A quality stone tool can last years (even decades) if properly cared for. Avoid dropping it on hard surfaces, stones can chip or crack.
Q: Should I keep it in the fridge? A: Optional but nice, especially for morning de-puffing. The cold enhances anti-inflammatory benefits. Store in a clean pouch or case in the fridge.
Q: What if I accidentally buy a low-quality tool? A: If the edges are smooth and it doesn't irritate your skin, you can still use it while you save up for a better one. If the edges are rough or it's damaging your skin, stop using it and invest in quality.
Q: Do I need different tools for different face shapes? A: No. One well-designed tool works for all face shapes. Adjust your technique and pressure, not your tool.
The Biggest Mistake First-Timers Make
The biggest mistake isn't choosing the "wrong" stone material or getting the "wrong" shape.
The biggest mistake is buying a tool and never learning proper technique.
You can have the most expensive, highest-quality, most beautiful gua sha tool in the world, but if you don't know how to use it correctly, the right pressure, the correct directions, the proper sequence, you won't get the results your after.
Before or immediately after you buy your first tool:
Learn proper technique (take my 5-Day Gua Sha Challenge for free step-by-step guidance)
Watch tutorial videos from licensed aestheticians (not just influencers)
Start slowly and build the habit
Be patient with the learning curve
The tool is just a tool. Your knowledge and consistency make it effective.
Final Thoughts: Keep It Simple
Choosing your first gua sha tool doesn't have to be complicated or stressful.
Here's the simple formula:
Choose a material you like aesthetically (jade is a great starter)
Pick a traditional shape with multiple functional edges
Make sure it's smooth, well-made, and comfortable to hold
Invest in a quality facial oil to use with it
Learn proper technique
Practice consistently
You don't need the most expensive tool, the rarest stone, or the trendiest brand. You need a well-made tool that feels good in your hand and that you'll actually use every day.
Everything else is just noise.
Ready to Start Your Gua Sha Practice?
Want to learn proper technique from the ground up? Join our free 5-Day Gua Sha Challenge where I'll teach you everything you need to know to use your new tool effectively and safely.
Ready to get started with a complete kit? Our Glow & Lift Kit includes a professional-grade gua sha stone and our signature Glow facial oil is everything you need to begin your practice with confidence. I created this kit based on 13 years of professional experience, choosing the exact tools I use in my own daily routine and recommend to clients.

How to Use Gua Sha for Puffy Eyes and Under-Eye Bags: A Complete Guide
If you wake up with puffy eyes, dark circles, or persistent under-eye bags that make you look exhausted no matter how much you sleep, you're not alone. The delicate skin around your eyes is one of the first places to show stress, poor sleep, fluid retention, and aging. As a holistic aesthetician with 13 years of experience, I've worked with countless clients struggling with under-eye puffiness and one of the most effective tools I've found is gua sha. When used correctly with the right technique, gua sha can visibly reduce puffiness, drain fluid, and brighten the entire eye area. Here's exactly how to do it.
by Amber Boone, Licensed Aesthetician & Founder of Skin Soul Rituals
You know the feeling. You wake up, look in the mirror, and your eyes are puffy, swollen, maybe even a little painful. The bags under your eyes make you look exhausted even though you slept seven hours. Concealer only does so much. By midday, you still look tired.
Under-eye puffiness is one of the most common concerns I hear from clients in my treatment room. It's frustrating because it's so visible. Your eyes are the first thing people see, and it's stubborn. Creams promise miracles but deliver minimal results. You're told to "sleep more" or "drink less salt" but even when you do, the puffiness persists.
As a licensed holistic aesthetician with over 13 years of hands-on experience, I've learned that puffy eyes and under-eye bags aren't just about one thing. They're about fluid retention, lymphatic drainage, inflammation, thin skin, aging, hormones, and stress, all layered together.
But here's the good news: gua sha, when done correctly, addresses many of these root causes at once. It manually drains the lymphatic fluid that's pooling under your eyes, reduces inflammation, increases circulation, and with consistent practice, can genuinely transform chronically puffy eyes into brighter, smoother, more awake-looking skin.
I'm going to teach you the exact technique I’ve used in my treatment room and in my own morning routine to de-puff your eyes quickly and effectively.
Important Disclaimer: I'm a licensed aesthetician, not a medical doctor. I cannot diagnose medical conditions. If your eye puffiness is sudden, severe, painful, or accompanied by vision changes or other symptoms, please see a healthcare provider. This guide is for cosmetic puffiness and fluid retention, not medical conditions.
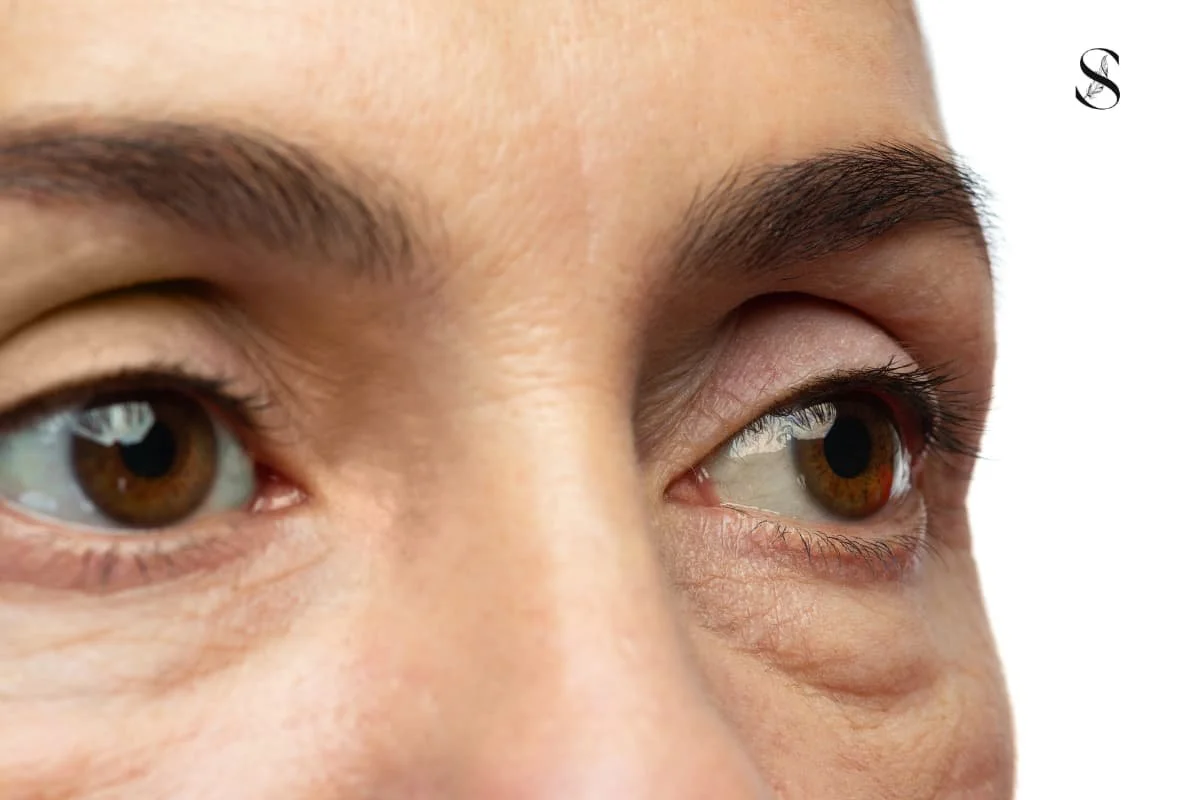
Why Do Your Eyes Get Puffy in the First Place?
Before we get to the technique, you need to understand what's happening under your eyes so the gua sha movements make sense.
The under-eye area is uniquely vulnerable to puffiness because:
The skin is incredibly thin: The skin under your eyes is the thinnest on your entire body, about 0.5mm thick compared to 2mm on the rest of your face. This means fluid, blood vessels, and any inflammation show through much more visibly.
Lymphatic drainage is poor: Your lymphatic system (which removes excess fluid and waste) doesn't drain the eye area as efficiently as other parts of your face. Fluid can easily pool and stagnate there, especially when you've been lying flat all night.
Fat pads can protrude: As you age, the supportive structures around your eyes weaken, and the natural fat pads under your eyes can bulge forward, creating the appearance of bags.
Collagen and elasticity decrease: Aging reduces the firmness and bounce of the skin, so it can't "snap back" as easily after swelling.
Common causes of eye puffiness:
Sleeping position: Lying flat allows fluid to accumulate in your face, especially around your eyes where drainage is already sluggish.
High sodium intake: Salty foods cause water retention throughout your body, and the delicate eye area shows it first.
Allergies and sinus congestion: Inflammation in your sinuses blocks lymphatic pathways and causes fluid backup in the surrounding areas, including your eyes.
Dehydration: When you're dehydrated, your body holds onto water, which paradoxically causes puffiness.
Hormonal fluctuations: Changes in estrogen and progesterone (during your cycle, perimenopause, menopause) affect fluid retention significantly.
Crying: Tears contain salt, and the rubbing and inflammation from crying cause temporary but significant swelling.
Alcohol consumption: Alcohol dehydrates you and causes inflammation, leading to pronounced morning puffiness.
Aging: As mentioned, weakened structures and decreased lymphatic efficiency make puffiness more persistent with age.
Lack of sleep or poor sleep quality: Ironically, not sleeping well can cause puffy eyes just as much as sleeping too much, because your body's systems (including lymphatic drainage) don't function optimally when you're exhausted.
The key thing to understand is that puffiness = fluid that's not draining properly. Gua sha helps move that fluid where it needs to go.
How Gua Sha Reduces Puffy Eyes
Gua sha works on multiple levels to address under-eye puffiness:
Manual lymphatic drainage: The gentle gliding strokes physically push stagnant lymphatic fluid out of the under-eye area and toward your lymph nodes (located near your ears and down your neck), where it can be filtered and drained.
Increases microcirculation: The massage brings fresh, oxygenated blood to the area, which helps reduce the dark, deoxygenated blood that contributes to dark circles and swelling.
Reduces inflammation: The gentle pressure and movement have an anti-inflammatory effect, calming the tissue and reducing puffiness caused by irritation or allergies.
Cools and soothes: The gua sha stone (especially if you keep it in the fridge) provides a cooling sensation that constricts blood vessels and immediately reduces swelling, similar to how you'd ice a sprained ankle.
Improves product absorption: If you're using an eye serum or oil, the gua sha massage helps it penetrate more deeply and work more effectively.
Trains better drainage over time: With consistent practice, you're essentially training your lymphatic system to drain this area more efficiently on its own, so puffiness becomes less frequent and less severe.
Think of gua sha for the eyes like a very gentle, manual pump for a drainage system that's gotten sluggish. You're helping your body do what it's supposed to do naturally.
The Correct Gua Sha Technique for Puffy Eyes
This is where most people go wrong. I see so many videos showing people scraping under their eyes with way too much pressure, in random directions, or skipping the most important preparatory steps.
The under-eye area is DELICATE. You need to be gentle, intentional, and follow the correct sequence for lymphatic drainage.
What you'll need:
A smooth gua sha stone with a flat or gently curved edge
A lightweight facial oil or eye serum for slip, never drag on dry skin
If you're just getting started, our Glow & Lift Kit includes a professional-grade gua sha stone and our signature Glow Elixir facial oil, designed specifically for gentle facial work including the delicate eye area.
Critical technique principles for the eye area:
LIGHT pressure: The skin under your eyes is extremely thin and fragile. Use the lightest possible pressure, you're encouraging drainage, not pushing deep into tissue. If you see redness, broken capillaries, or bruising, you're pressing too hard.
Correct direction: Always move fluid OUT and DOWN, away from the inner corner of your eye, toward your temple, and then down toward your lymph nodes at your neck. Never scrape back and forth or push fluid toward the center of your face.
Slow movements: Each stroke should take 3-5 seconds. You're gently coaxing fluid to move, not frantically scraping.
Open drainage pathways first: If you don't prepare your neck lymph nodes to receive the fluid you're draining from your eyes, you're just moving it around with nowhere to go.
Step-by-Step Gua Sha Routine for Puffy Eyes
Here's my exact morning routine for de-puffing eyes. I do this almost every day, and it takes about 3-5 minutes.
Step 1: Prep Your Drainage Pathways (1 minute)
This is the step everyone skips, and it's the most important.
Sit comfortably. Take three deep breaths. Deep breathing actually stimulates lymphatic flow throughout your body.
Using the flat edge of your gua sha tool, start at your collarbone. Sweep gently downward toward your heart 3-5 times on each side. This opens your thoracic lymph nodes.
Then move to your neck. Place the tool just below your ear and glide straight down the side of your neck toward your collarbone. Use long, smooth strokes. Repeat 3-5 times on each side.
Why this matters: All the fluid from your face drains through your neck. If those pathways are congested, draining your eyes won't help if the fluid has nowhere to go. Always start here.
Step 2: Apply Your Eye Product (30 seconds)
Apply a small amount of lightweight facial oil or eye serum around your eye area. I use a few drops of my Glow Elixir because it's nourishing but not heavy, and it provides perfect slip for the stone.
Where to apply: On your orbital bone (the bone that circles your eye socket), under your eye, and gently on your upper eyelid if it's puffy. Avoid getting oil directly IN your eye.
Use your ring finger to gently pat the oil in, never rub or pull the delicate skin.
Step 3: Under-Eye Drainage (2 minutes)
Now we address the puffiness directly.
Hold your gua sha tool flat or at a very slight angle. Place the edge at the inner corner of your under-eye area, right where your nose meets your eye socket.
With the lightest possible pressure, I cannot stress this enough, glide the tool outward along your orbital bone toward your temple. Imagine you're gently pushing fluid out and away from the center of your face.
Continue the stroke all the way to your hairline at your temple. Don't stop at your outer eye corner, go farther.
Repeat this stroke 3-5 times under each eye.
What you should feel: A gentle, soothing glide. Cooling if your stone is cold. A slight sense of drainage or lightness.
What you should NOT feel: Pain, pulling, tugging, or any sharp sensation.
Pro tip: If one eye is puffier than the other (this is common), do a few extra strokes on that side.
Step 4: Upper Eyelid and Brow Bone (1 minute)
If your upper eyelids are puffy (this happens with allergies, crying, or hormonal swelling), you can gently work this area too.
Place the flat edge of your tool at the inner corner of your brow bone (not directly on your eyelid, but just above it on the bone).
Glide outward toward your temple, following the natural arch of your brow. Repeat 3-5 times on each side.
For the upper eyelid itself, use extremely gentle pressure, almost hovering and sweep from inner to outer corner. Only do this if your eyelids are noticeably puffy; otherwise, skip this step.
Step 5: Complete the Drainage (1 minute)
Finish by draining everything down your neck.
From your temple, glide the tool down the side of your face, past your ear, and down your neck toward your collarbone. This completes the drainage pathway, you've moved fluid from your eyes, out to your temples, and now down to your lymph nodes where it can be processed and removed.
Repeat 3-5 times on each side.
The entire routine: 3-5 minutes. You should see immediate reduction in puffiness, and your eyes should feel lighter and look brighter.
When to Do Gua Sha for Puffy Eyes
Best time: First thing in the morning
Morning puffiness is the most common and most pronounced because you've been lying flat all night. Doing this routine right after you wake up before you even have coffee can dramatically reduce the swelling and help you look more awake.
I keep my gua sha stone and facial oil right next to my bathroom sink so I don't forget or skip it.
You can also do it:
After crying (wait until the acute swelling calms a bit, then gently drain)
During allergy season when your eyes are chronically puffy
Before important events when you want to look your most awake and bright
In the evening if you've had a salty meal or alcohol and notice swelling
How often:
For chronic puffiness, daily use is ideal. For occasional puffiness, use as needed. There's no harm in doing this every single day, it's gentle, supportive, and beneficial.
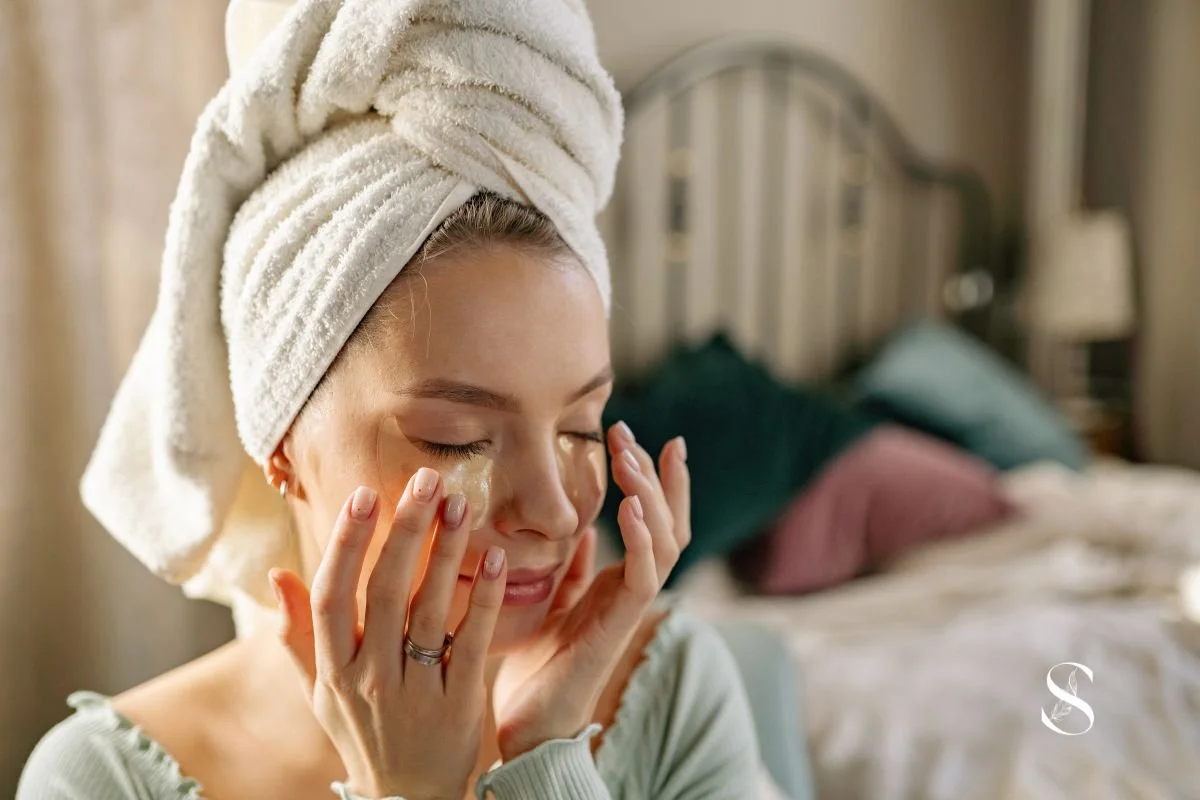
Extra Tips to Maximize De-puffing
Gua sha is incredibly effective, but combining it with these practices makes it even better:
Keep your stone in the fridge or freezer: The cold enhances the anti-inflammatory, de-puffing effect. A chilled stone feels amazing and works faster.
Sleep with your head slightly elevated: Use an extra pillow or a wedge pillow to prevent fluid from pooling in your face overnight. This reduces morning puffiness before it even starts.
Drink water first thing: Hydration helps your lymphatic system function better. Paradoxically, drinking MORE water reduces water retention.
Reduce salt intake, especially at night: High-sodium dinners guarantee morning puffiness. If you know you'll be eating something salty, plan for it and do extra gua sha the next morning.
Manage allergies: If seasonal allergies are causing chronic eye puffiness, address the root cause with antihistamines, nasal sprays, or whatever your doctor recommends. Gua sha helps with the symptoms, but treating the inflammation at its source is important.
Use a quality eye product: While gua sha works on its own, pairing it with a good eye serum or oil enhances the benefits. Look for ingredients like:
Caffeine (constricts blood vessels, reduces puffiness)
Vitamin K (helps with dark circles)
Peptides (support collagen and firmness)
Hyaluronic acid (hydrates and plumps)
My Glow Elixir isn't specifically an "eye serum," but it's gentle and nourishing enough to use around the eyes, and the botanical oils support skin health without irritation.
Avoid rubbing your eyes: The more you rub, tug, or pull at your eye area, the more you damage the delicate skin and worsen puffiness. Treat this area with care always.
Get consistent sleep: Easier said than done, I know. But poor sleep quality disrupts your body's drainage systems and contributes to chronic puffiness.
What Results to Expect (And When)
Let's set realistic expectations so you know what's normal.
Immediately after gua sha:
Visible reduction in puffiness (sometimes dramatic, sometimes subtle depending on severity)
Eyes look brighter and more awake
Under-eye area feels lighter, less "heavy"
Slight glow from increased circulation
These immediate results will fade somewhat over the next few hours as your body continues its normal processes. That's okay, you're training your lymphatic system to drain better over time.
After 1-2 weeks of daily practice:
Morning puffiness is less severe when you wake up
The de-puffing effect from gua sha lasts longer throughout the day
Dark circles may start to lighten slightly (from better circulation)
Skin texture around eyes improves
After 4-6 weeks:
Chronic puffiness becomes noticeably less frequent
Your lymphatic drainage functions more efficiently on its own
Fine lines from dehydration or fluid retention soften
Overall eye area looks healthier and more rested
Long-term (2-3 months+):
Baseline puffiness is significantly reduced
You might only need gua sha occasionally rather than daily
The under-eye area maintains better tone and firmness from consistent circulation
You look more awake naturally, without relying on makeup or caffeine
The key is consistency. Daily practice for at least a month will give you the best results.
Common Mistakes to Avoid
I see these mistakes all the time, and they can actually make puffiness worse or damage the delicate eye area:
Pressing too hard: This is the #1 mistake. The under-eye skin is so thin that aggressive pressure can break capillaries, cause bruising, or create more inflammation. Always use the lightest touch.
Dragging on dry skin: Without oil or serum for slip, you're tugging and pulling the skin, which contributes to sagging and wrinkles over time.
Moving in the wrong direction: Pushing fluid toward the center of your face or scraping back and forth doesn't support drainage. Always move OUT and DOWN.
Skipping the neck prep: If you don't open your drainage pathways first, you're just moving fluid around your face with nowhere for it to go.
Using a tool with sharp or rough edges: The eye area requires a perfectly smooth edge. Check your stone for any chips or rough spots before using it near your eyes.
Expecting instant permanent results: One session will reduce puffiness temporarily. Permanent improvement requires consistent practice over weeks.
Doing it too fast: Rushing defeats the purpose. Slow, intentional strokes are what stimulate lymphatic drainage.
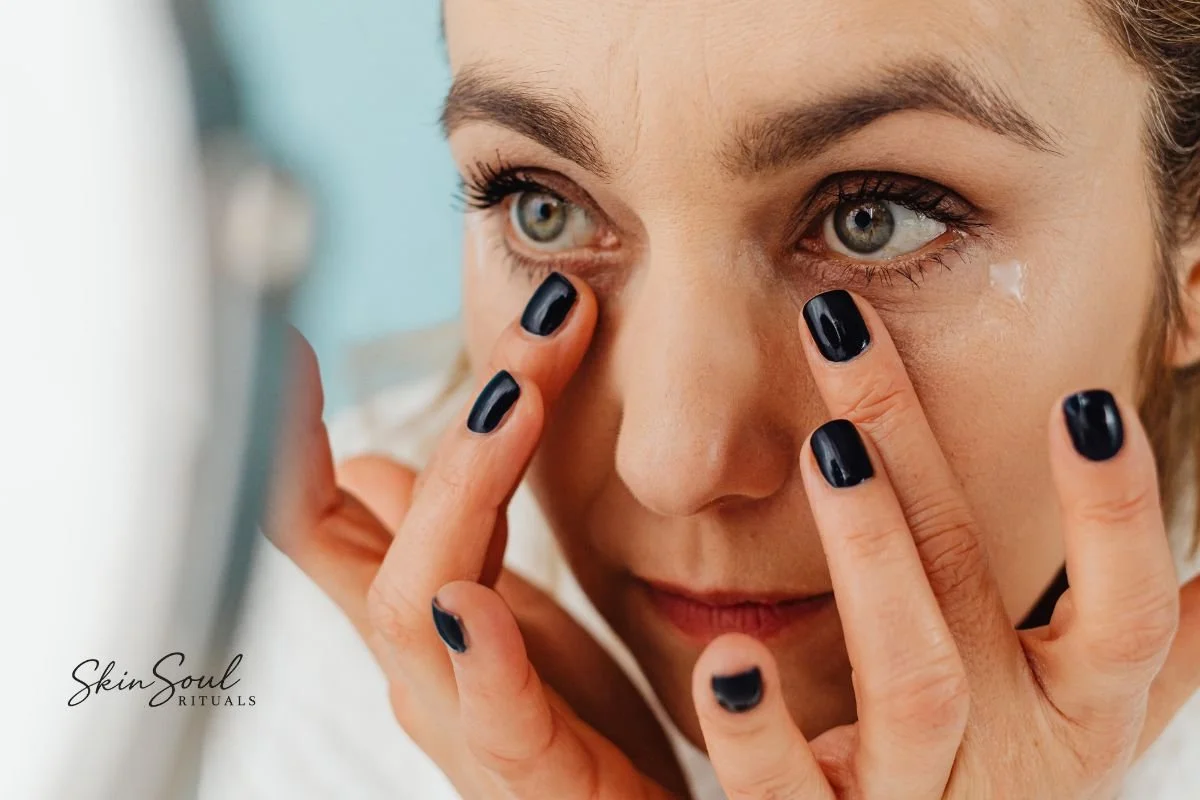
Can Gua Sha Fix Under-Eye Bags Permanently?
I want to be honest about what gua sha can and can't do.
What gua sha CAN help with:
Fluid retention and puffiness (this is where it shines)
Mild to moderate under-eye bags caused by swelling
Dark circles from poor circulation
Temporary bags from lack of sleep, salt, alcohol, crying
Fine lines and crepiness from dehydration
What gua sha CANNOT fix:
Severe under-eye bags caused by protruding fat pads (this is structural and may require cosmetic procedures)
Deep wrinkles or significant skin laxity from aging (though gua sha can improve them somewhat)
Genetic dark circles caused by pigmentation or very thin skin showing blood vessels
Medical conditions causing puffiness (thyroid issues, kidney problems, etc.)
If your under-eye bags are primarily from fat pad protrusion or severe skin laxity, gua sha will help with any fluid retention on top of that, but it won't address the structural component. That's where you'd need to talk to a cosmetic dermatologist or plastic surgeon about other options.
For most people dealing with everyday puffiness, hormonal swelling, and fluid retention, gua sha is incredibly effective.
Final Thoughts: Gentle Care for a Delicate Area
Your under-eye area is one of the first places to show stress, exhaustion, and aging. It's also one of the most delicate and deserving of gentle care.
Gua sha offers a way to actively support this vulnerable area without harsh treatments, expensive procedures, or complicated routines. It's a practice that honors your skin's natural intelligence, works with your lymphatic system rather than against it, and requires nothing more than a smooth stone, a bit of oil, and a few minutes of intentional attention.
If you struggle with puffy eyes, I encourage you to try this practice consistently for at least two weeks. Be gentle, follow the proper technique, and give your body time to respond.
Your eyes and the rest of your face, will thank you.
Ready to Get Started?
New to gua sha? Join our free 5-Day Gua Sha Challenge where I'll teach you the fundamentals of proper technique, including one video for the delicate eye area. You'll get daily video tutorials and guidance delivered straight to your inbox.
Ready to start today? Our Glow & Lift Kit includes everything you need: a professional-grade gua sha stone with smooth edges perfect for the eye area, and our nourishing Glow Elixir facial oil that provides the ideal slip for gentle massage.

How Long Does Gua Sha Take to Work? Realistic Timeline for Results
If you've just started practicing gua sha or you're considering it, you're probably wondering: how long until I actually see results? Will my face look different after one session, or does this take months? As a holistic aesthetician with 13 years of experience using gua sha both professionally and personally, I'm going to give you the honest timeline. Some benefits are immediate and visible within minutes. Others take weeks of consistent practice. Here's exactly what to expect and when, so you can set realistic expectations and stay motivated through the process.
by Amber Boone, Licensed Aesthetician & Founder of Skin Soul Rituals
You've seen the before-and-after photos. You've watched the videos promising sculpted cheekbones and lifted jawlines. You've maybe even bought a gua sha stone and started practicing.
And now you're wondering: How long until this actually works?
It's a fair question. We live in a world of instant gratification, and when you're investing time and effort into a skincare practice, you want to know when you'll see payoff.
As a licensed holistic aesthetician with over 13 years of hands-on experience using gua sha both in my treatment room with clients and in my own daily routine, I'm going to give you the honest, realistic timeline for gua sha results.
Here's what you need to know upfront: Some benefits are immediate. Others take weeks. And the most dramatic, lasting transformations require months of consistent practice.
There's no single answer to "how long does gua sha take to work" because it depends on what results you're looking for, how consistently you practice, your technique, your skin's starting condition, and your age.
But I can give you a comprehensive timeline so you know exactly what to expect at each stage and you don't give up right before the real magic happens.
Important Disclaimer: I'm a licensed aesthetician, not a medical doctor. I cannot diagnose skin conditions or prescribe treatments. This information is based on my professional experience, clinical research, and years of observing results in myself and my clients. Always consult with your healthcare provider if you have specific medical concerns.
Understanding How Gua Sha Works (So the Timeline Makes Sense)
Before we get to the timeline, you need to understand what's actually happening when you do gua sha, because different benefits work on different timelines.
Gua sha produces results through several mechanisms:
Immediate lymphatic drainage: When you perform gua sha correctly, you're manually moving stagnant lymphatic fluid out of your face and toward your lymph nodes where it can be drained. This happens in real-time during your session and produces immediate de-puffing.
Increased microcirculation: The massage stimulates blood flow to the skin's surface, bringing oxygen and nutrients while removing waste products. This creates an immediate glow and, over time, improves skin health.
Muscle tension release: The gentle pressure and gliding strokes release tight facial muscles (especially in your jaw, forehead, and around your eyes). Immediate relaxation, but retraining chronically tense muscles takes time.
Collagen stimulation: The micro-pressure from gua sha signals your skin to produce more collagen and elastin. This doesn't happen overnight, collagen production is a slow, cumulative process that takes weeks to months.
Improved product absorption: Gua sha helps your serums and oils penetrate more deeply. Immediate benefit, but the skincare results accumulate over time.
Nervous system regulation: The slow, intentional practice activates your parasympathetic nervous system (rest mode), reducing stress. You'll feel calmer immediately, but the long-term stress reduction benefits build with consistency.
Let me break down the realistic timeline.
Immediate Results: What You'll See Right Away (Within Minutes)
Some gua sha benefits are visible and tangible immediately after your very first session. This is important because it keeps you motivated to continue.
What happens during and immediately after a gua sha session:
Visible de-puffing (5-10 minutes): If you have any facial puffiness, especially under your eyes or along your jawline, you'll see it reduce noticeably within minutes of proper lymphatic drainage technique. This is because you're literally moving excess fluid out of your face. The effect is most dramatic in the morning when you wake up puffy.
Brighter, more radiant skin (immediate): The increased circulation brings oxygenated blood to your skin's surface, creating a healthy glow. You'll look more awake and vibrant. This "gua sha glow" lasts for a few hours after your session.
More sculpted appearance (temporary, 2-4 hours): After draining puffiness and releasing muscle tension, your natural bone structure becomes more visible. Your cheekbones look higher, your jawline looks sharper. This is real, but it's temporary, it will fade as fluid naturally moves around your face throughout the day.
Relaxed facial muscles (immediate): If you hold tension in your jaw, forehead, or around your eyes, you'll feel immediate relief after releasing those areas with gua sha. Your face literally feels lighter and more relaxed.
Softer fine lines from dehydration/puffiness (immediate, temporary): Lines caused by fluid retention or surface dehydration will look softer right after gua sha because you've smoothed and hydrated the area. Deep wrinkles won't change yet, but surface texture improves.
Calmer nervous system (immediate): The slow, meditative practice activates your relaxation response. You'll feel less stressed and more grounded. This benefit lasts beyond the session if you practice regularly.
Important reality check: These immediate results are temporary. Within a few hours, your face will return closer to its baseline as your body continues its normal processes. That's okay, this is why consistent practice matters.
But seeing these immediate benefits is crucial because it shows you that gua sha is working. You're not waiting weeks to see if this practice does anything, you can see and feel the effects right away, which motivates you to keep going.
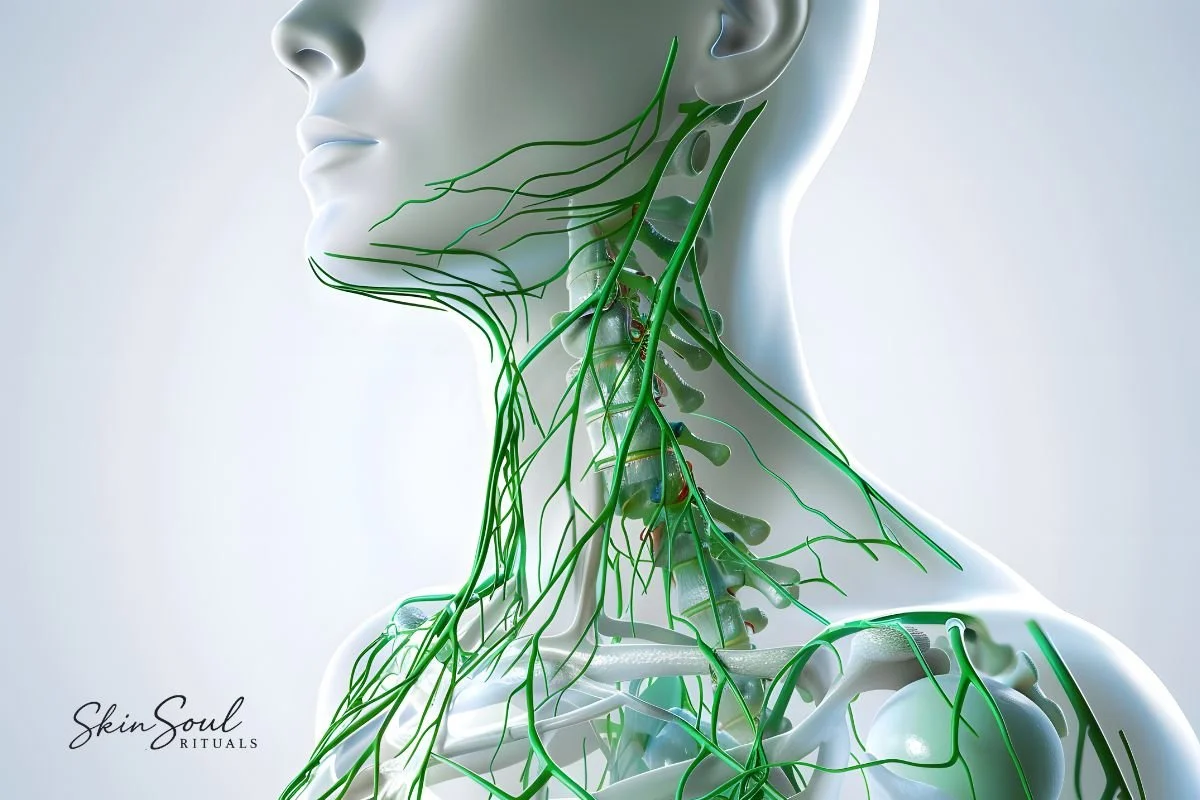
Week 1: Getting Started and Building the Habit (Days 1-7)
In your first week of gua sha, you're primarily establishing the practice and learning proper technique. Results are still mostly immediate and temporary, but you'll start noticing patterns.
What to expect in week 1:
You're figuring out technique: Your first few sessions might feel awkward. You're learning which edges of the stone work best where, how much pressure to use, and what the correct drainage directions are. That's normal. It takes a few sessions to feel confident.
Immediate depuffing each time: Every time you do gua sha, you'll see the same immediate reduction in puffiness and increased glow. But it still fades within hours.
Your face might look slightly different each morning: Some mornings you'll wake up puffier than others depending on what you ate, how you slept, hormones, etc. Gua sha helps, but it's not preventing the puffiness yet, just addressing it when it happens.
You might notice areas of tenderness: If you carry a lot of tension in your jaw or temples, those areas might feel tender during gua sha. This is normal and will improve as you release chronic tightness.
No permanent changes yet: Your face returns to baseline between sessions. You're not seeing cumulative sculpting or lasting changes yet.
The key in week 1: Focus on consistency and technique, not results. Practice daily or at least 5 times this week. The goal is to make it a habit and learn to do it correctly.
Weeks 2-3: Starting to See Cumulative Benefits (Days 8-21)
This is where things start to get interesting. You're past the learning curve, and your body is beginning to respond to the consistent stimulation.
What to expect in weeks 2-3:
Morning puffiness becomes less severe: You might notice that you're waking up less puffy than you used to, even before you do gua sha. This is because your lymphatic system is starting to drain more efficiently on its own from the daily stimulation.
The "gua sha glow" lasts longer: Instead of fading after a few hours, you might notice that your skin stays brighter and more radiant for most of the day after your morning session.
Muscle tension doesn't come back as quickly: If you've been releasing jaw tension daily, you might notice you're clenching less throughout the day. The muscles are learning a new pattern.
Skin texture starts improving: From the increased circulation and better product absorption, your skin might feel smoother and more hydrated overall, not just right after gua sha.
You're more consistent: By week 2-3, gua sha has likely become part of your routine rather than something you have to remember to do. The habit is forming.
Slight cumulative sculpting: You might start to notice that your face looks slightly more defined than it did three weeks ago, though the changes are subtle and gradual. Don't expect dramatic transformation yet.
Still mostly temporary results: The immediate effects are stronger and last longer, but permanent structural changes haven't happened yet. You're building toward them.
The key in weeks 2-3: Stay consistent. This is often when people get discouraged because they're not seeing the dramatic before-and-after transformations they've seen online. Remember: those transformations typically take 6-12 weeks. You're on track.
Weeks 4-6: Visible Transformation Begins (The Turning Point)
This is the timeframe where most people start seeing results that make them say "Oh, this is actually working."
What to expect in weeks 4-6:
Noticeably more sculpted facial contours: Your cheekbones look higher, your jawline is more defined, and the overall shape of your face appears lifted. This isn't just temporary depuffing anymore, this is cumulative change from improved muscle tone, reduced chronic puffiness, and better lymphatic function.
Reduction in chronic puffiness: If you typically dealt with under-eye bags or a puffy face, you'll notice it's significantly less frequent and less severe. Your baseline has shifted.
Fine lines and wrinkles start softening: Lines caused by dehydration, muscle tension, or poor circulation begin to fade. Deep wrinkles won't disappear, but surface lines improve noticeably.
Improved skin tone and brightness: From weeks of increased circulation and oxygenation, your overall complexion is more even, radiant, and healthy-looking.
Jaw tension and TMJ symptoms improve: If you've been working on jaw release, chronic tension and pain should be noticeably better by now.
Other people might comment: This is often when friends or family say "You look really good, did you do something different?" They can't pinpoint what changed, but they notice you look more rested, more lifted, more glowing.
Your technique has improved: By week 4-6, you're doing gua sha efficiently and correctly without thinking about it. This means you're getting better results from each session.
The immediate effects are now supported by cumulative changes: Yes, you still get immediate depuffing and glow after each session, but now you're building on a better baseline. Your face doesn't return all the way to where it started anymore.
The key in weeks 4-6: This is your motivation boost. You're seeing real, visible results that make all the consistency worth it. Take progress photos if you haven't already, you'll be surprised by the difference.
Weeks 8-12: Significant, Lasting Transformation (2-3 Months)
If you practice gua sha consistently for 8-12 weeks, this is where the most dramatic, lasting results appear. This is the "after" photo timeline.
What to expect in weeks 8-12:
Dramatically improved facial definition: Your face looks genuinely sculpted, higher cheekbones, defined jawline, lifted eye area. The transformation is obvious in photos.
Significantly reduced signs of aging: Fine lines are softened, skin firmness is improved, overall texture is smoother and more youthful. You're stimulating collagen production consistently at this point.
Lymphatic system functions efficiently: Your face drains naturally much better than it did before you started. You might not even need to do gua sha every single day anymore because your baseline puffiness is so low.
Chronic issues have resolved or significantly improved: Jaw tension, sinus congestion, under-eye bags, morning puffiness, whatever you were targeting is noticeably better.
Your skin looks healthier overall: From months of increased circulation, your complexion is brighter, more even, and more vibrant. People might ask what skincare you're using or if you got a treatment done.
The changes hold even when you skip days: If you miss a few days of gua sha, your face doesn't immediately return to how it looked before you started. The structural improvements and lymphatic training have staying power.
You've retrained muscle patterns: Facial muscles that were chronically tight have learned to relax. You might notice you're not clenching your jaw or furrowing your brow as much in daily life.
The ritual has become second nature: Gua sha is now a non-negotiable part of your routine, like brushing your teeth. You don't have to motivate yourself to do it, you just do it because it feels wrong to skip.
The key in weeks 8-12: Celebrate your results, but also recognize that gua sha is now a maintenance practice. To keep these results, you'll need to continue (though you might reduce frequency from daily to 4-5 times per week).
Long-Term Results: 3-6 Months and Beyond
After three to six months of consistent gua sha practice, you've achieved the maximum benefits the practice can offer. Continued practice maintains these results and may produce subtle continued improvement.
What long-term gua sha practice does:
Maintains the transformation: The sculpting, lifting, and skin quality improvements you've achieved stay with you as long as you keep practicing regularly.
Prevents regression: Without gua sha, your lymphatic system would gradually become less efficient again, muscle tension would return, and puffiness would increase. Continued practice keeps you at your new baseline.
May produce gradual additional improvement: Some people notice continued subtle improvements in skin texture, firmness, and definition even after six months, though the rate of change slows significantly.
Supports overall facial health and aging: By maintaining good circulation, lymphatic drainage, and muscle tone, you're supporting your face's natural health and potentially slowing visible aging.
Becomes a form of self-care and stress management: Beyond the physical benefits, the ritual itself becomes valuable for your mental health and nervous system regulation.
At this point, you can adjust frequency: Some people continue daily practice because they love it. Others reduce to 3-5 times per week for maintenance. Experiment to find what keeps your results without feeling burdensome.
The key long-term: Gua sha isn't a one-time fix, it's a practice. The results you've achieved require ongoing maintenance, but the time investment is minimal (5-10 minutes, a few times per week) for significant visible benefits.
What Affects How Fast You See Results?
Not everyone progresses at the same rate. Several factors influence how quickly gua sha works for you:
Consistency: Someone practicing daily will see results much faster than someone practicing twice a week. Daily practice for 4-6 weeks beats sporadic practice for 3 months.
Technique: Proper pressure, correct directions, and following lymphatic pathways matters enormously. Poor technique produces minimal results even with consistency.
Starting condition: If you have a lot of chronic puffiness, muscle tension, or lymphatic congestion, you'll see dramatic improvement relatively quickly. If you're already in good shape, changes will be more subtle.
Age: Younger skin (20s-30s) responds faster because collagen production and lymphatic function are still robust. Mature skin (50s+) takes longer to show results but still benefits significantly.
Lifestyle factors: Sleep quality, hydration, diet (especially sodium), stress levels, and hormones all affect facial puffiness and skin health. Gua sha works better when supported by healthy lifestyle habits.
Skin type: Some skin types show results more visibly than others. For example, someone with thin, fair skin might see changes (glow, reduced puffiness) faster than someone with thicker, oilier skin.
Product quality: Using a high-quality facial oil or serum enhances results. Dragging on dry skin or using poor-quality products reduces effectiveness.
Genetics: Some people are naturally prone to more facial puffiness, fluid retention, or muscle tension than others. Genetics play a role in how dramatic your results will be.
Common Timelines for Specific Goals
Here's a quick reference for how long specific gua sha goals typically take:
Depuffing and lymphatic drainage:
Immediate reduction: Visible within 5-10 minutes
Lasting reduction: 2-4 weeks of daily practice
Chronic puffiness resolved: 4-8 weeks
Sculpted, defined facial contours:
Temporary sculpting: Immediate (fades within hours)
Noticeable cumulative sculpting: 4-6 weeks
Dramatic transformation: 8-12 weeks
Reduced fine lines and wrinkles:
Lines from puffiness/dehydration: Immediate improvement
Improved texture and tone: 4-6 weeks
Softened deeper lines: 8-12 weeks
Maximum collagen stimulation benefits: 3-6 months
Jaw tension and TMJ relief:
Immediate release after session: Minutes
Reduced chronic tension: 2-3 weeks
Significant lasting improvement: 4-8 weeks
Brighter, more radiant complexion:
Immediate glow: During/right after session
Lasting improved skin quality: 2-4 weeks
Transformed skin tone and texture: 6-12 weeks
Under-eye bags and dark circles:
Immediate depuffing: 5-10 minutes
Reduced chronic bags: 3-6 weeks
Improved dark circles (from circulation): 6-12 weeks
How to Know If Gua Sha Is Working for You
Sometimes the changes are so gradual that you don't notice them day-to-day. Here's how to track progress:
Take before photos: On day one, take photos of your face from multiple angles in the same lighting. Take progress photos every 2-4 weeks in the same lighting and compare. You'll be amazed by the difference.
Notice how your face feels: Even before visible changes, you'll feel your face become less tight, less puffy, lighter, and more relaxed.
Track puffiness patterns: If you used to wake up puffy every morning and now you only wake up puffy occasionally, that's progress.
Pay attention to other people's comments: Friends and family will notice you look "well-rested" or "glowing" even if they can't pinpoint why.
Monitor your stress and jaw tension: If you're clenching less, feeling less stressed, or experiencing fewer headaches, gua sha is working on a deeper level.
Observe your skin quality: Smoother texture, better hydration, more even tone—these accumulate gradually.
What If You're Not Seeing Results?
If you've been practicing gua sha consistently for 4-6 weeks and you're genuinely not seeing any improvement, here are the most common reasons:
You're not doing it often enough: Twice a week won't cut it. You need at least 5-6 days per week for the first 4-6 weeks to see transformation.
Your technique is wrong: You might be pressing too hard, moving in the wrong directions, or skipping critical steps like opening drainage pathways at your neck. Consider taking my 5-Day Gua Sha Challenge to learn proper technique.
You're not using any facial oil: Dragging on dry skin doesn't allow proper gliding and lymphatic movement. Always use a nourishing oil like my Glow Elixir for slip.
You're expecting unrealistic results: Gua sha won't change your bone structure, erase deep wrinkles entirely, or take 20 years off your face. Set realistic expectations for what the practice can do.
Lifestyle factors are working against you: If you're chronically sleep-deprived, eating very high-sodium foods, or under extreme stress, gua sha can only do so much. It works best when supported by basic healthy habits.
You need professional guidance: Sometimes having an aesthetician or gua sha expert watch your technique and give personalized feedback makes all the difference.
My Personal Timeline: What I Experienced
I want to share my own gua sha journey so you have a real-life reference point.
Weeks 1-2: I saw immediate de-puffing every time I practiced, which motivated me to keep going. But my face returned to baseline quickly. I was still figuring out technique.
Weeks 3-4: I noticed my morning puffiness was less severe overall. My skin had a consistent glow even on days I didn't wear makeup. I started to really love the ritual itself, not just the results.
Weeks 5-6: My jawline looked noticeably sharper, especially in photos. Friends commented that I looked "really good" without knowing I'd changed anything. Chronic jaw tension from teeth grinding significantly improved.
Weeks 8-12: The transformation was obvious. My cheekbones were more prominent, my face looked lifted, and fine lines around my eyes had softened dramatically. I felt like I'd turned back the clock by a few years.
6+ months: I've maintained these results with 4-5 sessions per week. My face simply looks better now than it did before I started, more sculpted, less puffy, more radiant. Gua sha is now non-negotiable for me.
The timeline was gradual but consistent. The key was not giving up during weeks 2-4 when the changes were subtle.
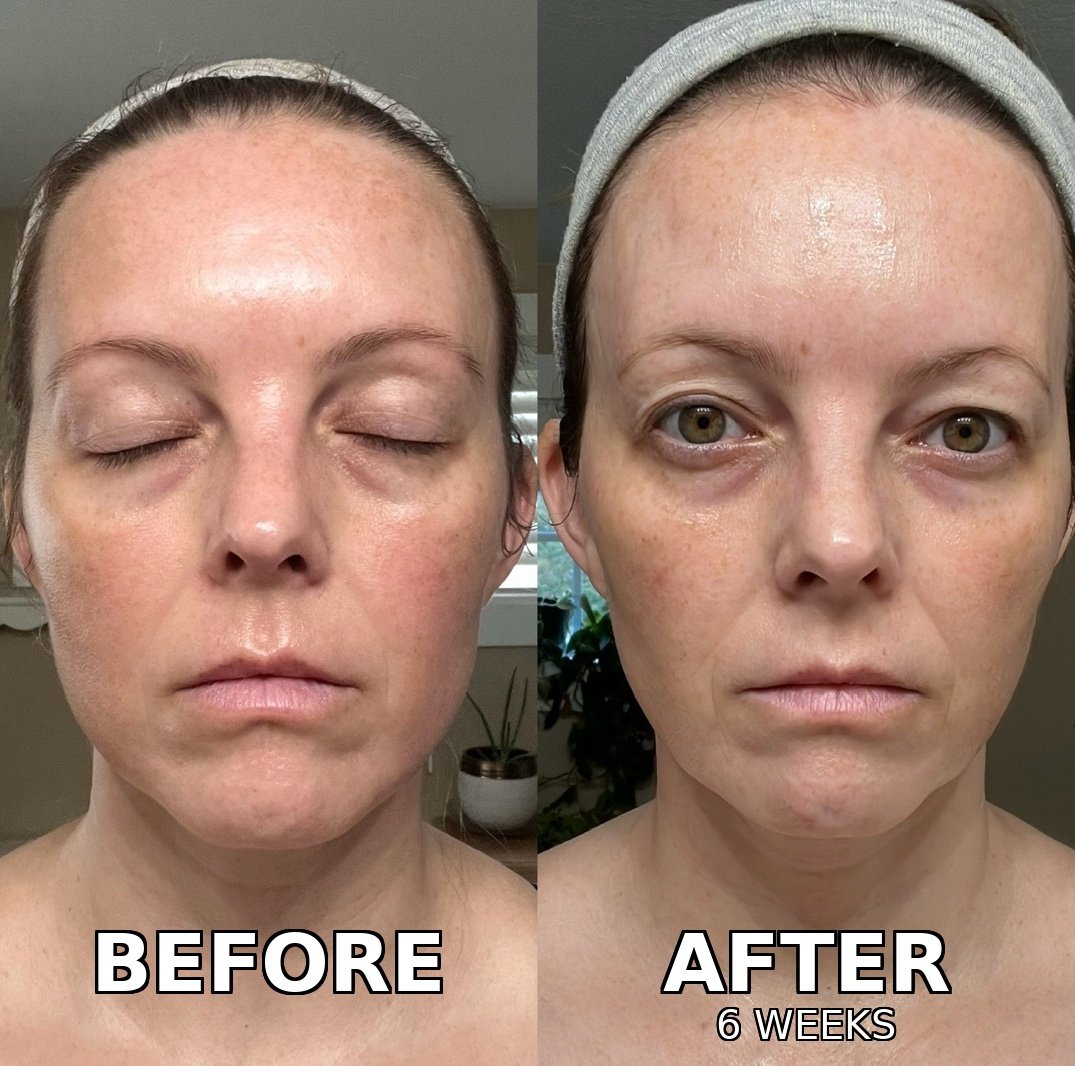
This is my personal before and after. 6 weeks to get these results.
Final Thoughts: Patience and Consistency Win
If there's one thing I want you to take away from this post, it's this: Gua sha is not a quick fix. It's a practice.
You will see some benefits immediately, de-puffing, glow, relaxation. Those immediate rewards help you stay motivated.
But the real transformation, the sculpted cheekbones, the lifted jawline, the smooth skin, the resolved chronic puffiness, that takes 4-12 weeks of consistent, daily practice.
In a world that promises instant results, this might feel frustrating. But here's the truth: the things that actually work for long-term skin health and facial sculpting take time. And unlike invasive procedures or harsh treatments, gua sha improves your face gently, naturally, and in a way that supports overall health.
If you're willing to commit to 5-10 minutes a day for two months, I genuinely believe you'll be shocked by the results. Not because gua sha is magic, but because consistent, intentional care for your face, supported by your body's natural healing mechanisms is incredibly powerful.
Your face is worth the time. Give gua sha the chance to work, and it will.
Ready to Start Your Gua Sha Journey?
New to gua sha? Join our free 5-Day Gua Sha Challenge where I'll teach you proper technique from the ground up, ensuring you get the best results in the shortest time. You'll learn the exact methods I use, with daily video tutorials and guidance.
Ready to commit to the practice? Our Glow & Lift Kit includes everything you need: a professional-grade gua sha stone and our nourishing Glow Elixir facial oil, the tools I use every single day in my own gua sha routine.

Gua Sha for Lymphatic Drainage: The Complete Guide to Depuffing Your Face Naturally
If you wake up looking puffy, feel like your face is retaining fluid, or notice swelling around your eyes and jawline, your lymphatic system might need support. As a holistic aesthetician with 13 years of experience, I've seen gua sha transform chronically puffy faces into sculpted, glowing skin—not through magic, but by supporting your body's natural drainage system. Here's everything you need to know about using gua sha for lymphatic drainage.
If you've ever looked in the mirror first thing in the morning and thought "Why does my face look so puffy?" you're not alone. Facial puffiness, swelling, under-eye bags, and that overall "heavy" feeling in your face are incredibly common, especially for women in their 40s and 50s navigating hormonal changes, stress, and the natural aging process.
As a licensed holistic aesthetician with over 13 years of hands-on experience, I've worked with countless clients who struggle with chronic facial puffiness. And one of the most effective tools I've found for addressing this issue isn't a prescription cream or an expensive treatment, it's gua sha for lymphatic drainage.
But here's what you need to understand: gua sha doesn't "fix" puffiness by force. It works with your body's natural drainage system to move stagnant fluid where it's supposed to go. When done correctly and consistently, it can transform a puffy, swollen face into a sculpted, glowing, lighter-feeling version of yourself.
Important Disclaimer: I'm a licensed aesthetician, not a medical doctor. If you're experiencing severe or sudden facial swelling, have a diagnosed medical condition affecting your lymphatic system, or notice swelling accompanied by pain or other symptoms, please consult with your healthcare provider. This guide is for general facial puffiness and natural lymphatic support, not a substitute for medical treatment.
What Is Lymphatic Drainage and Why Does Your Face Get Puffy?
Before we talk about gua sha, you need to understand what's actually happening when your face gets puffy.
Your lymphatic system is a network of vessels and nodes that runs throughout your entire body, sitting just beneath your skin. Its job is to collect excess fluid, waste products, toxins, and cellular debris, filter them through lymph nodes, and eventually return the cleaned fluid back into your bloodstream.
Think of it like your body's drainage and waste management system. When it's working efficiently, everything flows smoothly. When it gets sluggish or overwhelmed, fluid starts to accumulate, and your face is one of the first places you'll notice it.
Why facial puffiness happens:
Gravity and sleep position: When you lie flat all night, fluid naturally accumulates in your face because gravity isn't helping drain it downward. This is why morning puffiness is so common.
Hormonal fluctuations: Estrogen and progesterone affect fluid retention. During perimenopause, menopause, or even just different phases of your menstrual cycle, you might notice more facial swelling.
High sodium intake: Eating salty foods causes your body to retain water, and that extra fluid shows up as puffiness, especially around your eyes and jawline.
Stress and poor sleep: When you're stressed or not sleeping well, your lymphatic system doesn't drain as efficiently. Cortisol also contributes to inflammation and fluid retention.
Aging: As we age, our lymphatic system naturally becomes less efficient. The muscle tone in our face decreases, and the vessels don't pump fluid as effectively.
Dehydration: Counterintuitively, not drinking enough water makes your body hold onto fluid, leading to puffiness.
Sinus congestion or allergies: Inflammation in your sinuses can block lymphatic drainage pathways, causing facial swelling.
Here's the key thing to understand: your lymphatic system doesn't have a pump like your circulatory system has your heart. It relies on muscle movement, breathing, and manual stimulation to move fluid along. This is where gua sha comes in.
How Gua Sha Supports Lymphatic Drainage
Gua sha is an ancient Chinese healing technique that uses a smooth-edged tool to massage the skin with gentle, directional strokes. When used specifically for lymphatic drainage, those strokes follow the natural pathways of your lymphatic vessels, encouraging stagnant fluid to move toward your lymph nodes where it can be filtered and drained.
Here's what happens when you do lymphatic gua sha:
You manually pump the lymphatic vessels: Since your lymphatic system doesn't have its own pump, the gentle pressure and gliding motion of the gua sha tool acts like a manual pump, pushing fluid along the vessels.
You open drainage pathways: By starting at your neck (where major lymph nodes are located) and working systematically, you're essentially "opening the drain" so fluid from your face has somewhere to go.
You reduce inflammation: The massage stimulates circulation, which brings fresh oxygenated blood to the area while carrying away inflammatory waste products.
You release facial tension: Tight muscles in your face and jaw can compress lymphatic vessels, blocking drainage. Gua sha releases that tension, allowing vessels to function properly.
You activate your parasympathetic nervous system: The slow, intentional movements signal to your body that it's safe to relax, which actually improves lymphatic flow. Stress constricts vessels; relaxation opens them.
In my treatment room, I've watched clients' faces visibly transform during a lymphatic drainage gua sha session. Puffy under-eyes smooth out, jowls lift, and that "heavy" feeling disappears. But the key is technique, random scraping won't do it. You need to follow your lymphatic pathways.
The Correct Gua Sha Technique for Lymphatic Drainage
This is where most people get it wrong. I see so many videos on social media showing people scraping their faces in random directions, pressing way too hard, or skipping the most important steps. Let me walk you through the proper technique.
What you'll need:
A smooth gua sha stone with curved edges that fit your facial contours
A nourishing facial oil for smooth gliding—never work on dry skin
If you're just getting started, our Glow & Lift Kit includes a professional-grade gua sha stone and our signature Glow Elixir facial oil, the same tools I use, designed specifically for lymphatic drainage and facial work.
Critical technique principles:
Pressure: Lymphatic vessels sit very close to the surface of your skin. You need LIGHT pressure, lighter than you think. If you're pressing hard enough to see significant redness or feel discomfort, you're going too deep and missing the lymphatic layer entirely. Think "gentle glide," not "deep tissue massage."
Direction: Always move fluid TOWARD your lymph nodes. For your face, that means moving DOWN the neck, OUT toward your ears, and UP from your jaw to your cheekbones. Never scrape back and forth or in random directions. Lymph flows toward the heart.
Speed: Slow and intentional. Each stroke should take 3-5 seconds. You're encouraging gentle drainage, not frantically scraping.
Sequence: Always start by opening your drainage pathways (neck and chest) FIRST, then work on your face. If you don't open the drain, you're just moving fluid around with nowhere for it to go.
The Complete Lymphatic Drainage Gua Sha Routine
Here's the exact routine I teach my clients. Follow this sequence in order, the order matters for effective drainage.
Step 1: Prepare your drainage pathways (2 minutes)
This is the most important step that everyone skips. You need to open your lymph nodes before you start moving fluid from your face.
Sit or stand comfortably. Take three slow, deep breaths, deep breathing actually stimulates lymphatic flow throughout your body.
Place the flat edge of your gua sha tool at the center of your chest, just below your collarbones. Using very light pressure, sweep downward toward your heart. Repeat 3-5 times. This opens the thoracic duct, where all the lymph from your head and neck eventually drains.
Now move to your neck. Starting just below your ear, glide the tool straight down the side of your neck toward your collarbone. Use long, smooth strokes. Repeat 3-5 times on each side. You're opening the cervical lymph nodes and creating a pathway for facial fluid to drain.
Step 2: Drain under-eye puffiness (1-2 minutes)
Apply your facial oil generously around your eyes, this area is delicate and needs plenty of slip.
Place the flat or gently curved edge of your tool at the inner corner of your under-eye area (near your nose). With the lightest possible pressure, sweep outward toward your temple and all the way to your hairline. Imagine you're gently pushing fluid out and away. Repeat 3-5 times under each eye.
For the upper eyelid and brow bone, start at the inner brow and sweep outward toward your temple. This helps with puffy eyelids and that heavy feeling above your eyes. Repeat 3-5 times on each side.
Step 3: Sculpt and drain the cheeks (1-2 minutes)
Start at the side of your nose, right where your cheek begins. Using the curved edge of your tool, glide upward and outward along your cheekbone toward your ear. You're following the natural contour of your cheek. This drains fluid while also lifting and sculpting. Repeat 3-5 times on each side.
For the lower cheek area (where jowling can happen), start at the corner of your mouth and sweep upward toward your ear. This helps drain fluid that settles in the lower face. Repeat 3-5 times on each side.
Step 4: Define the jawline (1-2 minutes)
Place the curved notch of your tool at the center of your chin. Glide along your jawbone toward your ear, following the natural line of your jaw. This is one of the most satisfying moves, you can feel fluid moving and tension releasing. Repeat 3-5 times on each side.
For extra de-puffing, you can also work from just under your jawline (the soft area of your neck) and sweep downward toward your collarbone. This helps drain any fluid pooling under your jaw. Repeat 3-5 times on each side.
Step 5: Smooth the forehead (1 minute)
Start in the center of your forehead between your eyebrows. Sweep outward toward your temple and hairline. Work in horizontal sections—center to temple, just above that, then higher, until you've covered your entire forehead. Repeat 3-5 times across each section.
Step 6: Finish by draining the neck (1 minute)
End exactly where you started, at your neck. From below your ear, sweep straight down toward your collarbone. Repeat 3-5 times on each side. This completes the drainage circuit and ensures all the fluid you've moved from your face has somewhere to go.
The entire routine takes 5-10 minutes. You should feel immediate lightness in your face, and your skin should look brighter and less puffy right away.
When and How Often to Do Lymphatic Drainage Gua Sha
Best times to practice:
First thing in the morning: This is when most people are puffiest after lying flat all night. Doing lymphatic drainage gua sha right after you wake up can dramatically reduce morning puffiness.
Before important events: If you have a presentation, date, or photo opportunity and want to look your most sculpted and glowing, do a quick session 30 minutes before.
In the evening as a wind-down ritual: While morning is ideal for depuffing, evening gua sha can help you relax, release the day's tension, and support overnight drainage.
Whenever you feel puffy: After a salty meal, during your menstrual cycle, when you're stressed or anytime you notice extra facial swelling.
How often:
For general maintenance and gradual improvement, 3-5 times per week is ideal. If you're dealing with chronic puffiness, you can safely do this daily. The key is consistency, your lymphatic system responds better to regular gentle stimulation than occasional intense sessions.
What Results to Expect and When
Let me set realistic expectations so you're not disappointed or give up too soon. Here are my own results from 6 weeks of consistent lymphatic drainage gua sha practice:

My personal 6 weeks results. I didn’t realize my face was so puffy.
You can see the reduction in overall facial puffiness, more defined jawline and cheekbones, and that "lifted" appearance that comes from effective lymphatic drainage. This didn't happen overnight, it was the result of showing up 5-6 days per week for six weeks. But here's what you can expect at different stages:
Immediately after each session:
Visibly less puffiness, especially under eyes and along jawline
Face feels lighter and less "heavy"
Skin looks brighter and more radiant
Jawline and cheekbones appear more defined
Tension in face and jaw feels released
These immediate results will fade somewhat over the next few hours as your body goes about its day. That's normal.
After 1-2 weeks of consistent practice:
Morning puffiness doesn't come back as intensely
You start to look more "awake" and refreshed naturally
Under-eye bags reduce noticeably
Sinus congestion may improve (the drainage helps!)
After 4-6 weeks:
Your baseline face looks more sculpted and less puffy overall
The results from each session last longer throughout the day
Your lymphatic system becomes more efficient at draining on its own
Skin texture improves from better circulation and oxygenation
Long-term (2-3 months+):
Consistent facial sculpting and definition
Significantly reduced chronic puffiness
Improved skin tone and radiance
Better response to your skincare products (better absorption and circulation)
The key is that lymphatic drainage isn't a one-time fix, it's a practice. Just like going to the gym, you don't work out once and stay fit forever. But the more consistently you support your lymphatic system, the better it functions overall.
Common Mistakes That Block Drainage (And How to Avoid Them)
After years of teaching gua sha, these are the mistakes I see most often:
Pressing too hard: Remember, lymphatic vessels are superficial. Deep pressure bypasses them entirely and can actually burst capillaries in your face. Always use gentle, light pressure.
Skipping the neck: I cannot stress this enough, if you don't open your drainage pathways at the neck first, you're just pushing fluid around your face with nowhere for it to go. Always start and end at the neck.
Random directions: Lymph only flows in specific pathways. Scraping every which way doesn't work. Follow the sequence and directions I outlined above.
Using dry skin: Without oil, you'll drag and pull your skin, which can cause irritation, broken capillaries, and even premature wrinkles. Always use plenty of facial oil for slip.
Being inconsistent: Doing this once a month won't give you results. Your lymphatic system needs regular encouragement to stay efficient.
Working over active breakouts or inflamed skin: If you have active acne, rosacea flares, or other inflammation, skip those areas. You don't want to spread bacteria or irritate inflamed skin further.
Expecting face-changing transformation: Gua sha supports your natural structure, it doesn't restructure your bones or permanently change your face shape. It reveals your best version by reducing puffiness and releasing tension.
Lifestyle Factors That Support Lymphatic Drainage
Gua sha is incredibly effective, but it works best when combined with lifestyle practices that support your lymphatic system overall:
Stay hydrated: Drink plenty of water throughout the day. Counterintuitively, dehydration makes you more puffy because your body holds onto fluid.
Reduce sodium intake: Especially in the evening. High-salt meals before bed will guarantee morning puffiness.
Move your body: Exercise, walking, even gentle stretching helps pump your lymphatic system throughout your body.
Practice deep breathing: Deep diaphragmatic breaths create internal pressure changes that stimulate lymphatic flow.
Sleep with your head slightly elevated: Using an extra pillow can help prevent fluid from pooling in your face overnight.
Manage stress: Chronic stress constricts vessels and slows drainage. Find practices that help you genuinely relax.
Avoid alcohol before bed: Alcohol causes dehydration and inflammation, both of which contribute to morning puffiness.
Who Should Avoid or Modify Lymphatic Drainage Gua Sha
While facial gua sha is generally safe for most people, there are some situations where you should skip it or consult a healthcare provider first:
Avoid gua sha if you have:
Active skin infections or open wounds on your face
Severe acne or rosacea flares (wait until it calms down)
Recent facial surgery or cosmetic procedures (wait until fully healed—usually 4-6 weeks, but check with your provider)
Blood clotting disorders or if you're on blood thinners (consult your doctor)
Diagnosed lymphedema or other lymphatic conditions (work with a certified lymphatic therapist)
Use caution and lighter pressure if you have:
Very sensitive skin or conditions like eczema
Broken capillaries or very thin skin
Recent Botox or fillers (wait at least 2 weeks, be very gentle, avoid injection sites)
Pregnant women: Lymphatic drainage is generally safe during pregnancy, but check with your healthcare provider first, especially if you have any pregnancy complications.
When in doubt, consult with a healthcare professional who understands both gua sha and your specific health situation.
The Mind-Body Connection of Lymphatic Drainage
Here's something I've observed after years of practicing and teaching gua sha: the benefits go beyond the physical depuffing.
There's something deeply calming about taking 5-10 minutes to touch your own face with intention, to slow down, to breathe deeply, and to care for yourself. That nervous system regulation, the shift from stressed "fight or flight" to relaxed "rest and digest", is when your lymphatic system actually works best.
Many of my clients tell me that their gua sha practice has become less about chasing perfect cheekbones and more about creating a moment of peace in their day. And interestingly, when they approach it from that place of care rather than criticism, they often see better results. Your body responds to kindness.
The puffiness in your face isn't your enemy or something to punish away with aggressive scraping. It's your body asking for support, for movement, for drainage. Gua sha is how you lovingly provide that support.
Final Thoughts
If you struggle with facial puffiness, under-eye bags, or that heavy, swollen feeling in your face, lymphatic drainage gua sha offers a natural, effective way to support your body's own drainage system. It's not magic, and it's not a permanent fix but it is a powerful practice that can transform how you look and feel when done consistently and correctly.
Your lymphatic system is working hard every single day to keep you healthy, filter toxins, and manage fluid balance. Sometimes it just needs a little help, especially as we age or navigate hormonal changes. Gua sha is that help, a gentle, intentional way to partner with your body's natural wisdom.
If you're willing to show up consistently for 5-10 minutes several times a week, I believe you'll be genuinely amazed by how much lighter, brighter, and more sculpted your face can look.
Ready to Start Your Lymphatic Drainage Journey?
New to gua sha? Join our free 5-Day Gua Sha Challenge where I'll teach you the fundamentals of proper technique, including a complete lymphatic drainage routine. You'll get daily video tutorials and practice sequences delivered straight to your inbox so you can master this powerful practice step-by-step.
Ready to get started today? Our Glow & Lift Kit includes everything you need: a professional-grade gua sha stone and our nourishing Glow Elixir facial oil, the exact tools I used to develop and refine the lymphatic drainage techniques I've shared here.

Gua Sha for Jaw Tension and TMJ: A Holistic Aesthetician's Guide to Relief
If you wake up with a sore jaw, hear clicking when you chew, or carry tension in your face from stress and teeth grinding, gua sha might offer the natural relief you've been searching for. As a holistic aesthetician with 13 years of experience using gua sha in my treatment room, I've seen firsthand how this ancient technique can release facial tension, support lymphatic drainage, and help you finally relax those overworked jaw muscles.
by Amber Boone, Holistic Aesthetician & Founder of Skin Soul Rituals
If you've ever woken up with a sore, tight jaw or felt that familiar ache radiating up toward your temples, you're not alone. Jaw tension and TMJ (temporomandibular joint) discomfort affect millions of people, especially women in their 40s and 50s who juggle stress, hormonal changes, and the unconscious habit of clenching their teeth throughout the day or even all night long.
As a licensed holistic aesthetician with over 13 years of hands-on experience, I've worked with countless clients who carry chronic tension in their faces. And while I'm not a medical professional and can't diagnose or treat TMJ disorders (that's your dentist or doctor's job), I can share what I've learned about using gua sha as a supportive tool for facial muscle tension and lymphatic drainage.
Important Disclaimer: I'm a licensed aesthetician, not a medical doctor or TMJ specialist. If you're experiencing severe jaw pain, locking, chronic clicking, or symptoms that interfere with eating or daily life, please consult with your dentist, doctor, or a TMJ specialist for proper diagnosis and treatment. Gua sha is a complementary wellness practice for muscle tension, not a medical treatment for TMJ disorders.
Why Does Jaw Tension Happen?
Your jaw is surrounded by some of the strongest muscles in your body, the masseter muscles that help you chew can exert incredible force. When you're stressed, anxious, or concentrating deeply (hello, hours at the computer), these muscles often stay contracted without you even realizing it.
Common causes of jaw tension include:
Stress and anxiety leading to unconscious clenching
Teeth grinding, especially during sleep
Poor posture, particularly forward head position from screen time
Hormonal fluctuations that affect muscle tension and inflammation
Repetitive chewing on one side or chewing gum habitually
Over time, this chronic tension doesn't just stay in your jaw. It can travel up into your temples, down your neck, and even contribute to headaches, facial puffiness, and that overall feeling of tightness in your face.
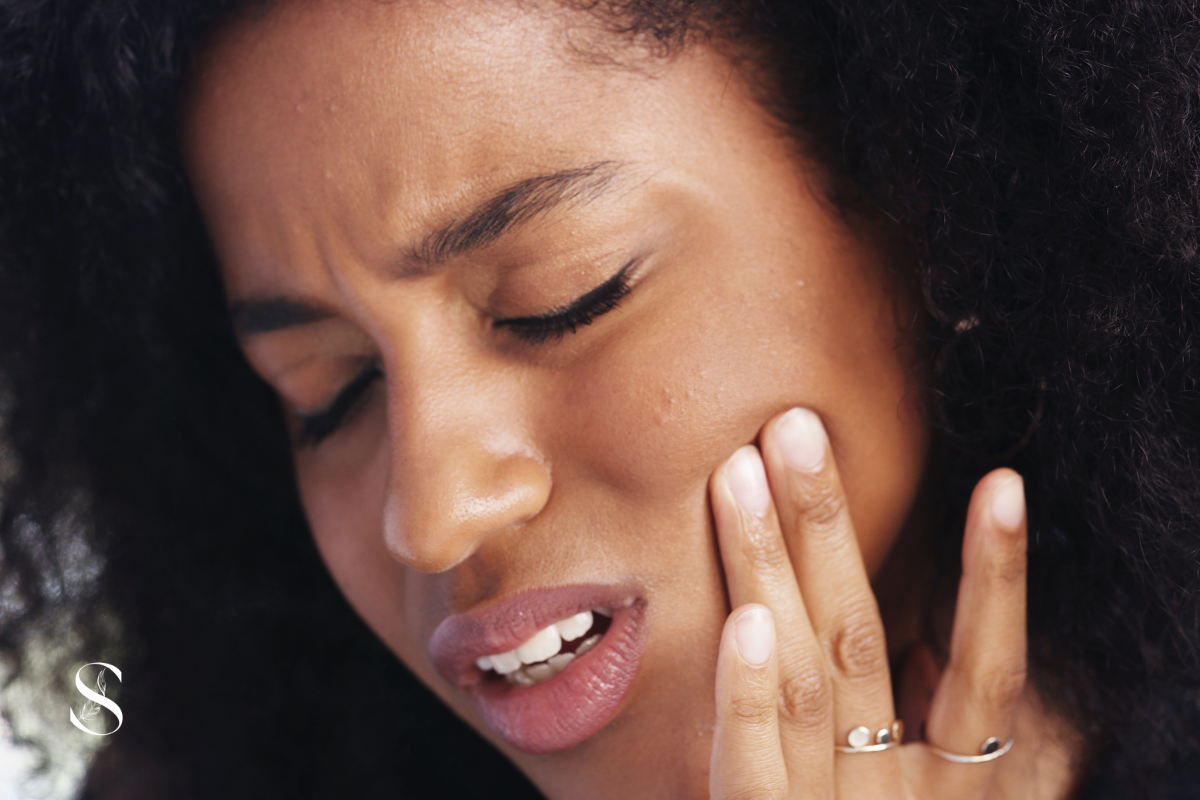
How Gua Sha Helps with Facial Tension
Gua sha is an ancient Chinese healing technique that uses a smooth-edged tool to apply pressure and massage along the skin. When used on the face, it works on multiple levels:
Releases muscle tension: The gentle pressure and gliding strokes help tight muscles relax and lengthen, similar to how a massage therapist would work on a knotted shoulder.
Supports lymphatic drainage: Your face has a complex network of lymph vessels that can become sluggish, especially when muscles are chronically tight. Gua sha encourages lymph flow, which can reduce puffiness and that "heavy" feeling in your face.
Increases circulation: The massage brings fresh blood flow to the area, delivering oxygen and nutrients while carrying away metabolic waste that builds up in tense tissue.
Provides nervous system regulation: The slow, intentional strokes activate your parasympathetic nervous system known as your body's "rest and digest" mode, which is the opposite of the stress response that causes clenching in the first place.
In my treatment room, I've watched clients visibly relax as we work through jaw tension with gua sha. They often report feeling like their face "opened up" or that they could finally unclench for the first time in days.
The Right Gua Sha Technique for Jaw Tension
Here's the approach I teach my clients for working with jaw tension at home. The key is to be gentle, intentional, and consistent.
What you'll need:
A smooth gua sha stone with curved edges that fit the contours of your jaw
A nourishing facial oil for slip—never drag on dry skin
If you're just getting started, our Glow & Lift Kit includes a professional-grade gua sha stone and our signature Glow Elixir facial oil, the same tools I use. The kit is designed specifically for facial work, with the right shape and weight for jaw release techniques.
The technique:
Start by taking three deep breaths. Place your hands on your jaw and just feel where you're holding tension. This awareness is half the work.
Step 1: Warm up with the neck Begin at your collarbone, using light pressure to sweep the gua sha tool up along the sides of your neck toward your jawline. This "opens the drain" for lymphatic fluid and helps your nervous system shift into relaxation mode. Repeat 5-7 times on each side.
Step 2: Release the jaw muscles Place the curved edge of your gua sha tool at the corner of your jawbone (right where your jaw hinges). Using light to medium pressure, glide the tool along your jawbone toward your chin. The movement should be slow and intentional—take about 3-5 seconds per stroke. Repeat 5-10 times on each side.
Step 3: Address the masseter muscle This is the major jaw muscle that does most of the clenching. Place your tool on your lower cheek, just above your jawbone, and glide upward toward your cheekbone. You're essentially "lifting" the masseter muscle. This might feel tender if you hold a lot of tension here—that's normal. Start with lighter pressure and work up as the muscle releases. Repeat 5-10 times on each side.
Step 4: Release temple tension Jaw tension often travels up into the temples. Using the flat edge of your tool, make small circular motions at your temples, then sweep outward toward your hairline. Repeat 5-7 times on each side.
Step 5: Finish at the lymph nodes End by sweeping down the neck again, encouraging all that released fluid and tension to drain toward your lymph nodes. This completes the circuit.
When to Do Gua Sha for Jaw Tension
Consistency matters more than duration. Even 3-5 minutes of focused jaw work can make a difference.
Best times to practice:
First thing in the morning if you grind your teeth at night and wake up sore
Mid-afternoon when work stress has you clenching without realizing it
Before bed as part of a wind-down ritual to prevent nighttime grinding
Any time you feel that "tight jaw" sensation coming on
I recommend starting with once daily, then adjusting based on how your body responds. Some clients with significant tension do a quick jaw release twice a day.
What Results to Expect
Gua sha isn't a quick fix, but it is effective when practiced consistently. Here's what you might notice:
Immediate: Many people feel looser and more relaxed right after a session. Your jaw might feel like it can open wider or move more freely.
Within a few days: You may notice less morning soreness if you've been grinding your teeth, or fewer tension headaches.
After 2-4 weeks: Chronic tension patterns start to shift. Your jaw might not default to clenching as quickly when stress hits. Facial puffiness often improves as lymphatic drainage becomes more efficient.
Long-term: Combined with stress management and possibly other interventions (like a night guard from your dentist), many people find their baseline tension decreases significantly.
Important Things to Remember
Pressure matters: You're working with facial muscles, not trying to break up deep tissue. Think "firm but comfortable" and never painful. If you see significant redness or bruising on your face, you're pressing too hard.
Oil is essential: Never drag your gua sha tool on dry skin. Always use a facial oil or serum for smooth gliding. This prevents irritation and makes the massage more effective.
Listen to your body: If something hurts beyond a normal "tender muscle" feeling, ease up or skip that area. Pain is not the goal.
This supports, not replaces, medical care: If you have diagnosed TMJ disorder, severe pain, jaw locking, or other medical concerns, work with your healthcare provider. Gua sha can complement treatment but isn't a substitute for it.
Teeth grinding might need more: If you grind your teeth significantly at night, you likely need a custom night guard from your dentist. Gua sha can help with the muscle tension, but it won't prevent the grinding itself.
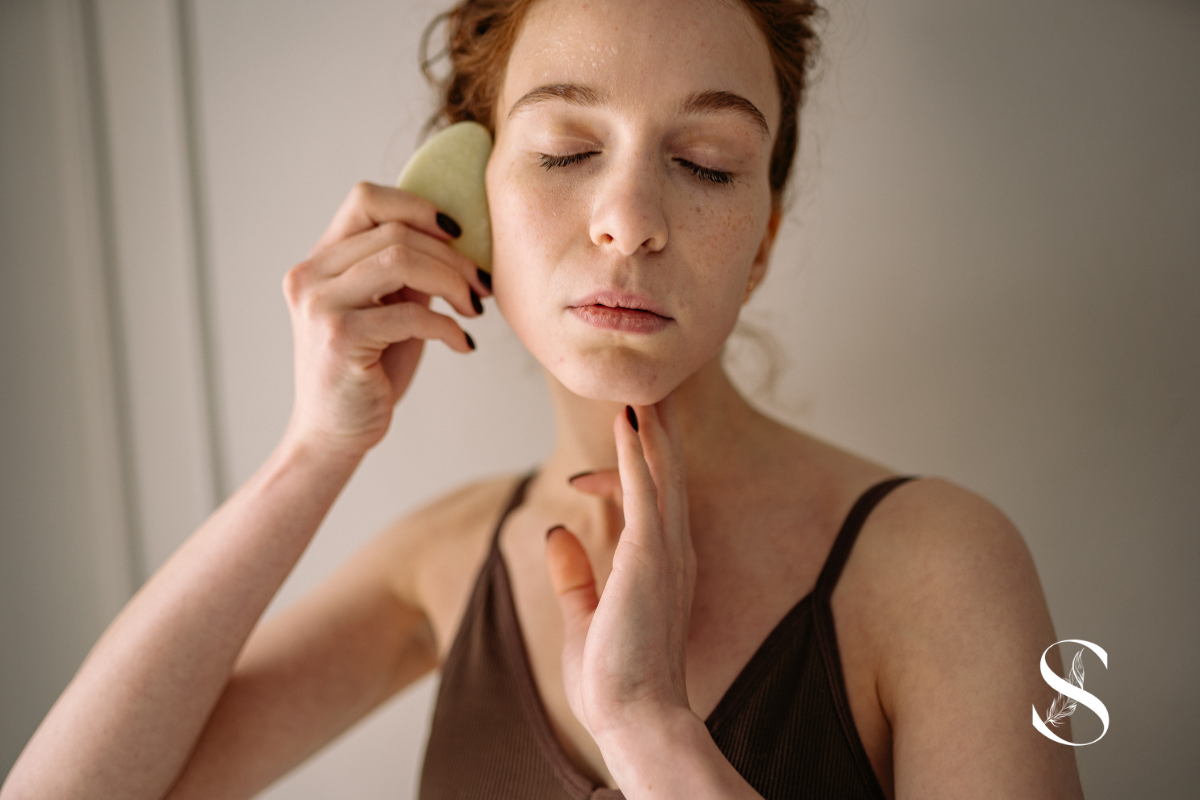
Beyond the Physical: The Mind-Body Connection
Here's something I've learned after years of working with faces: jaw tension is rarely just about your jaw. It's often where your body stores stress, anxiety, worry, and all the things you're mentally "chewing on."
The ritual of gua sha, the intentional touch, the slow pace, the focused attention is what gives your nervous system permission to let go. It's a few minutes where you're not multitasking, not pushing through, not proving anything. You're just caring for yourself.
Many of my clients tell me that the gua sha practice becomes less about the physical technique and more about creating a moment of peace in their day. And interestingly, when they stick with it, they often notice they're clenching less overall, not just because the muscles are less tight, but because they're carrying less stress in their bodies.
Final Thoughts
If you're dealing with jaw tension, TMJ discomfort, or just that feeling of carrying tightness in your face, gua sha offers a gentle, accessible way to support your body's natural ability to release and restore. It's not magic, and it's not a replacement for medical treatment when needed, but it is a powerful tool for self-care that you can practice at home, on your own schedule.
Your jaw has been working hard for you, day in and day out. Gua sha is one way to say thank you and give those overworked muscles a chance to finally relax.
Ready to Get Started?
New to gua sha? Join our free 5-Day Gua Sha Challenge where I'll walk you through the fundamentals step-by-step, including specific techniques for jaw tension relief. You'll get daily video tutorials, practice routines, and personalized guidance delivered straight to your inbox. Sign up here.
Ready to dive in now? Our Glow & Lift Kit includes everything you need: a professional-grade gua sha stone and our nourishing Glow Elixir facial oil, the same tools I use.
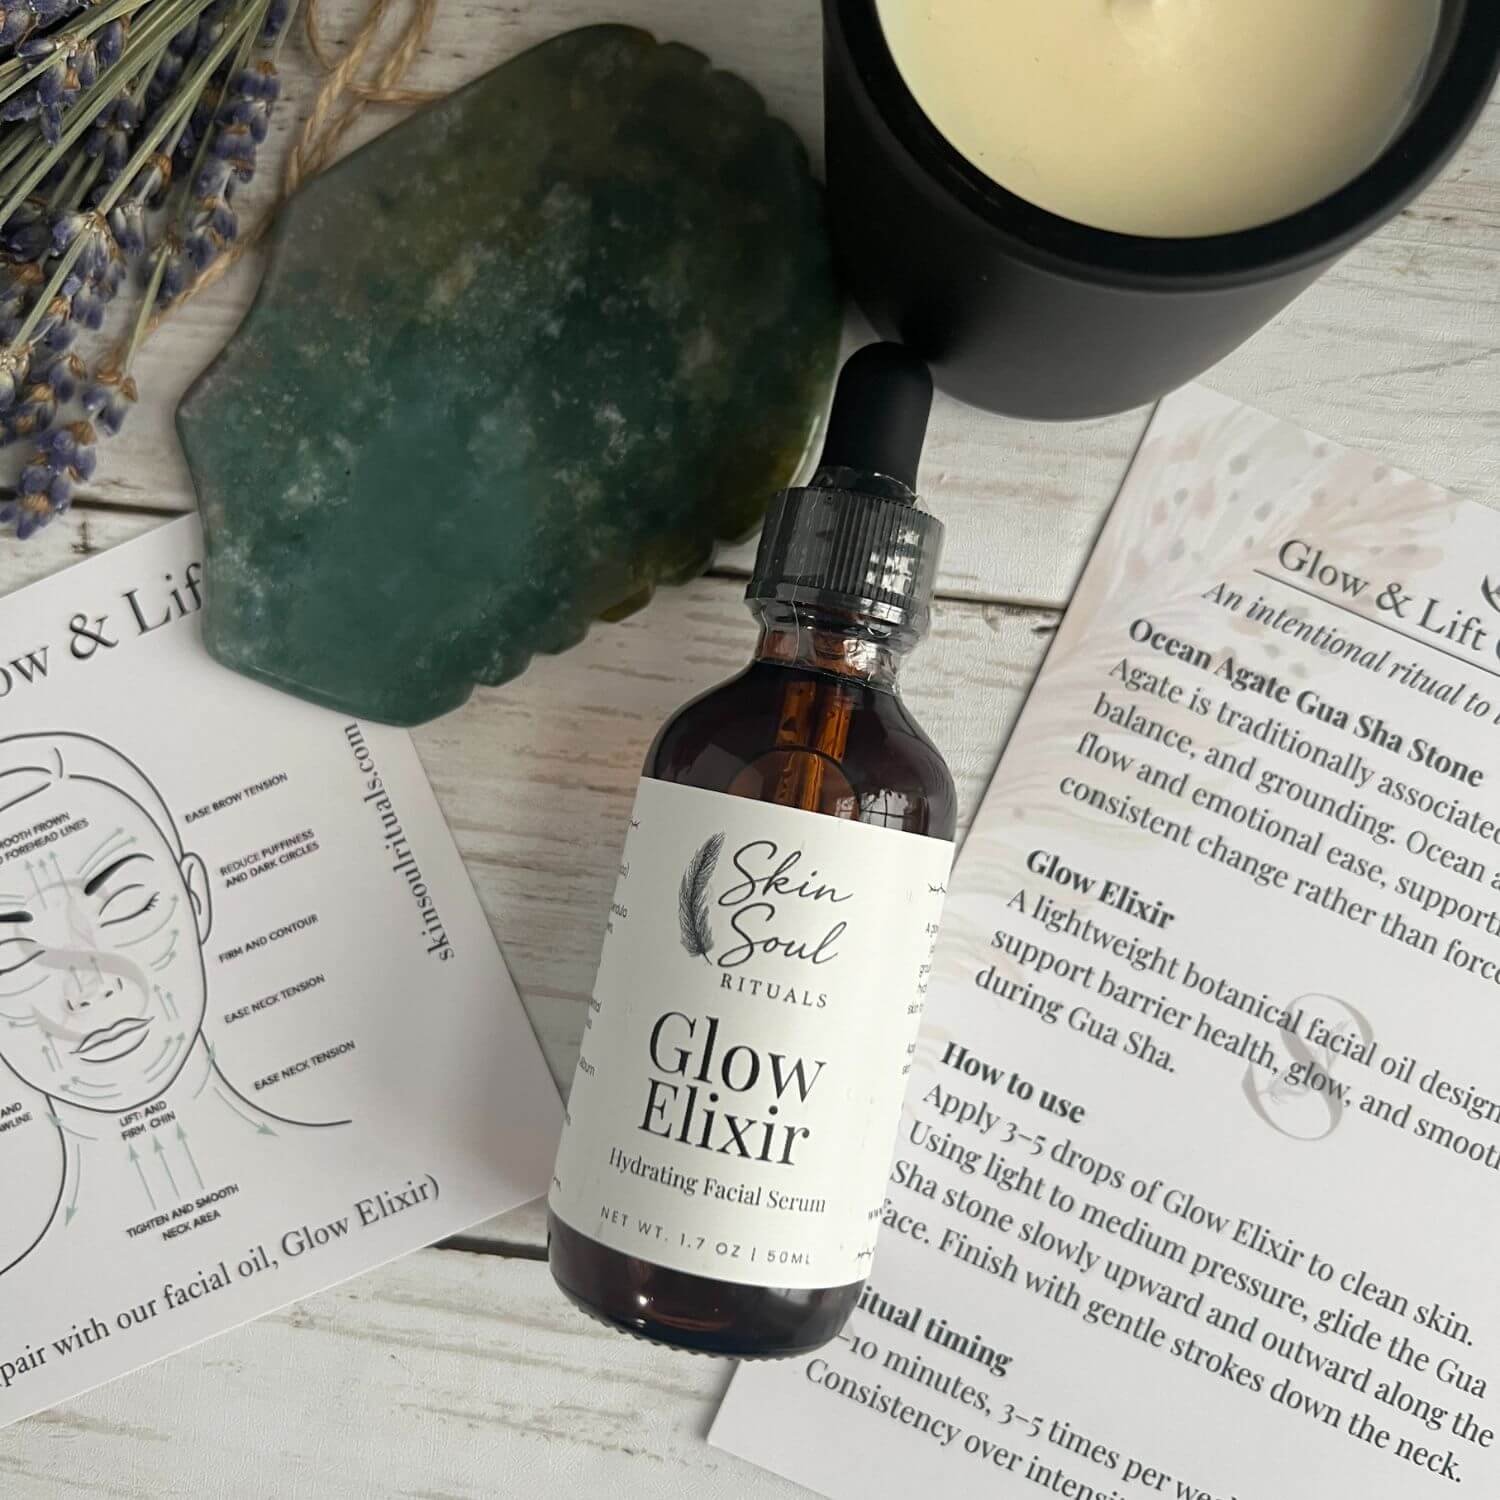
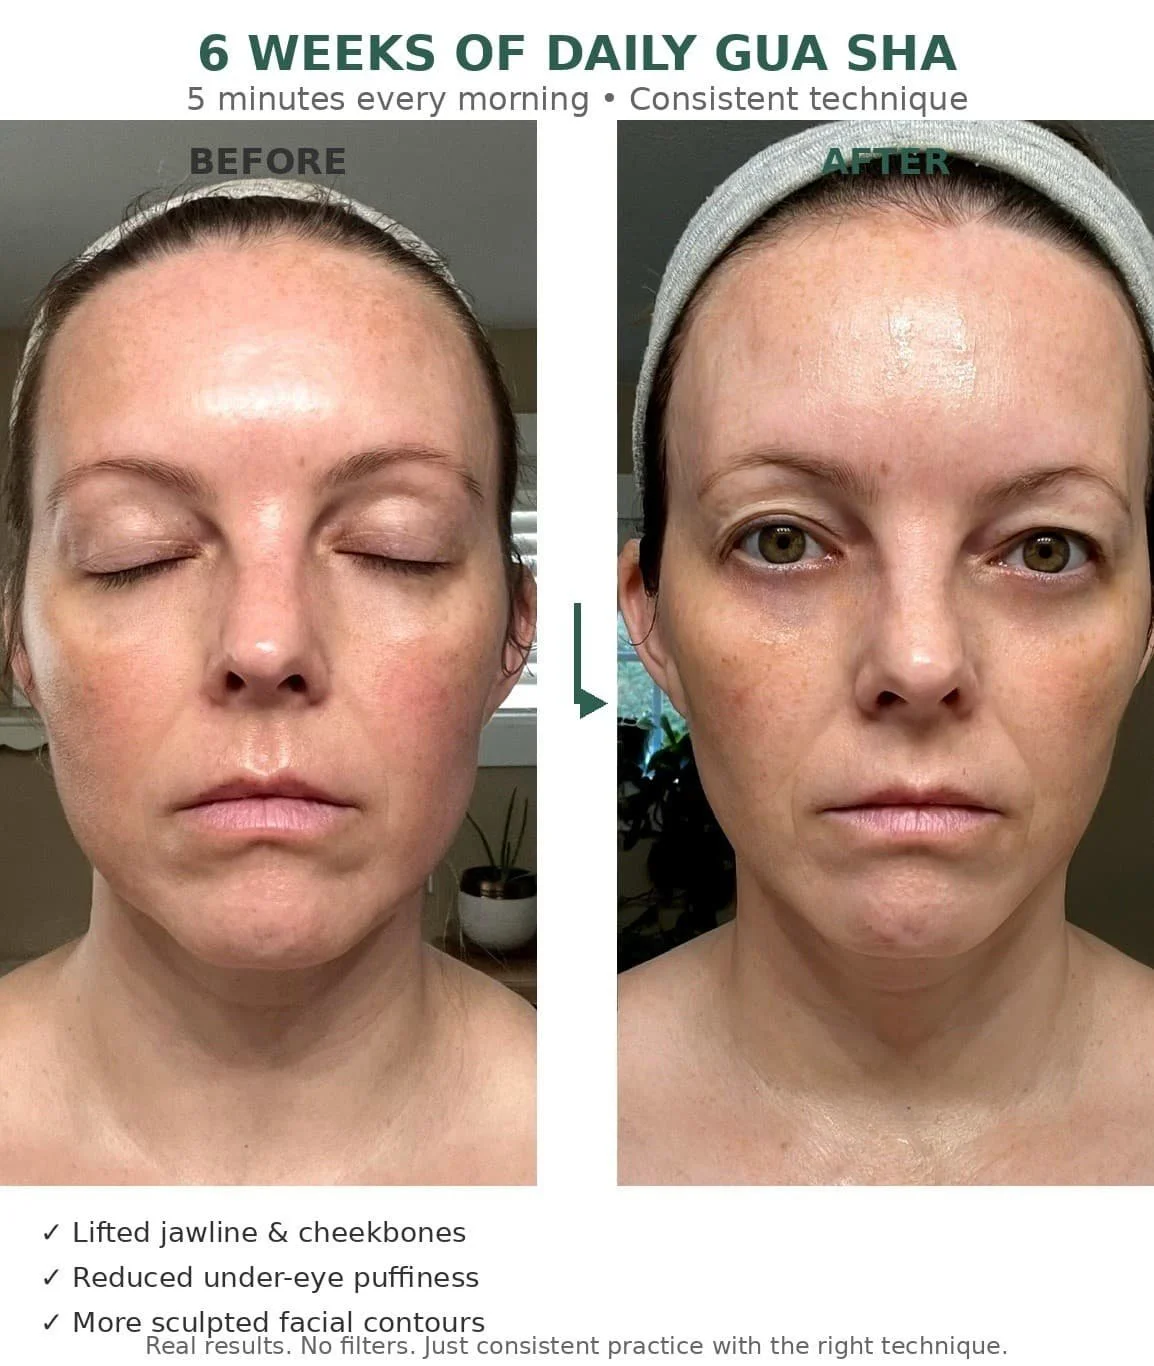
Gua Sha Before and After: Real Results and Realistic Timelines (6-Week Journey)
Wondering if gua sha actually works or how long it takes to see results? As a holistic aesthetician who's practiced gua sha for over a decade, I'm sharing my own 6-week before and after journey, the visible changes, the realistic timeline, and what you can genuinely expect when you commit to this ancient facial massage technique. Spoiler: the results are real, but they require consistency.
Let's be honest: we've all seen those dramatic gua sha before and after photos on social media where someone's face looks completely transformed in just one session. The lighting is perfect, the angle is slightly different, and you're left wondering if gua sha is actually that magical, or if you're being sold a fantasy.
As a licensed holistic aesthetician with 13 years of experience using gua sha both in my treatment room and in my own daily routine, I want to show you what real, consistent gua sha practice actually looks like. Not filtered, not perfectly lit, and not the result of one miraculous session, but six weeks of showing up for myself almost every day.
Because here's the truth: gua sha does work. But it works the way most worthwhile things work, through consistency, patience, and understanding what realistic results actually look like.
My 6-Week Gua Sha Journey: The Real Before and After
I decided to document my own gua sha practice over six weeks, with no makeup and the same neutral expression. No tricks, no filters just honest documentation of what happens when you commit to this practice.
My starting point (Week 0): I wasn't starting from scratch with gua sha, I've been practicing on and off for years. But I had fallen out of my consistent routine and noticed my face felt puffier in the mornings, my jawline looked less defined, and I was carrying more visible tension around my eyes and forehead. I'm in my late 40s, so I'm also navigating those early signs of aging that come with the territory along with perimenopause symptoms.
My commitment: I practiced gua sha 5-6 days per week, for about 5-10 minutes each session. I used my gua sha stone with my Glow Elixir facial oil (the same combination I recommend to clients). My routine focused on lymphatic drainage, facial sculpting along the jawline and cheekbones, and releasing tension in my forehead and around my eyes.
The results after 6 weeks:

What I noticed visually:
More defined jawline: The subtle jowling I was starting to see has lifted noticeably
Higher, more sculpted cheekbones: Not dramatically different, but definitely more definition
Less puffiness overall: Especially under my eyes and in my lower face
More "glow": My skin looks brighter and more radiant, partly from the increased circulation, partly from the oil massage nourishing my skin
Softer fine lines: Particularly around my eyes where I tend to hold tension
What I noticed that doesn't show in photos:
My face feels lighter, especially in the morning
Sinus congestion improved significantly
Jaw tension from stress and computer work releases faster
My skin texture is smoother and more plump
I sleep better on nights when I do evening gua sha
The Realistic Timeline: What to Expect Week by Week
If you're starting a gua sha practice, here's what realistic progress typically looks like. Remember, everyone's face and lymphatic system are different, so your timeline might vary.
Week 1: Immediate but temporary changes
You'll likely notice an immediate glow and slight de-puffing right after each session. Your face might look slightly more sculpted or lifted for a few hours. This is real, you've just moved lymphatic fluid and increased circulation. But it's temporary. Don't expect these results to last all day yet, and don't expect dramatic changes by the end of week one.
What you're building: muscle memory (yours and your face's), lymphatic pathway activation, and the habit itself.
Weeks 2-3: Consistency starts to compound
This is where you might start noticing that the morning puffiness doesn't come back as intensely. Your skin might look brighter overall, not just right after gua sha. If you're dealing with sinus congestion or jaw tension, you'll probably notice improvement here.
The changes are still subtle. If you're taking photos, and I encourage you to document your journey- you might not see a huge difference yet. But your face will start to feel different, lighter, less "heavy."
Weeks 4-5: Visible changes emerge
This is typically when other people might start asking if you've done something different. Your jawline looks more defined, your cheekbones are more prominent, puffiness is noticeably reduced. Fine lines from fluid retention (especially under eyes) often soften.
If you've been dealing with chronic facial tension or TMJ issues, the cumulative release of tight muscles becomes more obvious. Your face might look more relaxed and open.
Week 6 and beyond: Results stabilize and deepen
By six weeks of consistent practice, you've established new lymphatic drainage patterns and your facial muscles have responded to the regular massage. The results become your new baseline rather than something you have to "achieve" each session.
This is also when you'll notice that if you skip a few days, your face doesn't immediately revert back to how it looked before you started. The changes have staying power.
What Gua Sha Can and Can't Do: Setting Realistic Expectations
Let's talk about what's actually possible with gua sha, because managing expectations is crucial to not feeling disappointed.
What gua sha CAN do:
Reduce puffiness and fluid retention by supporting lymphatic drainage
Lift and define facial contours by releasing tight muscles that pull everything down
Improve circulation for brighter, more radiant skin
Soften fine lines caused by fluid retention and muscle tension
Provide a gentle, cumulative lifting effect similar to regular facial massage
Help products absorb better and nourish skin more deeply
Release chronic tension in jaw, temples, and forehead
Create a more sculpted appearance by reducing inflammation
What gua sha CANNOT do:
Erase deep wrinkles or permanently reverse significant sun damage (I still deal with my melasma even though it helps some for sure)
Replace medical treatments like Botox or fillers (though it can complement them)
Work miracles in one session with permanent results
Change your bone structure or facial proportions
Fix severe skin issues that require dermatological treatment
Substitute for a healthy lifestyle, good sleep, and proper skincare
Think of gua sha like going to the gym for your face. One workout won't transform your body, but consistent practice over weeks and months creates real, visible change. It's a maintenance practice, not a one-time fix.
Why Consistency Matters More Than Intensity
Here's something I learned both through my own practice and working with hundreds of clients: showing up for 5 minutes six days a week will give you better results than doing an intense 30-minute session once a week.
Why? Because your lymphatic system responds to regular, gentle encouragement. It's not about aggressive manipulation rather it's about creating new drainage patterns through repetition. Your muscles release better with frequent gentle work than occasional deep pressure.
This is actually good news because it means you don't need to carve out huge chunks of time. Five minutes in the morning or before bed, done consistently, is enough.
The Role of Facial Oil in Your Results
I need to be honest about something: gua sha technique matters, but so does what you're using with your stone. You absolutely cannot do gua sha on dry skin. You'll drag and pull, which can cause irritation and even broken capillaries.
But beyond just providing "slip," the right facial oil enhances your results significantly. During those 5-10 minutes of massage, you're pressing oil deep into your skin, feeding it nutrients, antioxidants, and hydration. The combination of massage plus nourishment creates that visible glow and plumpness.
I formulated my Glow Elixir specifically for this purpose. It's designed to be the perfect gua sha companion with ingredients like jojoba (which mimics skin's natural sebum), rosehip oil for cell regeneration, and calendula for calming inflammation. The lightweight texture glides beautifully without feeling greasy.
Whatever oil you choose, make sure it's pure, high-quality, and appropriate for facial use. This isn't the place to use coconut oil or random carrier oils that might clog pores.
Common Mistakes That Slow Your Results
After years of teaching gua sha, I've seen these mistakes hold people back from getting the results they want:
Inconsistent practice: Doing it three times one week, then not at all the next two weeks. Your lymphatic system and muscles need regular stimulation.
Too much pressure: Pressing so hard you're bruising or causing pain. This triggers inflammation rather than reducing it, and you're working against yourself.
Wrong direction: Randomly scraping without understanding lymphatic flow. You want to move fluid toward your lymph nodes (down the neck, out toward ears), not pushing it around randomly.
Skipping the neck: Your neck is where all facial lymph drains. If you skip neck prep and finish strokes, you're creating a traffic jam. Always start and end at the neck.
Using the wrong tool: Not all gua sha stones are created equal. You want smooth edges, the right thickness, and proper curves for facial contours. Cheap tools can irritate the irritate skin. It’s worth investing in a quality stone.
Not using enough oil: If you feel any dragging or pulling, you need more oil. Period.
Expecting overnight miracles: This is a practice, not a procedure. Give it time.
How to Start Your Own Gua Sha Journey
If you're inspired to try gua sha for yourself, here's how to set yourself up for success:
Start with the right tools. You need a quality gua sha stone and a nourishing facial oil. Our Glow & Lift Kit includes both, a professional-grade stone and our Glow Elixir oil, which is exactly what I used for my 6-week journey.
Learn proper technique. Good tools won't give you results if you don't know how to use them. I created a free 5-Day Gua Sha Challenge specifically to teach the fundamentals, proper pressure, correct directions, full-face routine, and how to target specific concerns. You'll get daily video tutorials delivered to your inbox so you can practice along with me.
Commit to consistency. Pick a time that works for your schedule. Morning if you deal with puffiness, evening if you want a relaxing wind-down ritual. Set a realistic goal like 5 days a week for 6 weeks, and track your practice.
Take before photos. Trust me on this. You see your face every day, so changes happen gradually and you might not notice them. Take photos in the same lighting, same angle, no makeup. Compare after 4-6 weeks.
Be patient with yourself. Some days you'll do 10 minutes, some days just 3. That's okay. What matters is showing up consistently, not being perfect.
Final Thoughts: The Real Magic of Gua Sha
After my 6-week journey, here's what I believe about gua sha: the real transformation isn't just what shows up in before and after photos. It's the ritual itself, those few minutes each day when you slow down, touch your own face with intention, and care for yourself.
Yes, the physical results are real and visible. My jawline is more defined, my face is less puffy, and my skin genuinely glows more. But the deeper benefit is that I feel more connected to my face, more aware of where I hold tension, and more committed to caring for myself daily.
Gua sha won't replace good sleep, stress management, or a healthy lifestyle. But it's a beautiful practice that supports all of those things while giving you tangible, visible results along the way.
If you're willing to show up consistently for six weeks, I believe you'll be genuinely surprised by what's possible.
Ready to Start Your Own Gua Sha Journey?
New to gua sha? Join our free 5-Day Gua Sha Challenge where I'll teach you everything you need to know, proper technique, full-face routine, and how to target your specific concerns. You'll get daily video tutorials and practice routines delivered straight to your inbox.
Ready to get started today? Our Glow & Lift Kit includes everything you need: a professional-grade gua sha stone and our nourishing Glow Elixir facial oil, the exact tools I used for my 6-week transformation.
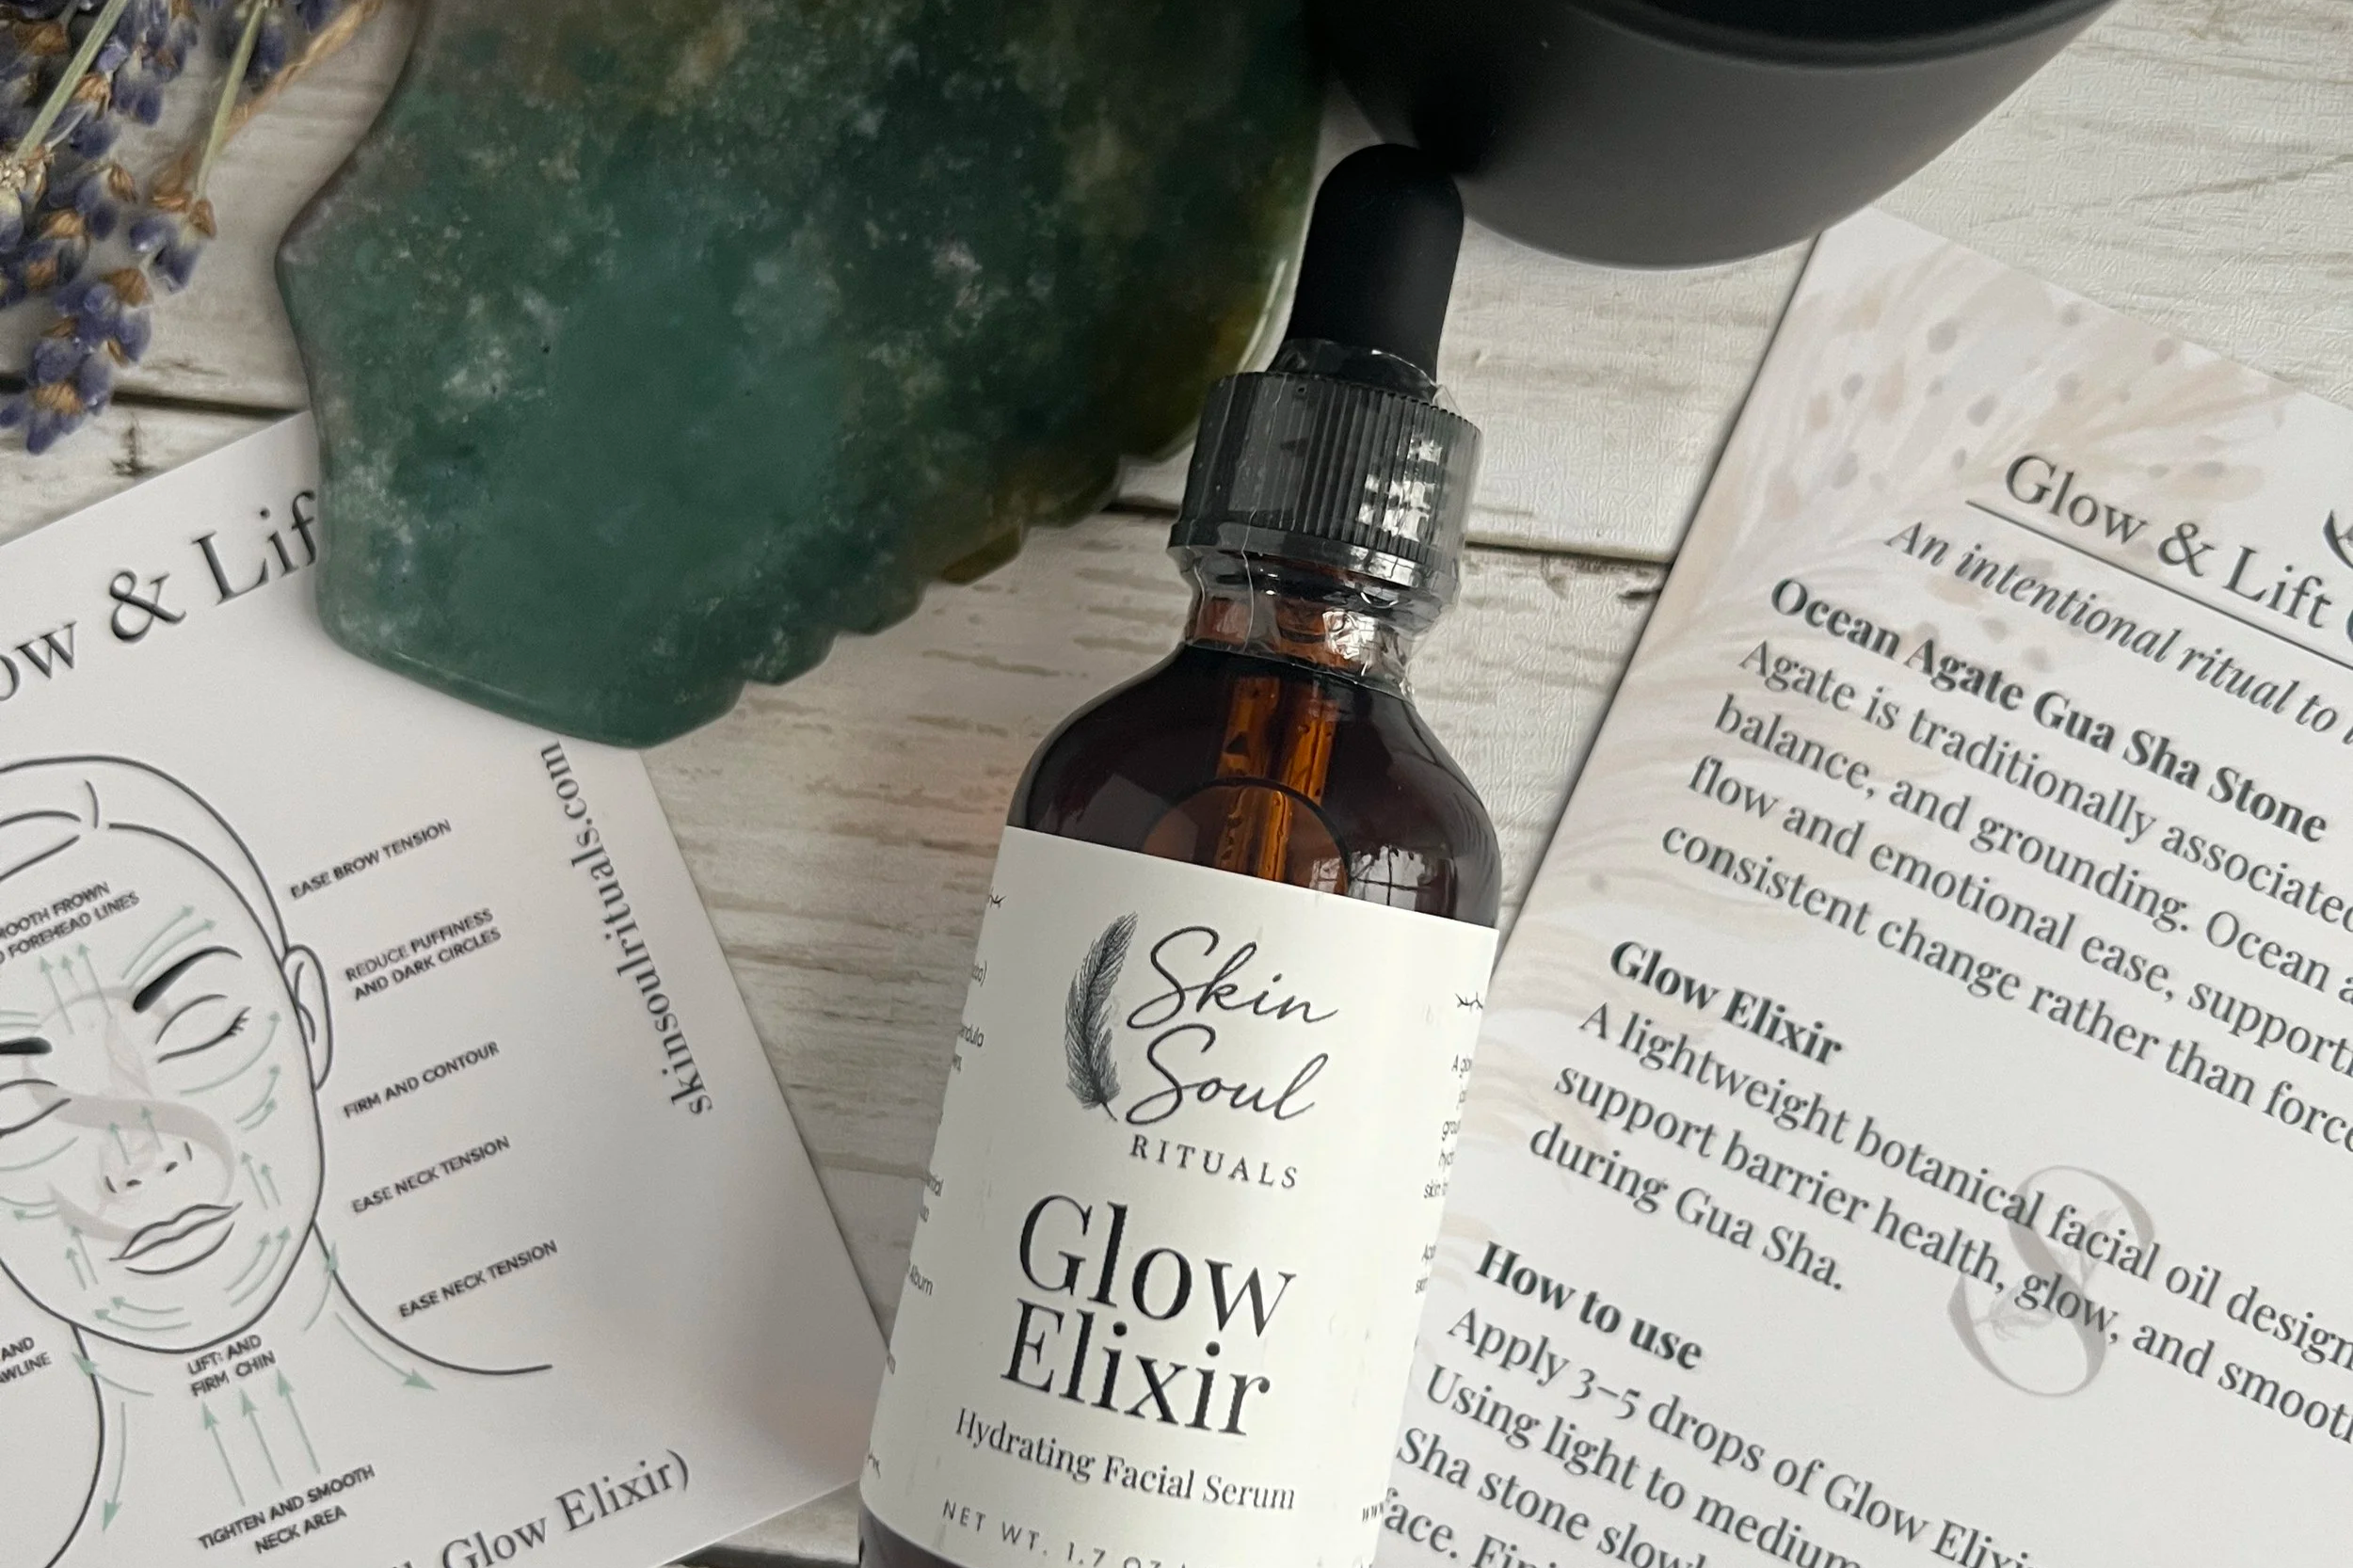
Glow & Lift Kit
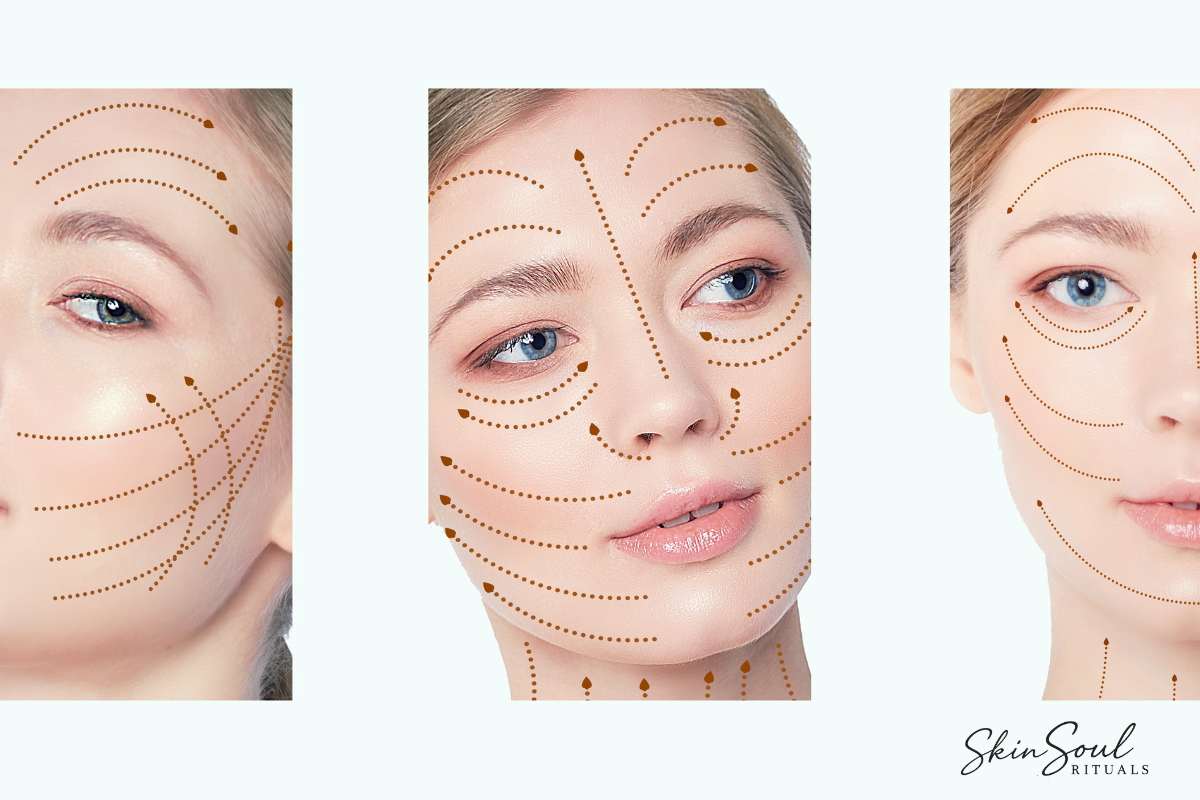
The Science Behind Gua Sha: Circulation, Fascia & Lymphatic Flow
Gua sha isn’t just a beauty trend. It works by improving circulation, releasing tight fascia, and supporting lymphatic drainage. Learn how these systems affect facial aging and why gua sha helps the face look more lifted and sculpted.
by Amber Boone, Holistic Aesthetician & Founder of Skin Soul Rituals
Gua sha might look like a trendy skincare tool… but the reason it works has everything to do with how your body already functions.
Your face isn’t just skin. Underneath the surface, you have:
• Blood flow
• Lymph fluid
• Muscles
• Fascia (connective tissue)
When these systems move well → your face looks lifted, sculpted, and radiant.
When they get sluggish → puffiness, sagging, and dullness show up.
Gua sha helps get things moving again.
Let’s break this down.
First: Why Movement Matters in the Face
Your face is not meant to be stagnant.
Every day your tissues deal with:
Gravity
Stress tension
Poor sleep
Hormonal changes
Screen time posture
Over time, this can slow down circulation and fluid flow, and tighten the connective tissue that holds everything in place.
That’s when you start noticing:
• Puffiness
• Heaviness in the jawline
• Lines that look deeper
• Skin that looks tired
Gua sha works by gently guiding movement back into these systems.

1. Circulation: Bringing Fresh Blood to the Skin
Circulation is simply blood flow.
Blood carries:
✔ Oxygen
✔ Nutrients
✔ Repair support
When circulation slows, skin can look:
Dull
Uneven
Less firm
When you glide a gua sha tool across the skin, you create gentle stimulation that encourages blood to move to the area.
Think of it like this:
Your skin cells are like tiny workers.
Blood flow delivers their supplies.
More flow = better working conditions.
That’s why after gua sha you often see:
A healthy glow
Slight warmth
Brighter-looking skin
It’s not magic, it’s biology.
2. Fascia: The Hidden Structure of Your Face
Fascia is one of the most important (and least talked about) parts of facial aging.
Fascia is a thin layer of connective tissue that:
• Wraps around muscles
• Connects everything together
• Helps give your face shape
When fascia is healthy, it’s flexible and mobile.
But stress, tension, and repetitive facial expressions can cause it to get:
Tight
Stuck
Pulled downward
When fascia tightens, it can contribute to:
• Sagging
• Heaviness
• Loss of contour
Gua sha helps gently glide and release tension in this tissue.
Imagine wearing a tight sweater all day.
When you finally stretch and loosen it, things feel lighter.
That’s similar to what happens when fascia can move more freely.
3. Lymphatic Flow: Reducing Puffiness
Your lymphatic system is your body’s drainage system.
It helps move away:
Waste
Excess fluid
Inflammation
Unlike blood, lymph does not have a pump like the heart.
It relies on movement.
If lymph gets sluggish, you may see:
• Puffy cheeks
• Under-eye swelling
• A less defined jawline
Gua sha uses light, directional strokes that follow lymph pathways to help fluid move toward drainage areas (like the sides of the neck).
This is one of the reasons gua sha can make your face look:
Less swollen
More defined
Slimmer and sculpted
Often after just one session.
Why This Creates a “Lifted” Look
Gua sha doesn’t lift your face like a surgical procedure.
Instead, it improves the conditions of the tissues.
When you have:
✔ Less fluid retention
✔ Better circulation
✔ Freer fascia movement
Your face can look:
• More contoured
• Less heavy
• More awake
• Naturally lifted
It’s like decluttering, nourishing, and loosening the face all at once.
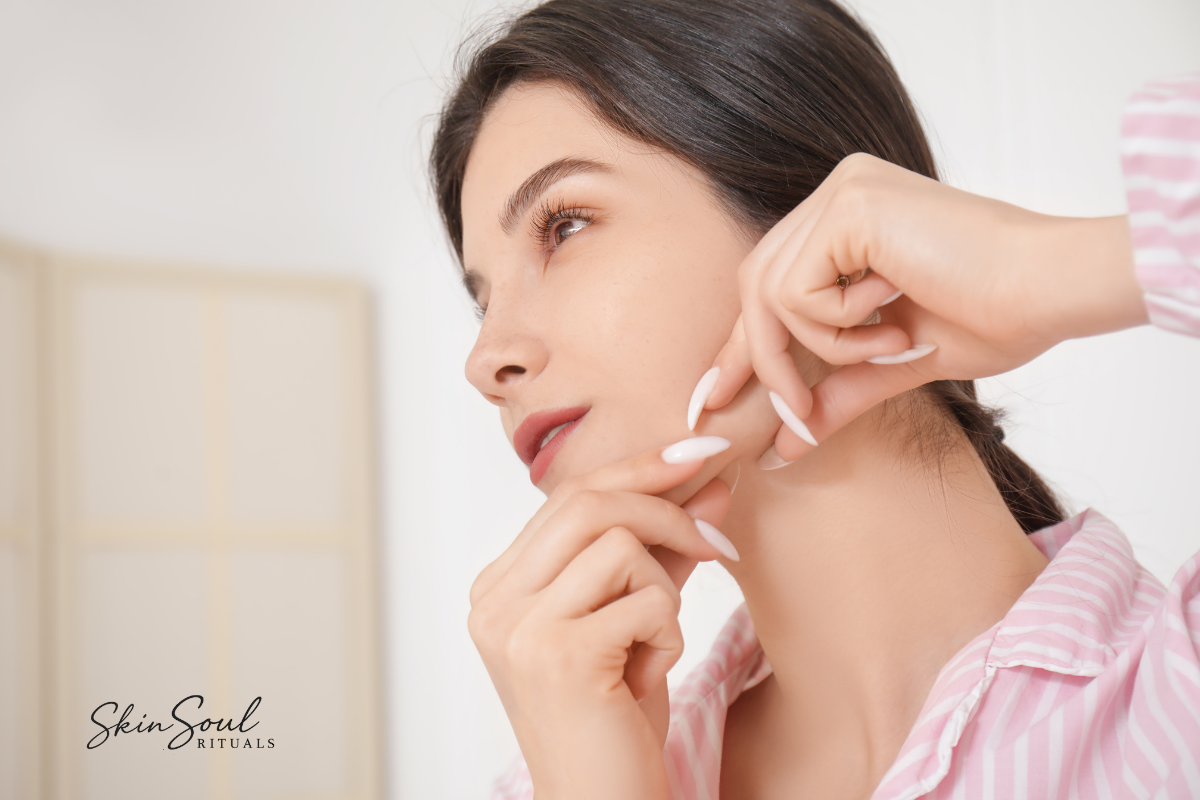
Why Consistency Matters
One gua sha session can give temporary results.
But consistent practice supports:
• Long-term tissue health
• Muscle balance
• Better fluid movement
Think of it like brushing your teeth.
You don’t do it once and expect lifetime results.
Small daily rituals make the biggest difference.
Final Takeaway
Gua sha works because it supports systems your body already uses:
Circulation → nourishes
Fascia → shapes
Lymph → drains
You’re not forcing the face into a result.
You’re helping the body do its job better.
That’s why gua sha feels both relaxing and effective, it’s working with your biology, not against it.
Ready to try Gua Sha for yourself? Sign up for my free 5 days of Gua Sha Challenge.
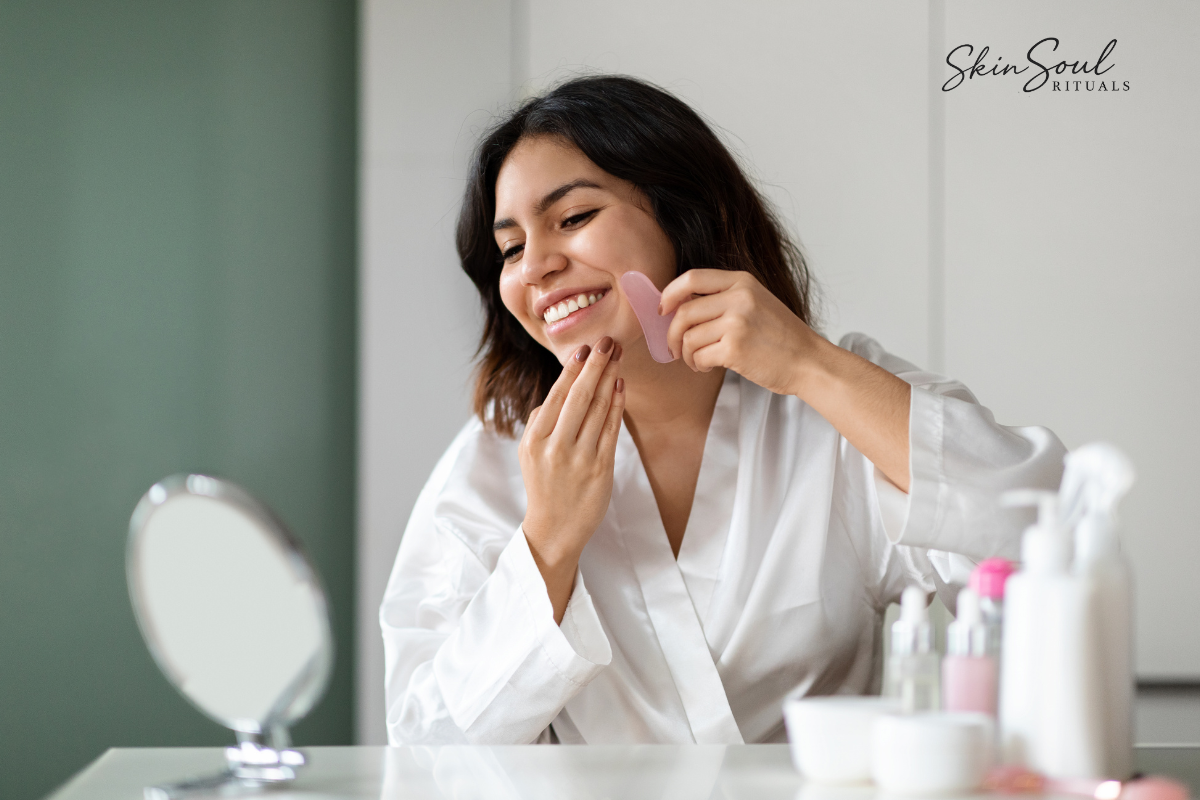

Can Gua Sha Replace Botox? A Realistic Look at Natural Face Lifting
Is Botox the only way to lift and smooth the face? Not necessarily. This guide explains how Botox works, what causes facial aging beyond wrinkles, and how gua sha supports natural lifting by improving circulation, fascia mobility, and lymphatic flow.
by Amber Boone, Holistic Aesthetician & Founder of Skin Soul Rituals
If you’ve ever looked in the mirror and thought,
“Is it time for Botox?”
You are not alone.
Fine lines, forehead creases, and loss of facial firmness are a normal part of aging but in a world where injectables are everywhere, it can feel like Botox is the only option.
Here’s the truth: Botox is one option.
But it is not the only path to a lifted, sculpted, confident-looking face.
Gua sha and other holistic facial practices offer a completely different approach to facial aging, one that works with your tissues instead of temporarily freezing them.
This article isn’t about Botox-bashing. I used to get it myself. Nothing wrong with it. However, I didn’t realize there were other options at the time. That’s what this article is about, understanding there are other options that can work for you.
Let’s break it down.
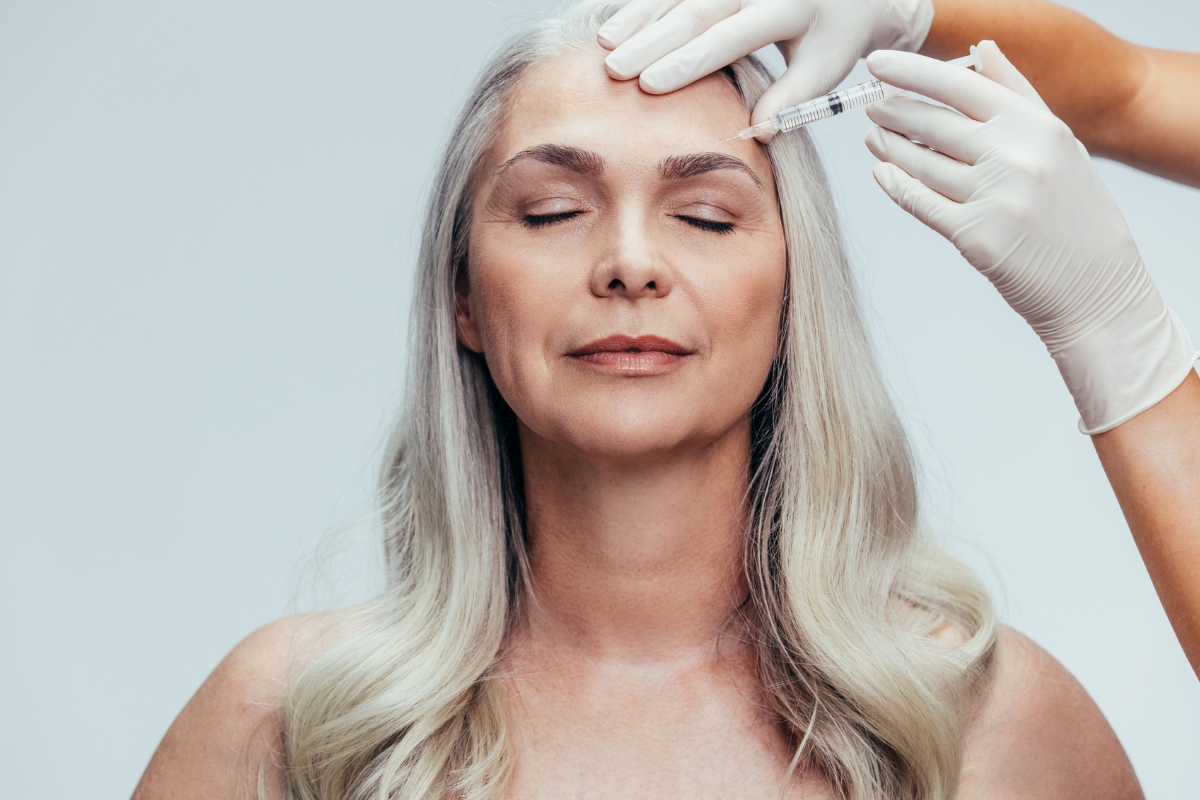
First: What Is Botox and How Does It Work?
Botox is a brand name for botulinum toxin, a purified neurotoxin used in small, controlled doses.
When injected into a muscle, Botox:
• Blocks nerve signals to that muscle
• Reduces muscle movement
• Softens expression lines caused by repetitive facial motion
That’s why it’s commonly used for:
Forehead lines
Frown lines (11s)
Crow’s feet
What Botox does well:
✔ Quickly smooths dynamic wrinkles
✔ Results appear within 3–10 days
✔ Effects last about 3–4 months
But here’s the key point:
Botox does not improve:
Circulation
Lymphatic drainage
Tissue health
Skin quality
Fascia mobility
It reduces muscle activity and it doesn’t address the underlying tissue systems that influence facial aging.
Why Faces Age in the First Place (It’s Not Just Wrinkles)
Facial aging is not only about lines.
It involves:
• Sluggish lymphatic flow → puffiness & heaviness
• Reduced circulation → dull, tired-looking skin
• Tight, stuck fascia → sagging & loss of contour
• Muscle imbalances → some areas overactive, others weak
• Fluid retention → loss of definition in jawline & cheeks
This is where natural facial practices come in.
What Is Gua Sha for the Face?
Facial gua sha is a traditional East Asian technique that uses a smooth stone tool to gently glide along the face and neck.
It is not about scraping hard.
It is about rhythm, direction, and intention.
Modern facial gua sha is used to:
✔ Support lymphatic drainage
✔ Increase circulation
✔ Release fascial tension
✔ Reduce fluid retention
✔ Improve muscle tone and relaxation balance
✔ Encourage natural lift and contour
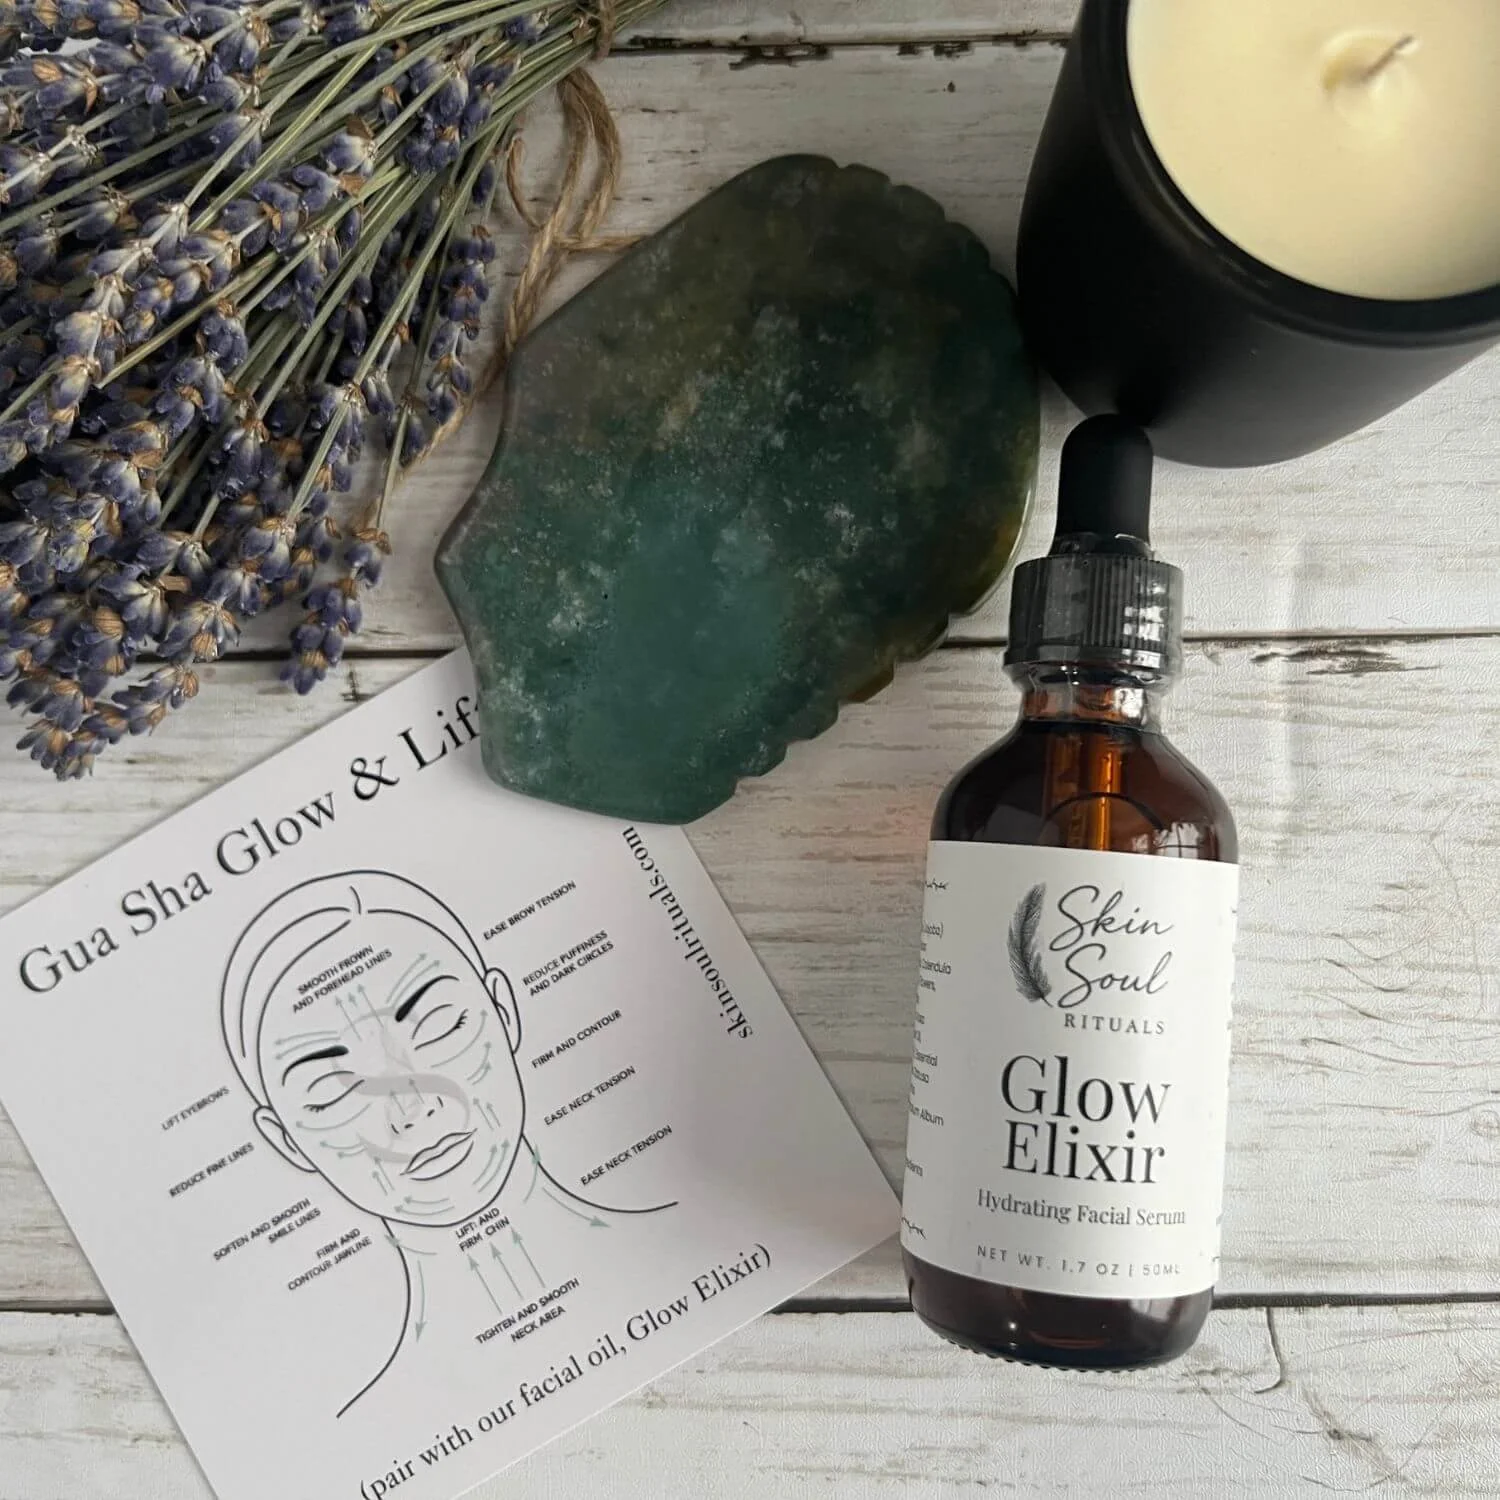
Can Gua Sha Replace Botox?
Here’s the honest answer:
Gua sha does not freeze muscles like Botox.
But it works on systems Botox does not touch.
Instead of paralyzing movement, gua sha helps restore:
• Fluid flow
• Tissue mobility
• Muscle balance
• Natural definition
So the question becomes less “Does it replace Botox?”
And more…
“Do you want to freeze movement, or improve tissue function?”
They are two completely different strategies.
What Gua Sha Can Do for the Face
With consistent practice, gua sha can help:
Reduce Puffiness
By moving stagnant lymphatic fluid, especially in:
Under eyes
Cheeks
Jawline
Improve Facial Contour
Releasing tight fascia allows tissues to sit more naturally, helping:
Jawline look more defined
Cheekbones appear lifted
Face look less heavy
Support Smoother Expression Lines
When overactive muscles (like between the brows) are gently relaxed and circulation improves, lines can appear softer over time.
Give a “Rested” Look
Better circulation = more oxygen & nutrients to skin
This often translates to a healthy glow Botox alone does not provide.
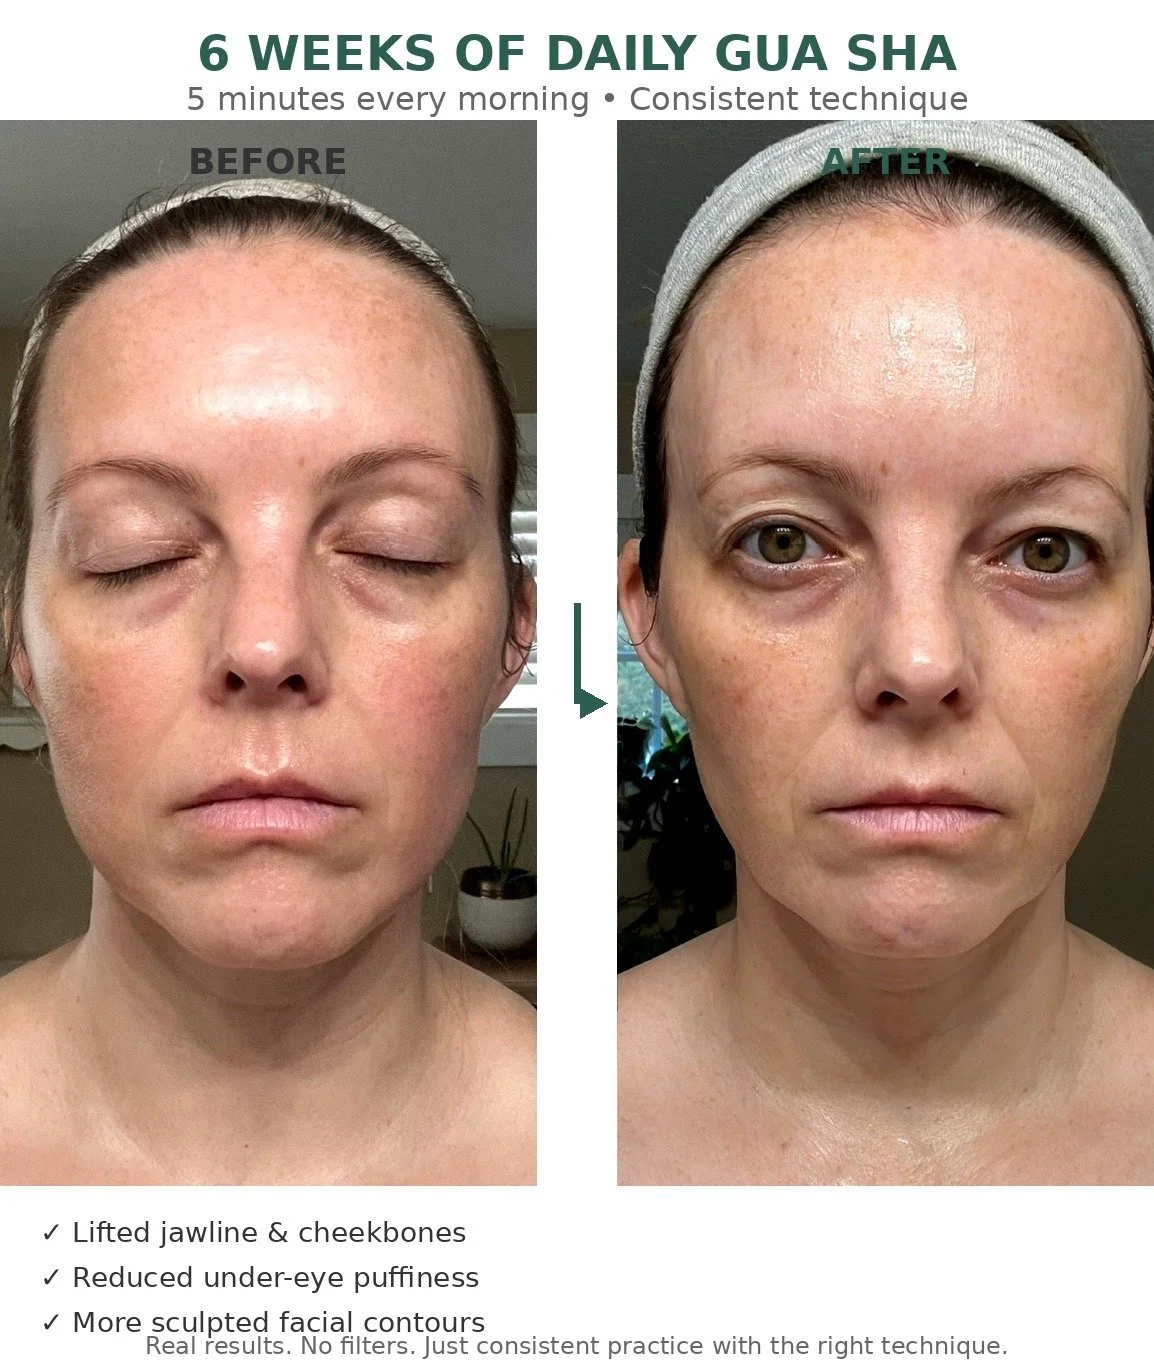
6 weeks of consistent Gua Sha. This is my before and after using my Glow & Lift Kit.
Why Gua Sha Results Look Different Than Botox
Botox = quick, muscle-freezing effect
Gua sha = gradual, tissue-supporting effect
Botox results can look smooth but sometimes flat.
Gua sha results look alive, sculpted, and naturally expressive.
It’s less “frozen forehead”
More “lifted, healthy face.”
What Makes Gua Sha So Effective?
It works on three major systems Botox does not:
1. Lymphatic System
Reduces fluid retention that causes heaviness and sagging.
2. Fascia
The connective tissue that holds the face together. When tight or stuck, it pulls downward.
3. Circulation
Brings nutrients and oxygen to the skin, supporting tone and glow.
You are improving the environment of the face, not just muting one muscle.
Who Might Prefer Gua Sha Over Botox?
Gua sha may appeal to you if you:
• Want a natural, non-invasive approach
• Prefer improving tissue health over freezing muscles
• Enjoy self-care rituals
• Want long-term maintenance vs repeated injections
• Are sensitive to the cost or commitment of Botox
A Personal Note
Many people explore both options at different stages of life. Some choose injectables. Others shift toward holistic methods.
For some, gua sha becomes more than skincare.
It becomes a ritual, a moment to slow down, connect, and support your body naturally.
And that in itself is powerful.
The Bottom Line
Botox and gua sha are not enemies.
They are different tools with different mechanisms.
Botox works at the neuromuscular level.
Gua sha works at the circulatory, lymphatic, and fascial level.
One is not automatically “better.”
But if you’re looking for a natural, at-home approach that supports your tissues and helps you feel connected to your beauty routine, gua sha is absolutely worth exploring.
You have options.
And understanding how each one works helps you choose what feels right for you.
Looking to try Gua Sha? I have a free 5-day challenge for you to learn the technique and process. Sign Up Below.

Gua Sha Mistakes Beginners Make (And How to Fix Them for Better Results)
Tried gua sha and thought, "Why isn't this working for me?" You're not doing it wrong because gua sha doesn't work, you're likely making one of a few very common beginner mistakes. From using too much pressure to skipping lymphatic prep, these errors can block results or even make your face look more swollen. Learn the 9 most common gua sha mistakes and exactly how to fix them for visible de-puffing, sculpting, and long-term skin health.
by Amber Boone, Holistic Aesthetician & Founder of Skin Soul Rituals
Tried gua sha and thought, “Why isn’t this working for me?”
You’re not doing it wrong because gua sha doesn’t work you’re likely making one of a few very common beginner mistakes.
Facial gua sha is incredibly effective for:
De-puffing
Sculpting
Improving circulation
Supporting long-term skin health
But it’s technique-dependent. Small errors can block results or even make your face look more swollen.
Let’s fix that.
Mistake #1: Using Too Much Pressure
Many beginners think gua sha should feel like deep muscle work. It shouldn’t.
Facial tissue contains delicate lymphatic vessels that sit close to the surface. Pressing too hard can:
Increase inflammation
Cause redness
Stress the skin barrier
Trigger puffiness instead of reducing it
Fix: Use light-to-moderate pressure. The tool should glide, not drag. Think “lifting and sweeping,” not scraping.
Mistake #2: Skipping Lymphatic Prep (Starting at the Face)
This is the #1 reason gua sha makes people feel more puffy.
Your lymphatic system needs an exit pathway. If you move fluid in the face without opening drainage points, it has nowhere to go.
Fix: Always begin at the neck and collarbone with gentle downward strokes. This signals the body where fluid should drain before you sculpt the face.
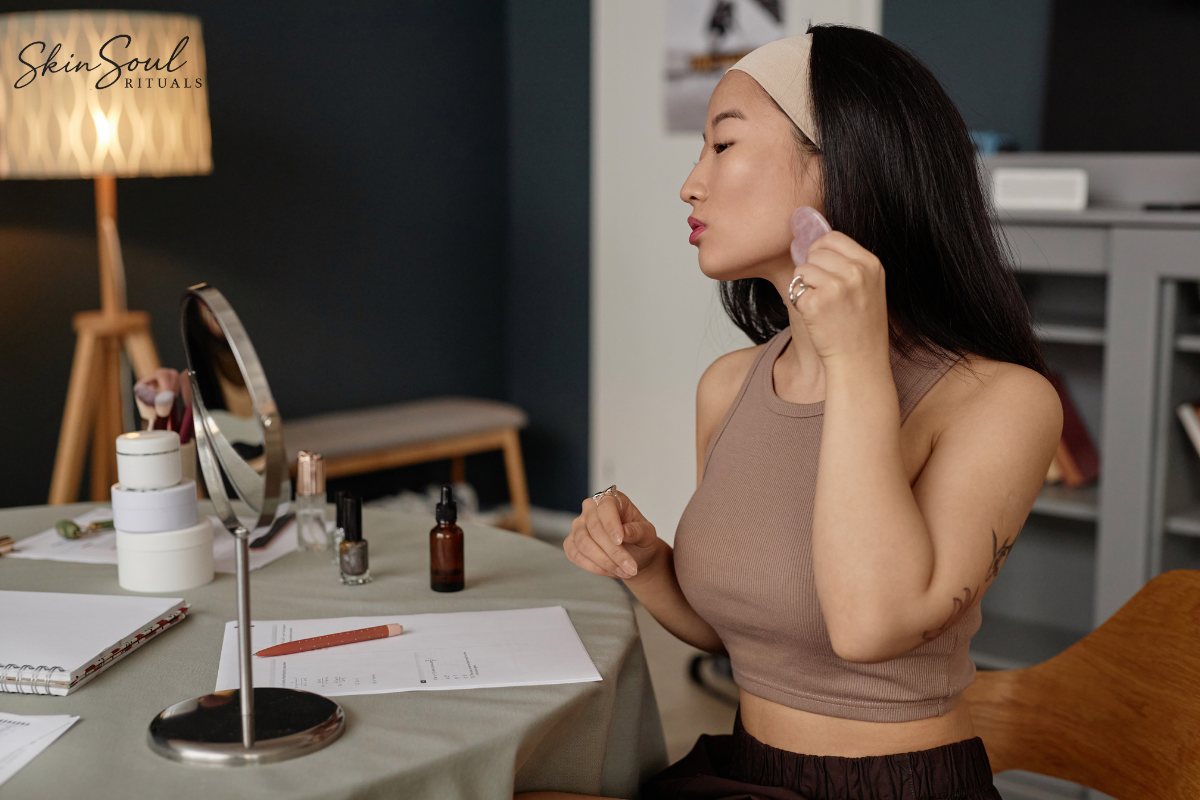
Mistake #3: Not Using Enough Slip
Dry or under-lubricated skin causes:
Tugging
Micro-stress to the skin
Reduced effectiveness
Gua sha works best when the stone glides smoothly.
Fix: Apply a nourishing facial oil or serum first. This supports the skin barrier and allows proper technique.
Mistake #4: Using a Decorative Stone Instead of a Functional One
Many tools look beautiful but aren’t designed for facial anatomy.
A poorly shaped stone makes it difficult to:
Fit under cheekbones
Follow the jawline
Work around the eyes
Address the neck properly
Fix: Choose a stone with multiple edges, curves, and rounded contours. The shape should work with your face, not against it.
Mistake #5: Moving Too Fast
Gua sha isn’t a quick scrub. Fast strokes don’t effectively support lymphatic flow.
Fix: Slow, intentional movements are key. Think rhythm, not speed.
Mistake #6: Being Inconsistent
Doing gua sha once in a while gives temporary de-puffing, but not sculpting.
Long-term benefits like improved tone and contour come from:
Regular circulation support
Releasing habitual muscle tension
Ongoing lymphatic movement
Fix: 3–5 minutes most days is enough.
Mistake #7: Expecting Instant Structural Change
Gua sha is not filler. It doesn’t force change, it supports your body’s natural systems.
Immediate results:
Reduced puffiness
Brighter tone
Gradual results:
More sculpted appearance
Softer tension lines
Better skin vitality
Fix: Track subtle improvements. They build over time.
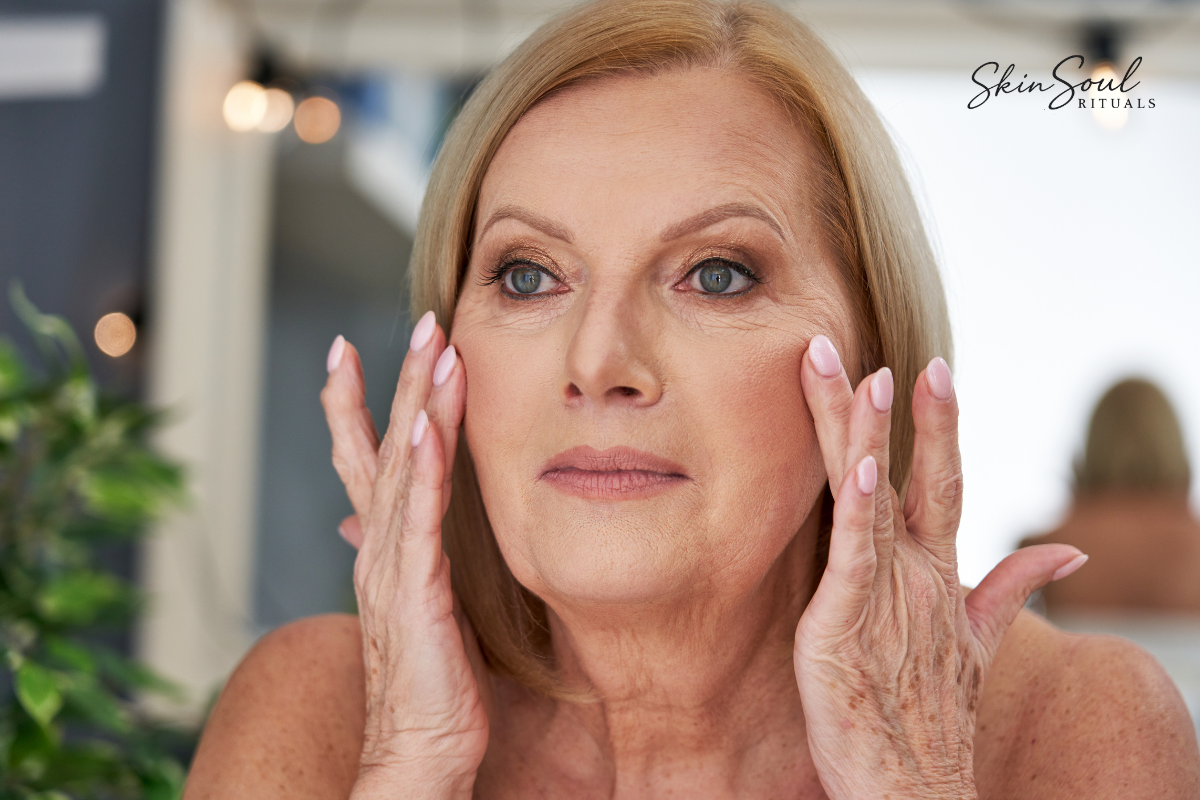
Mistake #8: Ignoring Facial Tension
Holding tension in the jaw, brows, or mouth area can limit results. Tight muscles pull the face downward.
Fix: Use gua sha as a relaxation tool, not just sculpting. Slow strokes + breath = better outcomes.
Mistake #9: Not Cleaning Your Tool
Bacteria transfer can lead to breakouts and irritation.
Fix: Wash with gentle soap and water after use.
Why Gua Sha “Doesn’t Work” for Some People
It’s rarely the practice. It’s usually:
Too much pressure
No lymphatic prep
Wrong tool
Inconsistency
When these are corrected, gua sha becomes one of the most effective natural sculpting rituals available.
Final Thoughts
If gua sha hasn’t worked for you yet, don’t quit, adjust and learn. If you ready to go deeper, join me for the 5-day Gua Sha Challenge. It’s free to sign up and teaches you the proper techniques to get results. Sign up here: 5-Day Gua Sha Challenge
The difference between “this doesn’t work” and “this is magic” is often just technique, tools, and consistency.
Once those align, results follow.

How Often Should You Do Gua Sha for Visible Results?
Not sure how often to do gua sha for visible results? Discover the ideal gua sha frequency, how long results take, and how to build a ritual that actually works.
by Amber Boone, Holistic Aesthetician & Founder of Skin Soul Rituals
As an aesthetician, one of the most common questions I hear about gua sha is:
“How often should I actually be doing this to see results?”
And the honest answer is refreshing, you don’t need to do gua sha every single day for it to work. Consistency matters but pressure and intention also play a role in getting results.
When gua sha is done correctly, it supports lymphatic flow, releases facial tension, and improves circulation. All of which contribute to a more sculpted, lifted, and radiant appearance over time.
Let’s break down what works.
How Gua Sha Works (Why Frequency Matters)
Gua sha isn’t about forcing change in the face. It’s a gentle approach and works by:
Encouraging lymphatic drainage
Relaxing overworked facial muscles
Supporting circulation and glow
Helping fluid move where it naturally wants to go
Because these systems respond best to gentle, repeated signals, gua sha delivers results through regular practice, not intensity.
How Often Should You Do Gua Sha?
The sweet spot for visible results:
By practicing 3-5x per week you’ll see visible changes to your face.
This frequency:
Keeps lymph moving
Prevents fluid buildup
Allows facial muscles to soften and rebalance
Avoids irritation or over-stimulation
For most people, this is where results start to build to feel noticeable and sustainable. It becomes a part of your daily skincare routine that you really enjoy.
Can You Do Gua Sha Every Day?
Yes, absolutely if your using the right technique.
Daily gua sha works well if:
You’re using very light pressure
You’re moving slowly
You’re using enough face oil for slip
This is especially helpful if you experience:
Morning puffiness, it’s great for de-puffing the face and underneath the eyes.
Jaw or neck tension, this works great to release tightness and tension
Sinus congestion
That said, daily gua sha isn’t required to see results. Many people see beautiful changes with just a few intentional sessions per week.
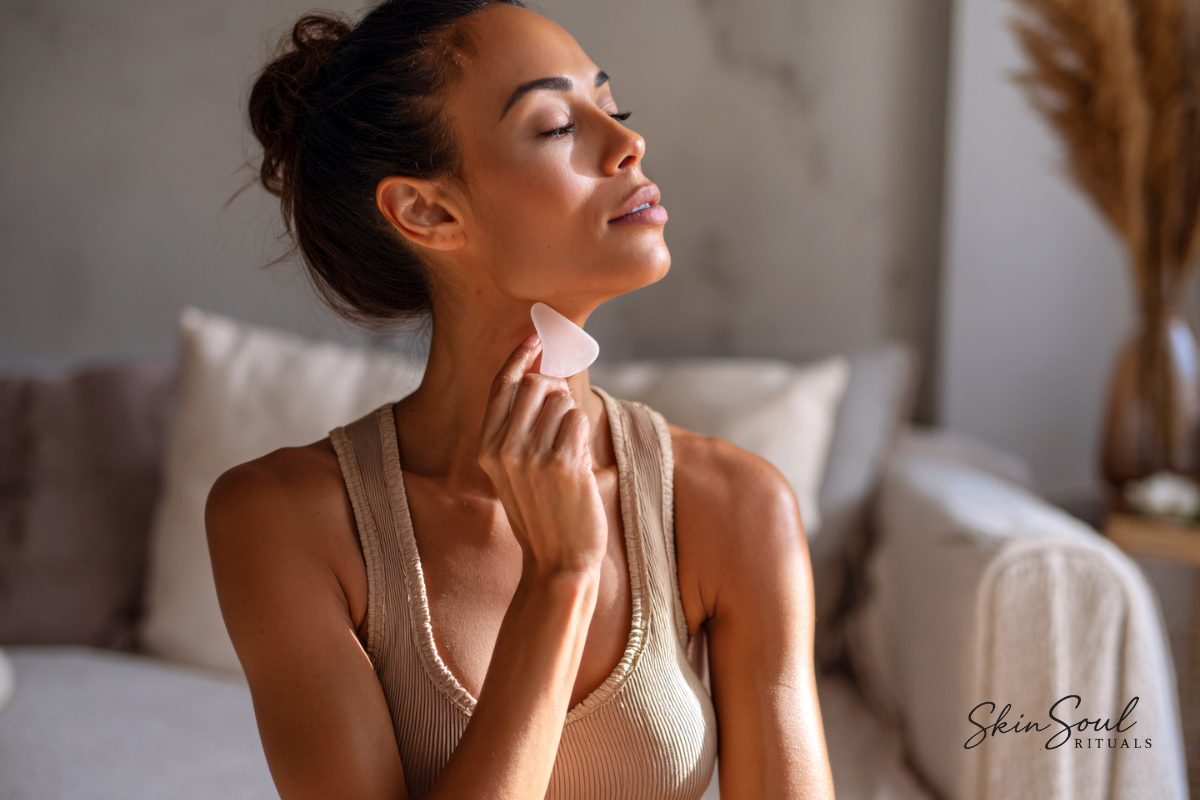
How Long Does It Take to See Results?
Most people notice:
Reduced puffiness right away with best results being in 1–2 weeks
Improved glow immediately as it works on creating improved circulation with best results in 2–3 weeks
Subtle sculpting and definition is more of a long game approach so it takes a little longer and typically can see results within 4–6 weeks
The biggest changes come from cumulative practice, not chasing instant results.
Think of gua sha like yoga for your face, the benefits build quietly over time.
Signs You’re Doing Gua Sha Too Often (or Too Hard)
More isn’t always better.
If you notice:
Redness that lingers
Tenderness or irritation
Breakouts from friction
Feeling rushed or stressed during practice
That’s your cue to slow down, take a breath and lighten your pressure.
Gua sha should feel calming, not aggressive. It’s a slow, feel good practice.
Morning vs Evening: Does Timing Affect Frequency?
Yes, timing can help you use gua sha more effectively.
Morning gua sha best for:
Reducing puffiness
Boosting circulation
Great for lighter, shorter sessions
Evening gua sha best for:
Releasing tension
Supporting relaxation
Ideal for deeper muscle release
Many people find:
For Morning or Evening I would do 5–10 minutes 3-5x week. The best time is when you will do it so pick your favorite and stick to a routine.
You don’t necessarily need long sessions, you need consistent ones.
Why Face Oil Makes a Difference
Proper slip is essential. When you find the right facial oil it all comes together. If you want to learn more about the best oil to use for gua sha. Read this blog next: Best Facial Oil for Gua Sha
Using a nourishing face oil:
Prevents tugging
Protects the skin barrier
Allows the tool to glide smoothly
Makes your ritual practice more enjoyable
This is why gua sha works best as part of a complete ritual practice, not just a stone on dry skin.
A Simple Weekly Gua Sha Schedule
If you want an easy rhythm to follow, try this:
3 evenings ( Monday-Wednesday-Friday) per week: full 5–10 minute ritual
Optional mornings: quick de-puffing as needed
This balance delivers visible results without feeling overwhelming. It’s easy to make a routine.
Why Consistency Beats Perfection
The biggest mistake people make with gua sha isn’t technique, it’s inconsistency.
You don’t need:
Perfect strokes, you will get better as you go
Long routines, make the most of 3 minutes if that’s all you have
Daily commitment, make this a non-negotiable in your self-care routine
You need a routine that feels good enough to return to again and again.
That’s where results come from.
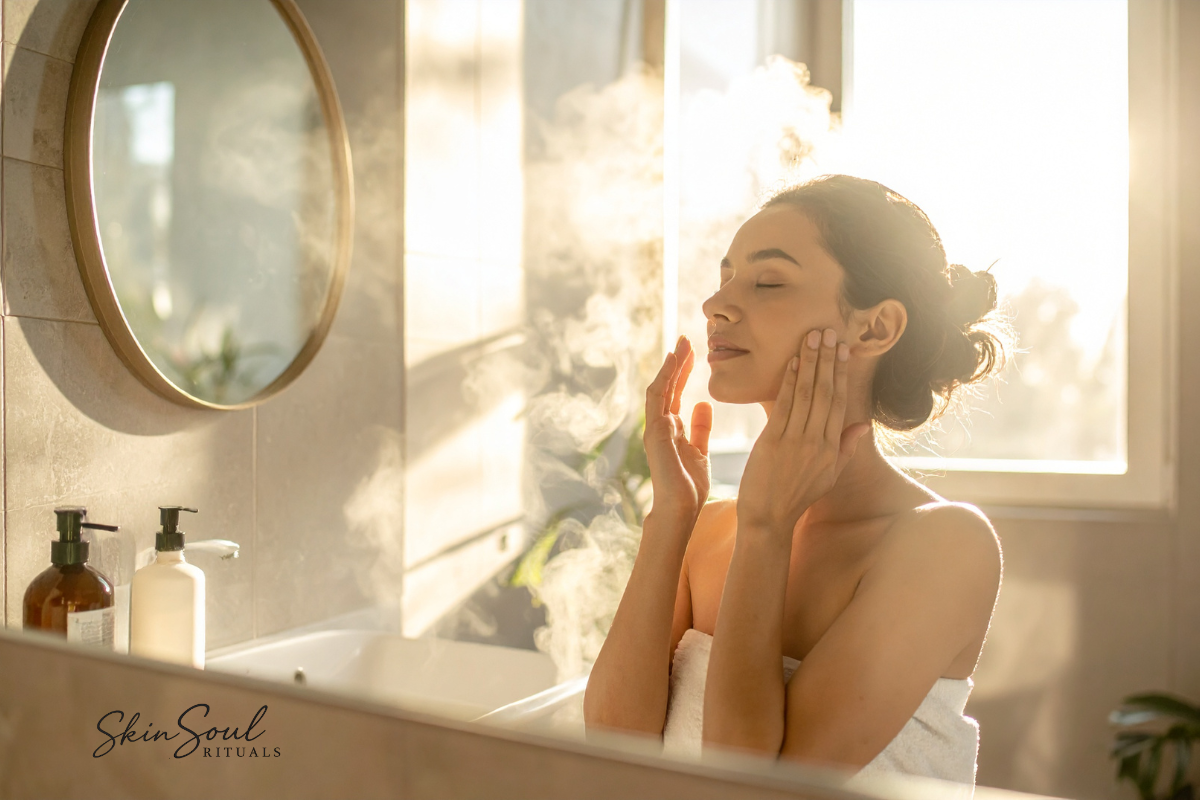
Supporting Results with the Right Tools
Using a well-designed gua sha stone and a supportive face oil makes consistency easier, especially if you’re working with mature or sensitive skin.
The Glow & Lift Kit was created to support gentle, effective gua sha rituals that fit into real life so results can build naturally over time.
Explore the Glow & Lift Kit to support your gua sha practice with intention and ease.
Final Thoughts
So, how often should you do gua sha for visible results?
3–5 times per week.
Gentle pressure.
Consistent rhythm.
A ritual practice you’ll enjoy.
That’s the formula.
And when gua sha becomes something you look forward to, your skin reflects it.
New to gua sha? If you’re looking for guidance, check out my 5 day video series. It’s 5-days of guided gua sha tutorials led by me. You’ll be a pro in no time. Sign up here and start your gua sha journey. Gua Sha Foundations.

The Intention Behind Skin Soul Rituals: Why Every Product Is Chosen With Purpose
The feather that found me, the philosophy behind Skin Soul Rituals, and why every product is intentionally chosen to help women slow down, breathe, and reconnect.
by Amber Boone, Holistic Aesthetician & Founder of Skin Soul Rituals
There are symbols we choose and then there are the ones that seem to find us.
When I started building Skin Soul Rituals, I knew I wanted the brand to feel intentional, grounding, and meaningful. I kept trying to land on a symbol that felt right… and honestly, nothing stuck. If you know me, you know I can change my mind a lot, so that didn’t help.
Then the feather kept showing up.
At first, I just liked how it looked. It had that soft, boho, natural vibe I was drawn to. But when I looked into what the feather actually symbolizes, everything clicked in a way I didn’t expect.
The feather represents freedom, the ability to rise above, move lightly, and release what no longer serves you. It represents softness, trust, and the ability to soar without force.
And that’s exactly what Skin Soul Rituals is about.
Why I Created Skin Soul Rituals
As women move through their 30s, 40s, 50s and beyond, life doesn’t usually slow down, it gets fuller, heavier, and more layered. We carry more responsibility, more mental load, more expectations.
Somewhere in that, we stop pausing.
Skin Soul Rituals was born from a desire to give women small moments back.
Not a complicated routine.
Not more pressure.
Not another thing to keep up with.
But small, grounding moments that help calm the nervous system, create space to breathe, and reconnect to yourself.
Sometimes we just need a minute to reset. A quiet moment when everything feels heavy. A breath in, a breath out moment. A reminder that we’re allowed to take care of ourselves too. We’re allowed to take a pause and reset when everything feels heavy.
That’s where every guided practice and collection begins.
I always ask myself: Will this help a woman feel calmer, more grounded, more connected to herself?
If the answer isn’t a resounding YES, it doesn’t belong here in this space. This brand isn’t about mass production. It’s about soulful intention.
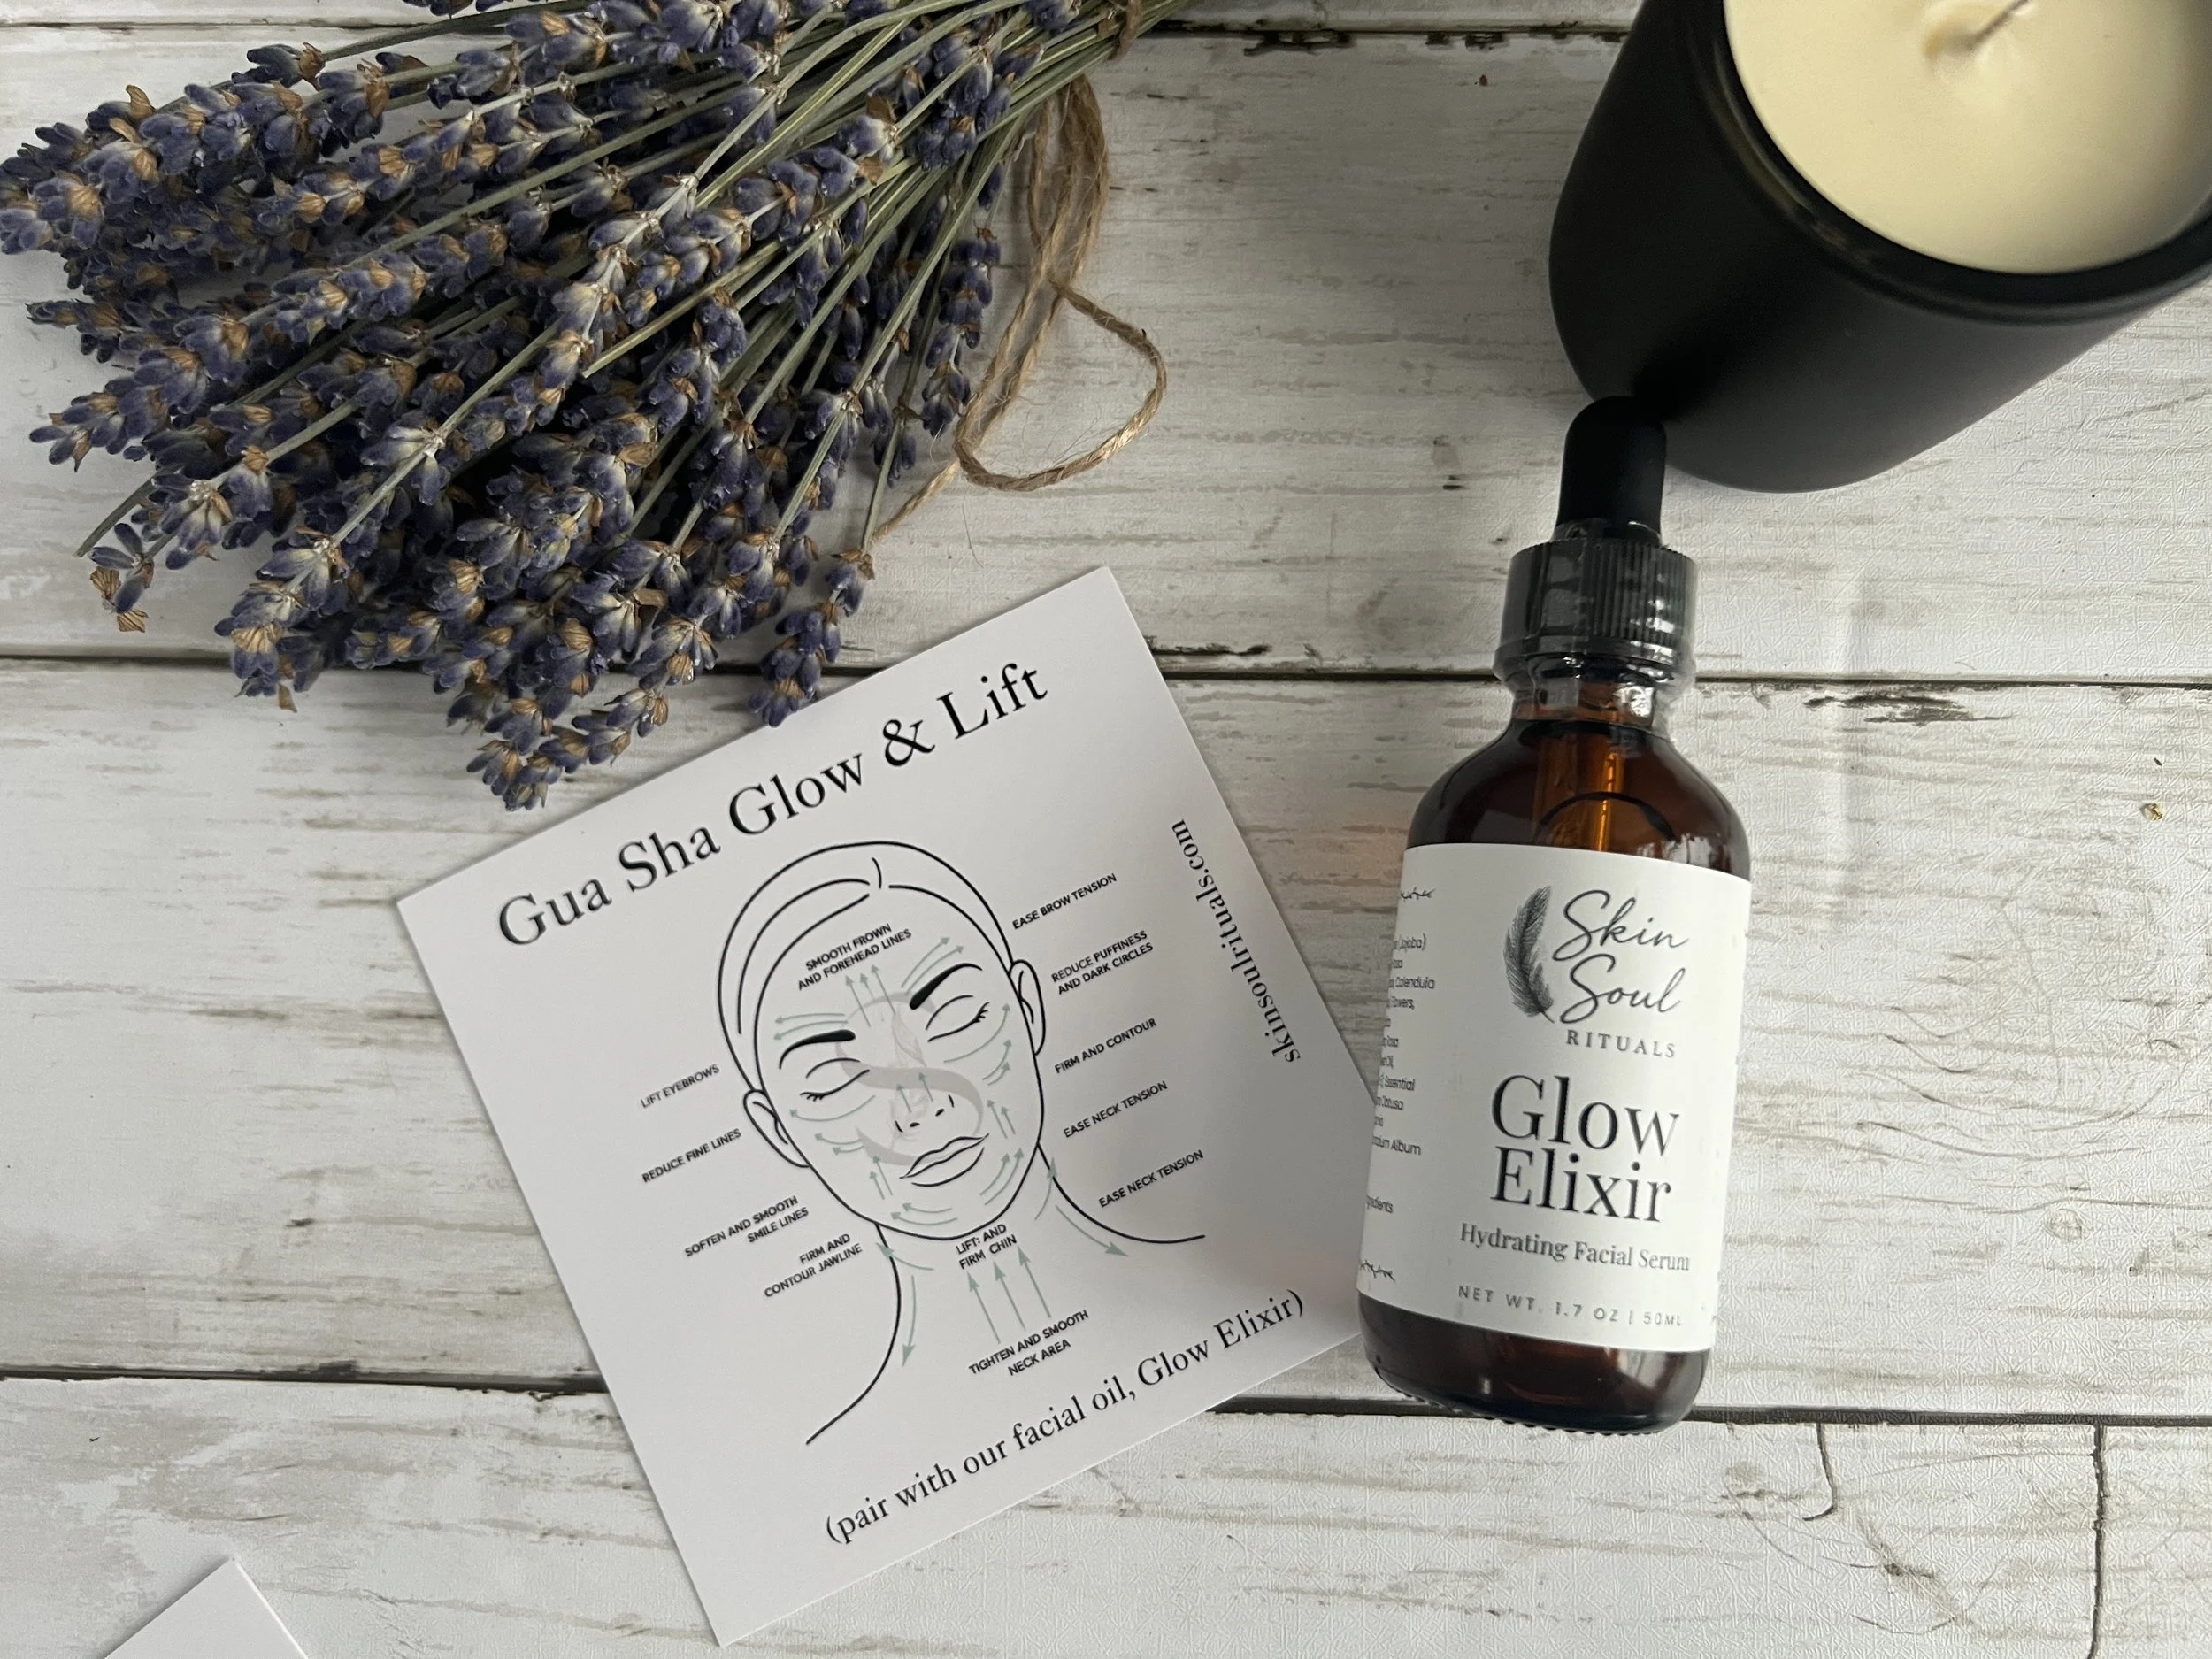
What Beauty Means Here
In this space, beauty isn’t about chasing some version of yourself the world says you should be. I struggled with this in sales, we were suppose to look a certain way, act a certain way and it just wasn’t true to who I was or even who I wanted to be.
Beauty is confidence.
Beauty is self-connection.
Beauty is the freedom to be fully you.
We shouldn’t need permission to show up as ourselves but sometimes I think we forget that and the pressure and expectations to be a certain way or look a certain way is exhausting. Skin Soul Rituals is about dissolving pressure, expectations and simply giving ourself space to let go of what is no longer serving you. You don’t need permission, you just need to be reminded. Let go, breathe and simply be you.
It’s the glow that comes from feeling at home in your skin, not trying to become someone else. That changes everything. It ignites a spark that’s contagious. The only definition of beauty you should be concerned with is your own. You get to decide. What makes you feel beautiful?
Why Every Product Is Chosen Intentionally
Nothing in this brand is random. I’ve carefully curated the products, the intention and the space I wanted Skin Soul Rituals to create.
Every guided practice and curated collection is chosen to:
Ground you
Uplift you
Give you space
Help you breathe
Offer a moment to regroup
These aren’t just skincare or self-care practices. They’re a solid foundation for nervous system support, for emotional reset, for coming back to yourself.
I want these to be ritual practices that you can return to, something familiar that says, you’ve got this.
The Space I Hope This Brand Creates
More than anything, I want Skin Soul Rituals to feel like a safe, grounding supportive space.
A place where you know what you’re reading and using was created with so much care and intention. A place that lifts you instead of overwhelming you. A place that feels calm, grounded, and supportive.
I want you to feel:
calm
safe
empowered
cared for
Like you’re doing something good for yourself, not because you have to, but because you want to because it feels good and aligns. Because it resets your nervous system and gives a moment to breathe. Every collection or ritual practice should feel like an experience.
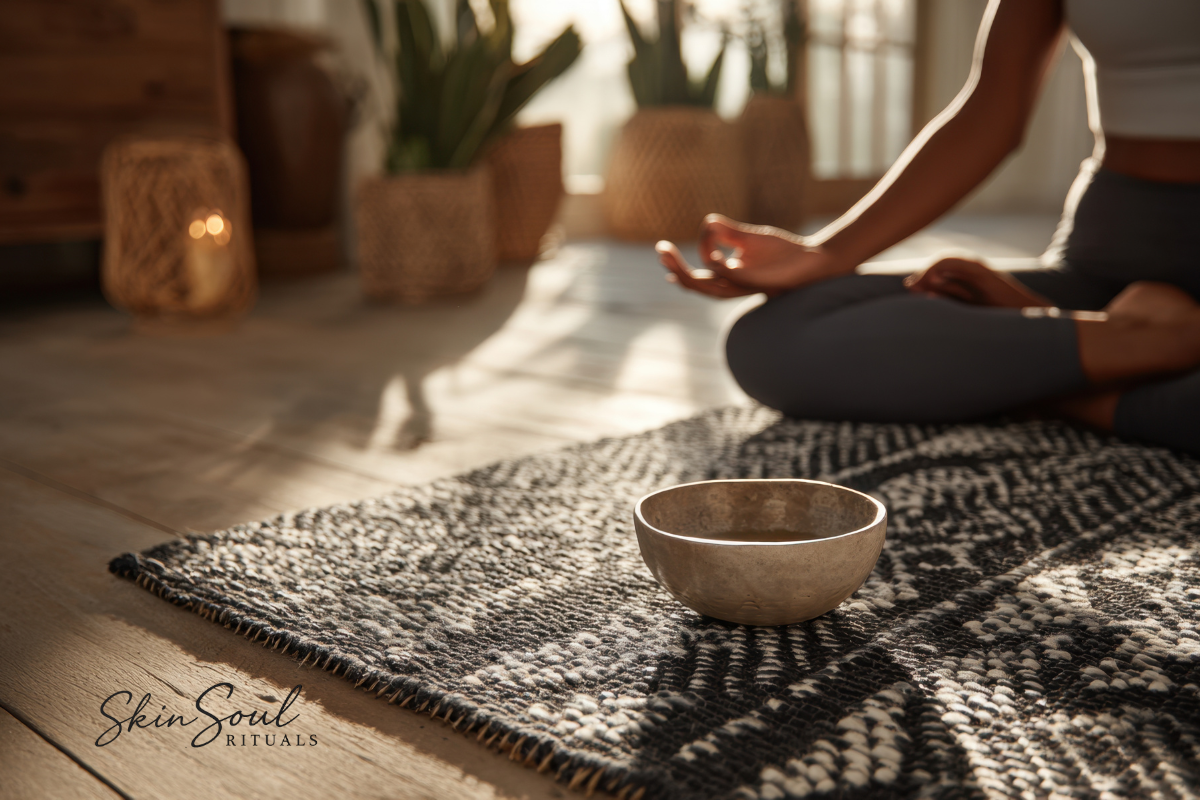
What I Won’t Do
I won’t create products just to have more products. No mass production here.
I won’t chase every trend.
I won’t overwhelm you with clutter.
Everything here has to feel meaningful, comforting, and aligned with the ritual-based practices & heart of this brand.
The Feather as a Reminder
The feather reminds me that building something meaningful is a journey. That we don’t have to rush becoming. We don’t have to have everything figured out yesterday. Although, I know that’s sometimes exactly how it feels. That lightness comes from letting go of what weighs us down and truly embracing who we are and who we are becoming. The beauty of it all, you’re allowed to change your mind, change directions, do something different or something not planned… anytime you want or need too. Redirect, reframe and move forward boldly into the beautiful life that we are so blessed to live every day.
We are not behind, we are right where we are meant to be.
My hope in sharing this is that when you experience Skin Soul Rituals, you feel supported, cared for, and reminded that you can pause… breathe… and return to yourself.

Does Your Gua Sha Stone Actually Matter: An Aestheticians Honest Guide
Does your gua sha stone actually matter? Yes, more than you think. From material and weight to shape and craftsmanship, the right tool can improve results, protect your skin, and elevate your facial sculpting ritual.
by Amber Boone, Holistic Aesthetician & Founder of Skin Soul Rituals
You've probably noticed that gua sha stones come in every color, material, and price point imaginable. And if you've ever wondered whether the material actually matters, it does. More than most people realize.
I've been a licensed aesthetician for over a decade, and gua sha has been part of my practice from the beginning. I fell in love with it early, for the results, yes, but also for the way it feels. Rooted in touch, rhythm, and intention, it's a practice that has stood the test of time for a reason.
But here's what doesn't get talked about enough: your stone comes into direct contact with your skin, your fascia, your lymphatic system, and even your nervous system. It becomes part of the experience. Which means the material it's made from and the integrity behind it, deserves real consideration.
So today I'm breaking it all down for you.
What Makes One Stone Different From Another
Many gua sha tools on the market are mass-produced from dyed glass or synthetic materials. They may look beautiful, but not all tools offer the same experience or results.
Some of our favorite Gua Sha Stones
Weight & Feel
Natural stone carries a different weight and presence than lightweight imitations. That subtle weight helps create steady, controlled movements rather than rushed or uneven pressure.
Temperature
Natural stone holds coolness longer, which can feel calming and soothing on the skin especially during a slow, mindful ritual. This cooling effect also makes it supportive for de-puffing and encouraging circulation for a healthy glow.
Shape & Function
A well-designed stone supports the natural curvatures of the face and neck. It should glide along contours without tugging and allow for sculpting, lifting, and lymphatic movements with ease.
We’ll talk more about shape below, because this is where results truly change.
Authenticity
We prioritize natural stone because we believe materials carry integrity. Authentic sourcing takes more time and care, but it aligns with how we approach everything we create from our formulations to tools.
The Energetic Side of Ritual
For centuries, stones have been used in practices connected to grounding and balance. Whether you see this through an energetic lens, emotional awareness, or simply the psychology of intention, the materials we use affect how we feel.
When something feels meaningful, we return to it.
And consistency is where the real results happen.
Why Gua Sha Stone Shape Matters More Than You Think
Facial gua sha works by:
• Encouraging stuck lymphatic drainage
• Releasing facial tightness and tension
• Supporting circulation and contour
Your face isn’t flat and a poorly designed stone can’t properly follow facial anatomy.
When the shape is wrong:
Pressure is uneven
Movements feel clunky
Certain areas get skipped
Results are inconsistent
A well-designed stone should fit your face, not force your face to adapt to it.
Best Gua Sha Stone Shapes (What To Look For)
1. Curved Edge (Jawline + Cheekbones)
A long, smooth curve is essential for sculpting the jawline, lifting the cheeks, and releasing masseter tension.
Why it matters: Flat or overly sharp edges can irritate skin and limit lift.
2. Notched or U-Shape (Jaw + Chin Area)
A gentle notch allows you to sculpt both sides of the jaw evenly and create definition without excessive pressure.
Especially helpful for beginners learning placement.
3. Small Tip/ Or Edged Corner (Under-Eyes + Delicate Areas)
A small tip or edged tip supports under-eye lymphatic drainage and temple work without irritation.
The best tips increase the risk of broken capillaries and sensitivity.
4. Broad Flat Side (Neck + Lymphatic Prep)
The neck is where gua sha should begin but many stones ignore this.
A flat surface allows for gentle lymphatic opening and smooth neck work. One of my favorites.
Materials: What to Know
Natural stone supports durability and glide, but results come from technique and shape.
High-quality stones:
• Feel smooth against the skin
• Have consistent weight
• Don’t drag or snag
• May vary slightly in color or translucency (this is normal)
What to Look for in a Beginner-Friendly Stone
If you’re new to gua sha, choose a stone with:
Multiple usable edges
Rounded, smooth contours
A shape that works for jaw, cheeks, eyes and neck
A comfortable grip
The goal is for it to be easy to use and choosing these qualities in a stone will help you get off to a good start. Some of my favorites I’m currently working with are white jade, moss agate and green aventurine.
Natural Variation Is Part of the Beauty
It’s also important to note that natural stones are not always perfectly uniform. Variations in color, veining, and translucency are signs of authenticity.
Your tool is uniquely yours.
How to Clean & Care for Your Gua Sha Stone
Your gua sha tool touches your skin, oil, lymphatic fluid, and hands, so keeping it clean isn’t optional. A well-cared-for stone not only lasts longer, it protects your skin and keeps your ritual feeling fresh and hygienic.
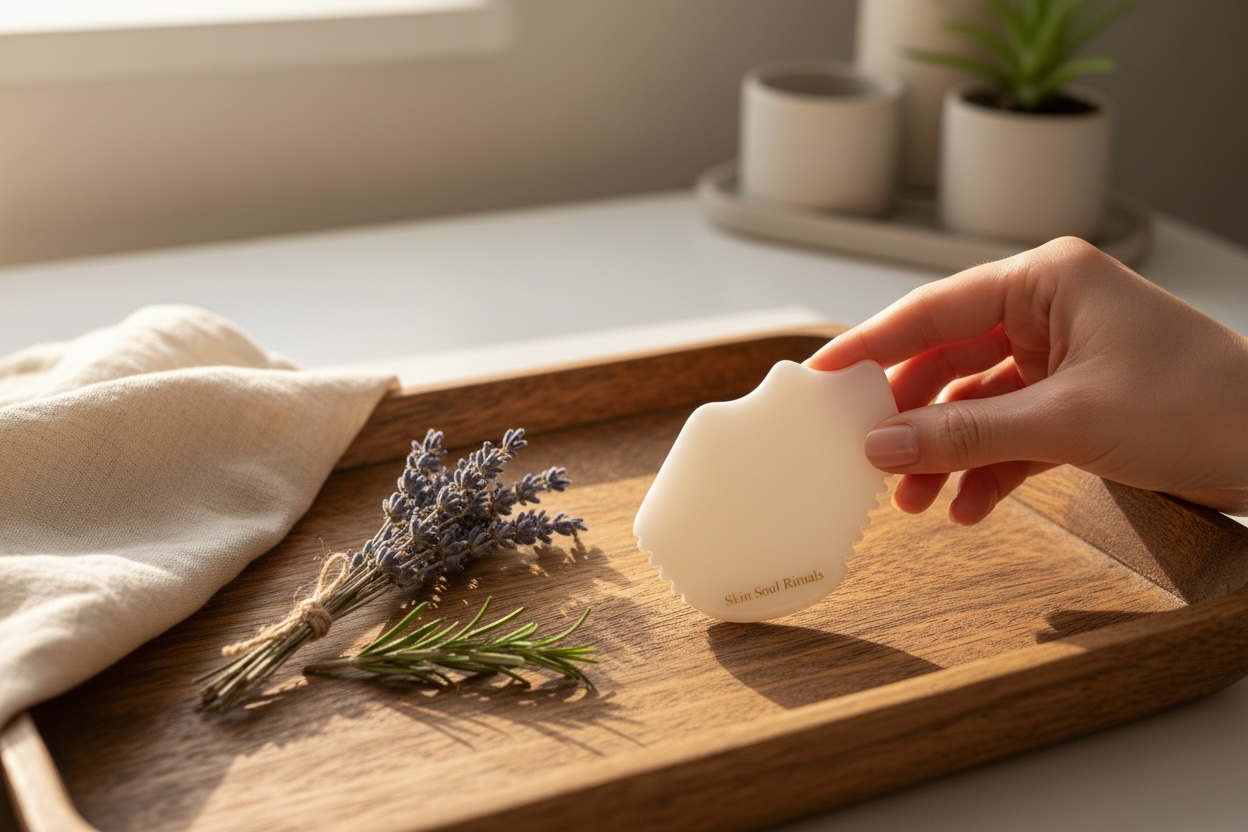
Remember to Clean Your Stones After Every Use with a Gentle Cleanser
After Every Use (Quick Clean)
Rinse with lukewarm water
Avoid hot water, extreme temperature changes can stress natural stone.Use a gentle cleanser
A mild soap, facial cleanser, or natural dish soap works well. Rub with your fingers, not a rough cloth.Rinse thoroughly
Make sure no residue from oils or cleanser remains.Dry completely
Pat dry with a clean towel and allow it to air dry before storing.
Weekly Deep Clean
If you use facial oils regularly (especially thicker oils), give your stone a deeper clean once a week.
Wash with gentle soap and warm (not hot) water
Use a soft toothbrush to clean edges and grooves
Rinse well and dry fully
This prevents oil buildup that can make the tool slippery or dull.
What Not to Do
Natural stone is strong, but it isn’t indestructible.
Avoid:
Boiling water
Soaking for long periods
Harsh chemicals or alcohol
Dropping it on hard surfaces
These can weaken the stone, fade its finish, or cause cracks.
Storage Matters Too
Store your gua sha tool:
In a dry place
In a soft pouch or box
Away from moisture or steam (like the shower)
Keeping it protected prevents chips and keeps your ritual feeling intentional rather than tossed in a drawer.
The Right Stone Makes All the Difference.
Gua sha isn't about collecting tools, it's about choosing one that actually works with your face, your hands, and your life.
When the shape fits your anatomy, something shifts. Results come faster. The ritual feels intuitive. And you actually want to come back to it tomorrow. That's where the real transformation lives not in one session, but in the consistency that a good tool makes possible.
If you're ready to stop guessing and start seeing results, we made it simple.
Our Glow & Lift Kit includes everything you need to begin, the right stone, the right botanical oil, and access to my 5-Day Gua Sha Foundations video series so you can pick it up with total confidence from day one.
Already have a stone? Grab the free 5-Day Gua Sha Challenge and learn the exact techniques that make the real difference.
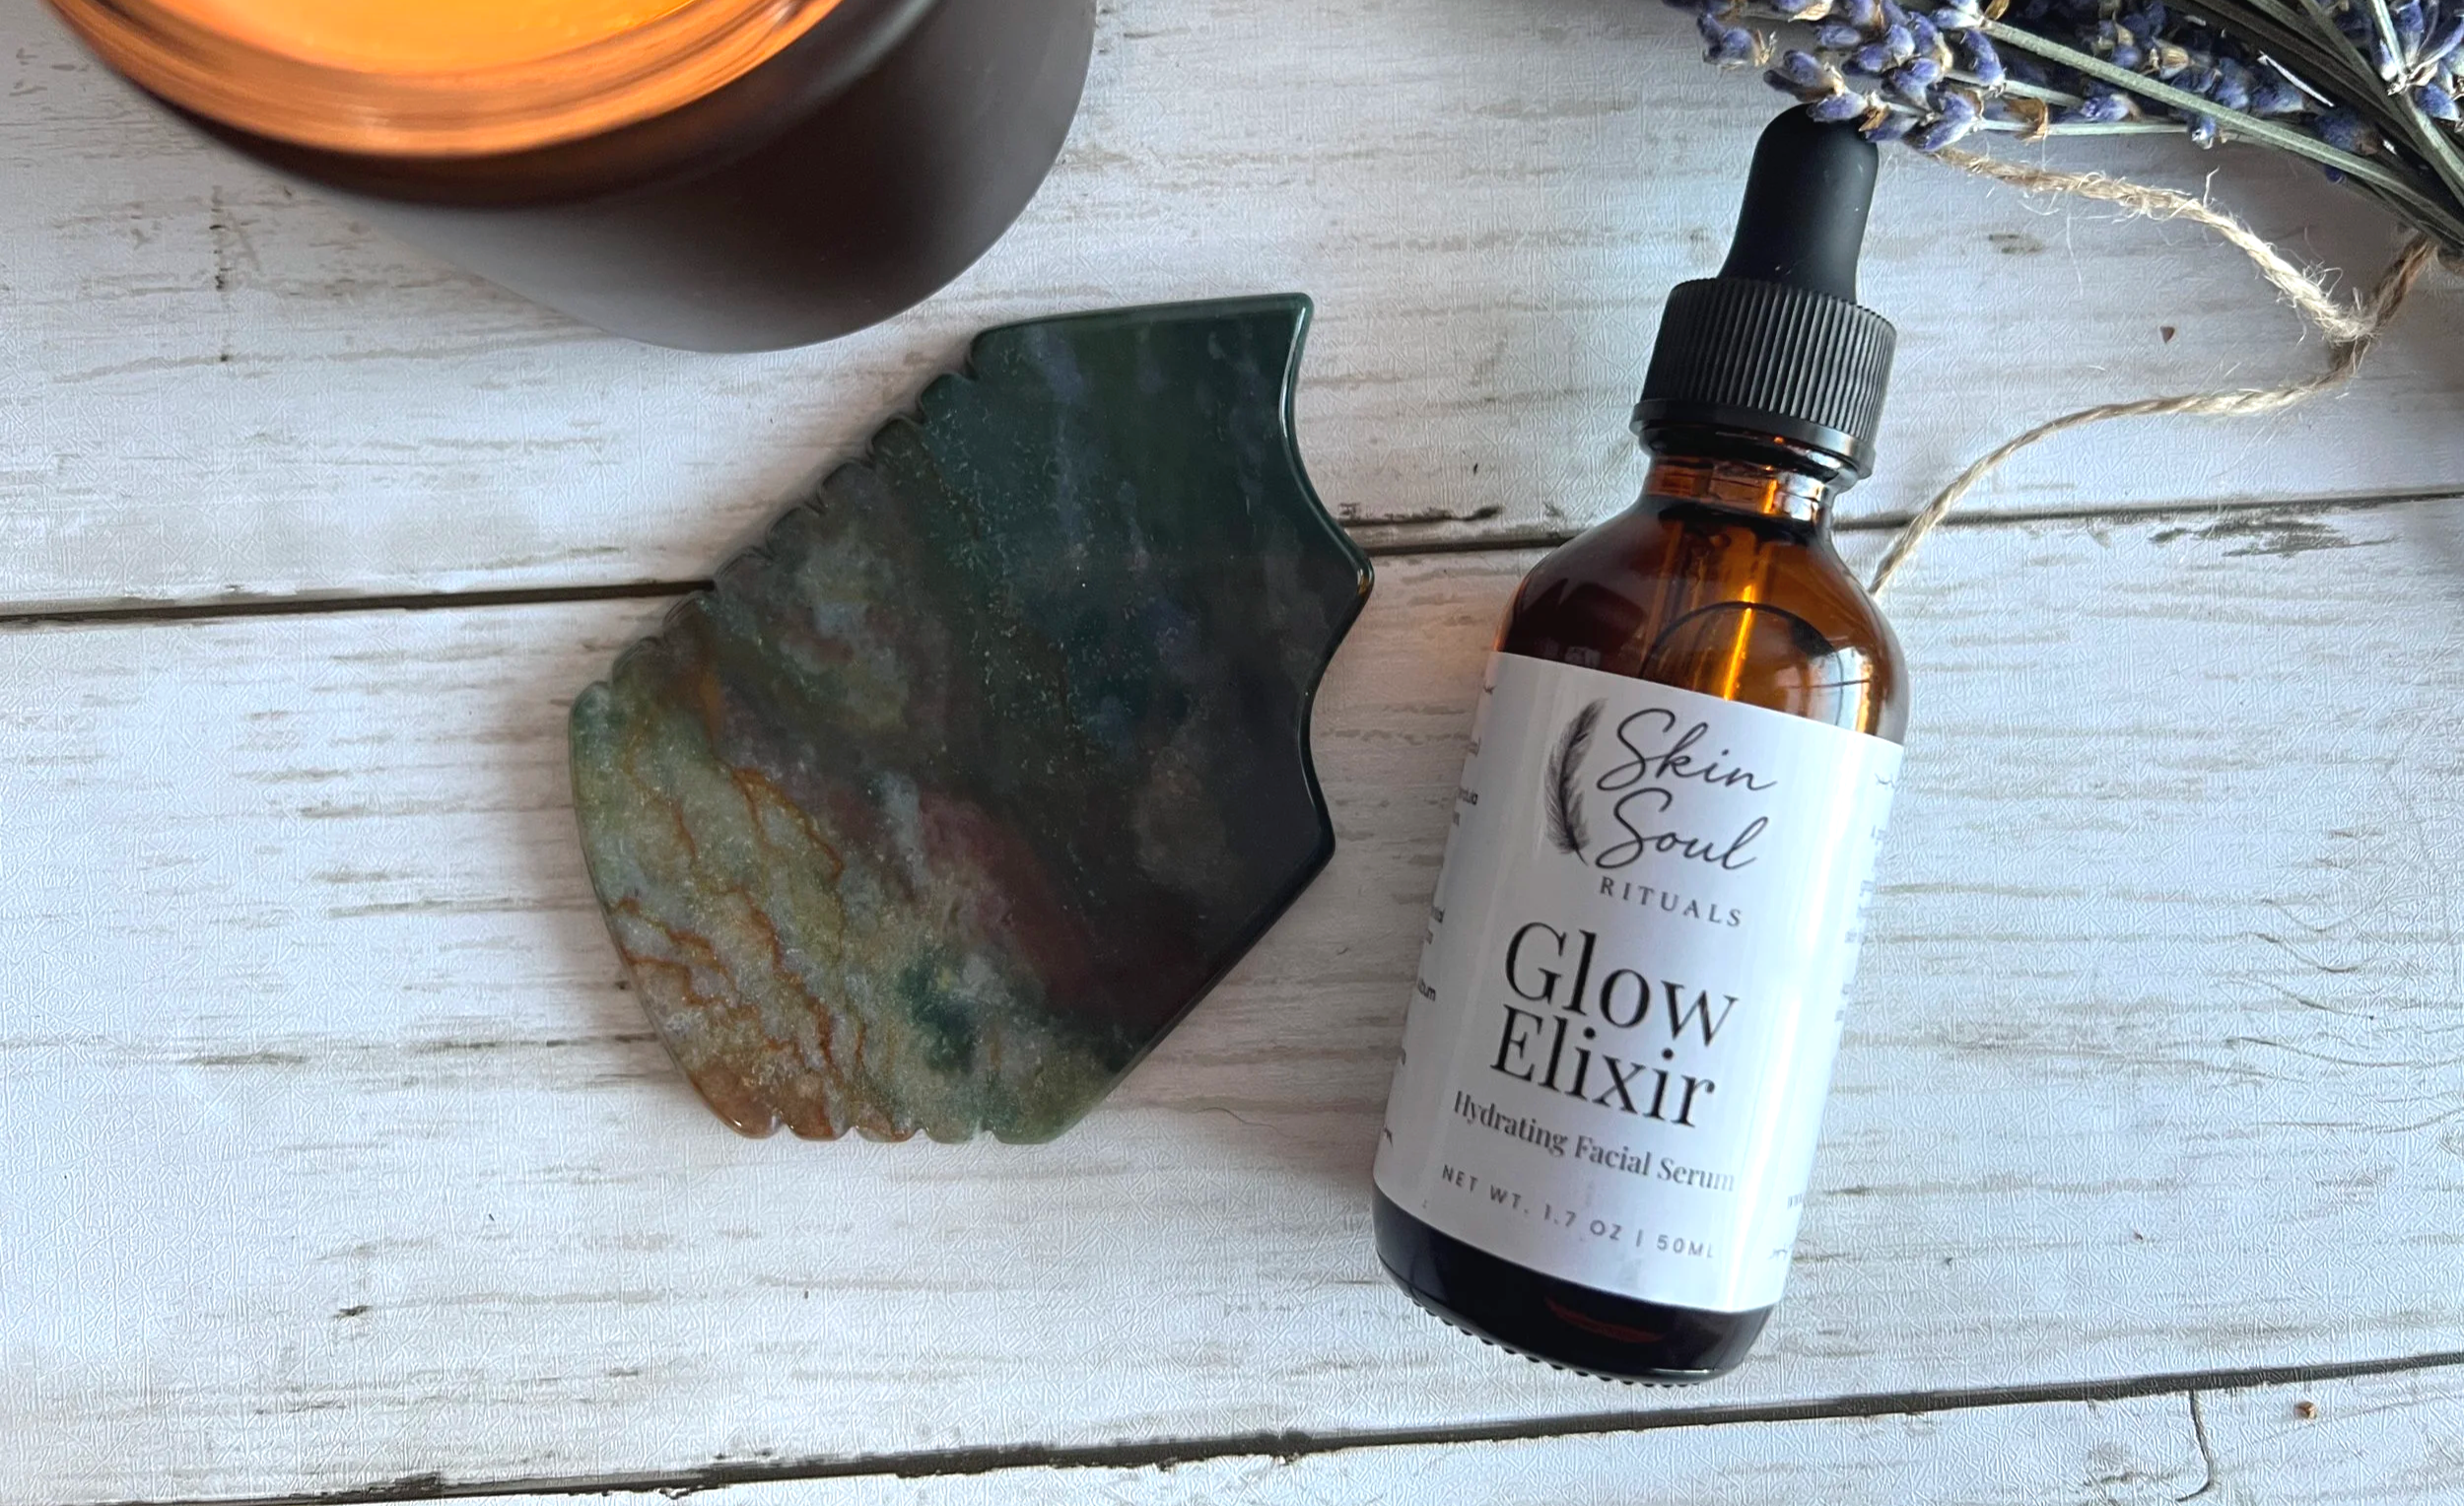
Start Your Transformation
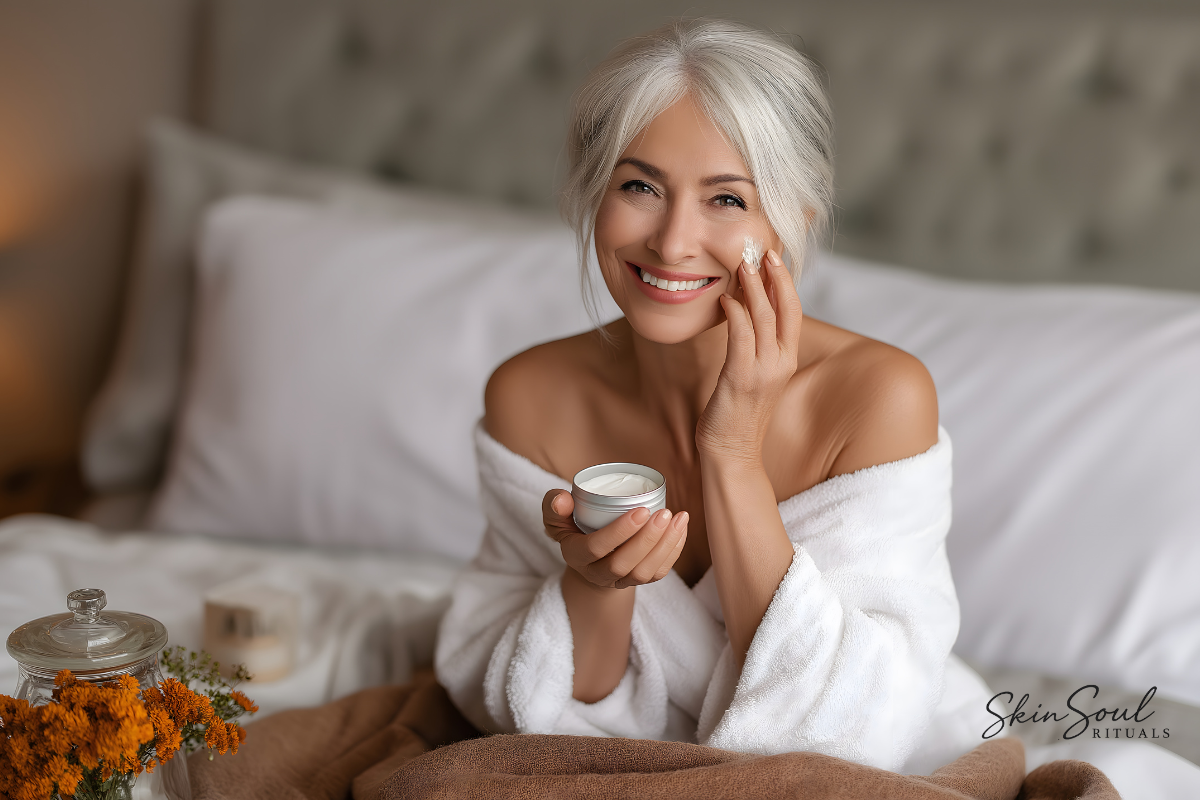
Gua Sha for Beginners: How to Start & See Results
New to gua sha? This beginner-friendly guide breaks down how to start, what tools matter, and how to see real lifting and sculpting results.
by Amber Boone, Holistic Aesthetician & Founder of Skin Soul Rituals
If you’re new to gua sha and wondering whether it actually works or maybe how to do it to see results, you’re not alone.
Gua sha has exploded in popularity over the last few years and some may believe it’s just a trend but as a licensed aesthetician with over a decade of experience I can confidently say, it works!
When done correctly, gua sha can lift, sculpt, de-puff, and support healthy skin aging, it requires a few things to get started, the right tools, technique and consistency are key to getting results. But don’t worry we’ll go over everything you need and if you would like further guidance, sign up for my Gua Sha Foundations video series. It will teach you a step-by-step guided gua sha routine.
In this beginner’s guide, you’ll learn:
What gua sha actually does
How to start safely and effectively
Common mistakes beginners make
How to see visible results faster
What Is Gua Sha?
Gua sha is a traditional East Asian healing technique that involves gently gliding a smooth stone across the skin to stimulate circulation, support lymphatic drainage, and release facial tension.
Originally used on the body, facial gua sha is a refined, gentle version designed to:
Reduce puffiness
Improve circulation
Support collagen production
Sculpt facial contours
Relax tight facial muscles
Unlike quick fixes, gua sha works with your skin, not against it.

Does Gua Sha Really Work?
Yes, when done correctly and consistently you can see and feel great results.
Gua sha works by:
Encouraging lymphatic drainage (which reduces puffiness)
Increasing blood flow (which supports glow and vitality)
Releasing muscle tension (which softens lines caused by facial holding patterns)
Many people don’t see results because they:
Use too much pressure
Skip lymphatic preparation
Use poor-quality tools
Don’t follow a consistent routine
When gua sha is approached as a ritual, not a trend, results will follow.
What You Need to Start Gua Sha (Beginner Essentials)
Before you begin, gather these essentials:
1. A High-Quality Gua Sha Stone
Not all stones are created equal. A well-shaped, smooth stone makes a huge difference in results and comfort.
Look for:
Smooth edges (no sharp corners)
Natural stone (each piece will vary slightly)
Shapes that fit the jawline, cheekbones, and neck (bonus if it has a perforated edge side)
2. A Facial Oil or Serum
Never perform gua sha on dry skin. This can cause irritation and tugging neither feel good or are good for the skin.
A nourishing oil helps:
Protect your skin barrier
Improves gua sha glide
Enhance overall results
3. Clean Skin
Always start with freshly cleansed face and neck to avoid pushing impurities deeper into the pores.
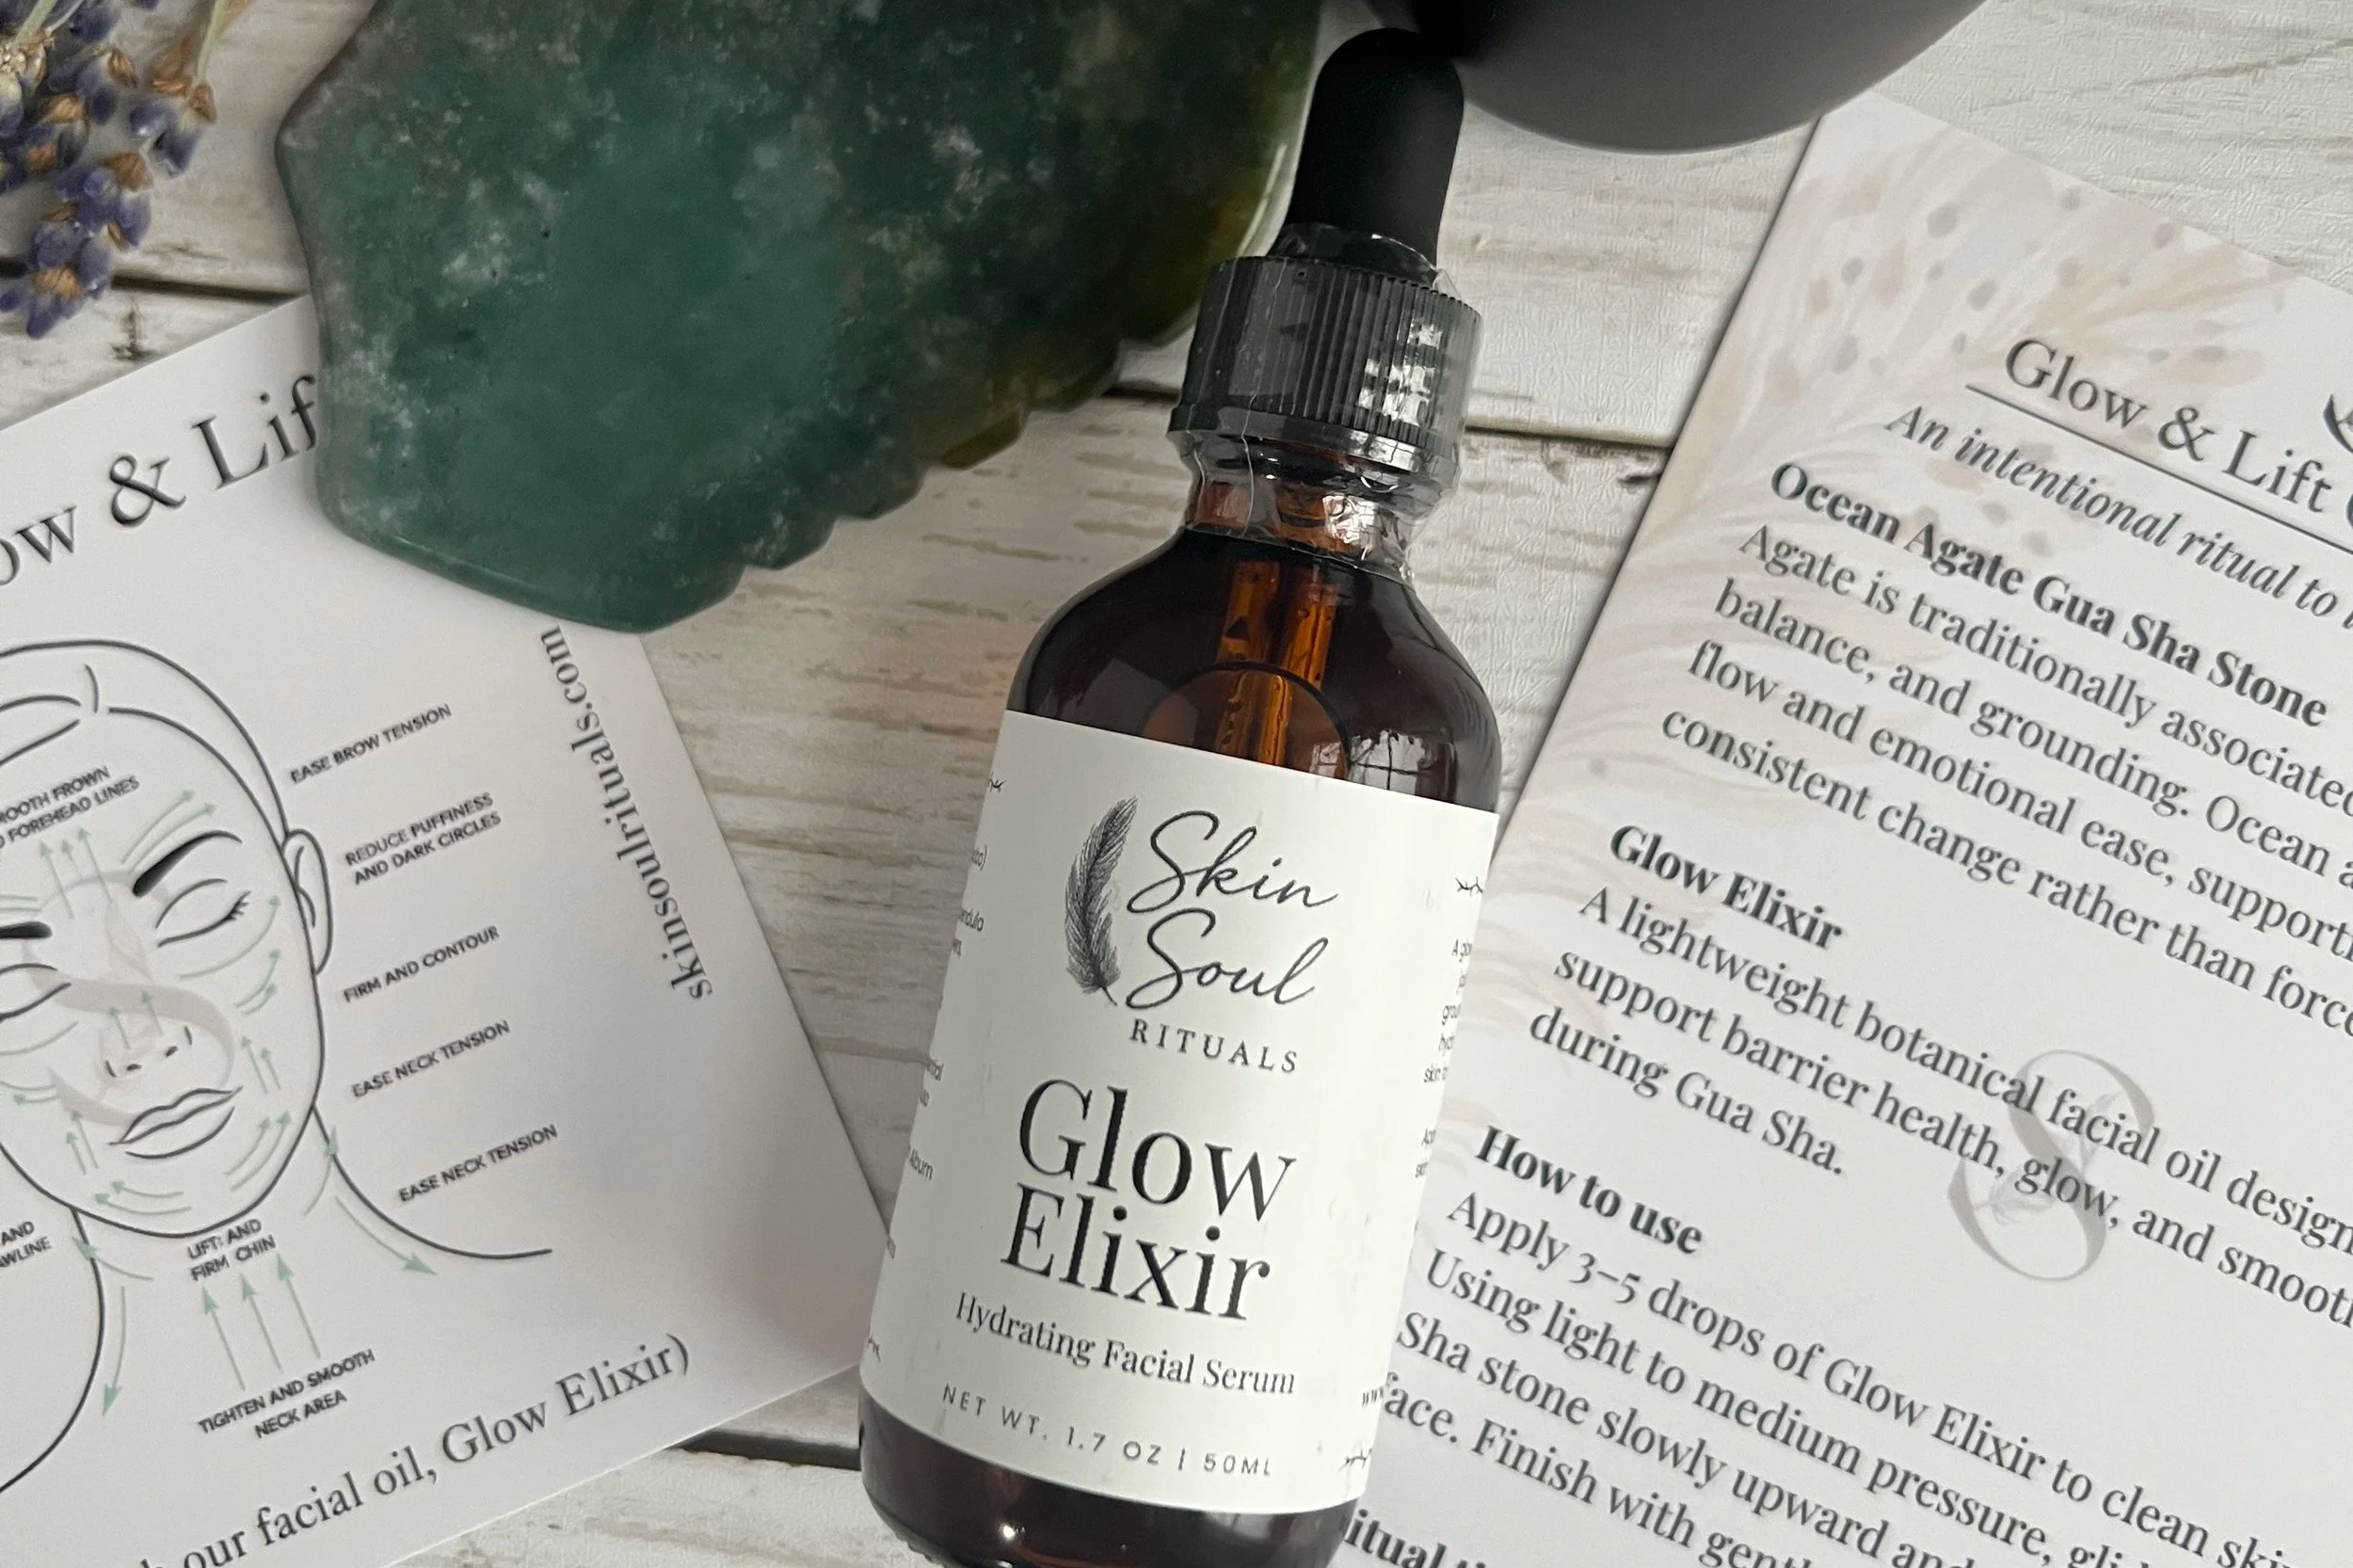
Curated Gua Sha Kit
How to Do Gua Sha for Beginners (Step-by-Step)
Step 1: Prep the Lymphatic System
This step is often skipped, but it’s essential. Start by opening up the lymphatic drainage points, righat above your collar bone. Use the pads of your fingertips and lightly tap for 10-15 seconds. You lightly tap all across the face to increase circulation and prep for gua sha.
Start with light strokes at the neck and collarbone to encourage lymphatic flow. This creates a pathway for fluid to drain properly. Be gentle when working with the neck and face, with light strokes down the neck. Lymphatic drainage does not need heavy pressure, the pressure is light to move lymph.
Step 2: Apply Facial Oil
Use enough oil so the stone glides effortlessly across the skin. Depending on your oil, 2-3 drops is typically enough. You don’t want your stone to drag or tug at the skin.
Step 3: Hold the Stone at a Low Angle
Keep the gua sha tool nearly flat against the skin (about 15 degrees). More pressure does not mean better results. Light pressure is key to lymphatic flow.
Step 4: Work in Upward and Outward Motions
Move slowly and intentionally:
Neck → Jawline → Cheeks → Under-eyes → Forehead
Always work outward toward the ears or downward toward lymphatic drainage points
Step 5: Keep It Short and Consistent
5-10 minutes a day is plenty of time when done correctly. 3-5 passes per section is ideal as well as making sure your getting in 3-5x per week for results.
Common Gua Sha Mistakes Beginners Make
If you’re not seeing results, check for these common issues:
Using too much pressure
Skipping the neck and lymphatic prep
Using a low-quality or poorly shaped stone
Practicing inconsistently
Expecting instant results
Gua sha is cumulative and your results will improve with time. You’ll notice de-puffing immediately but sculpting and lifting take some consistency and time.
How Long Does It Take to See Results?
Most beginners notice:
Reduced puffiness immediately after use
Improved glow within 1–2 weeks
More sculpted contours after 3–4 weeks of consistent practice
Like any holistic ritual, gua sha works best when practiced regularly.
How to Get Better Results Faster
To maximize your results:
Pair gua sha with a nourishing facial oil
Follow a structured routine (Gua Sha Foundations here)
Use a stone designed specifically for gua sha
Stay consistent, even 3–5 minutes matters
This is why curated kits often outperform random tools.
A Simple Way to Get Started
If you’re new to gua sha and want a guided, beginner-friendly setup, a ritual kit that includes:
A properly shaped gua sha stone
A barrier-supporting facial oil
Step-by-step guidance
The Glow & Sculpt Ritual Kit can remove the guesswork and help you see results faster.
Final Thoughts: Gua Sha Is a Practice, Not a Trend
Gua sha isn’t about perfection, it’s about connection.
When practiced intentionally, it becomes more than skincare.
It’s a ritual that supports your skin, nervous system, and confidence.
Start slow. Stay consistent. Trust the process.